Toyota CH-R Service Manual: Dtc Check / Clear
DTC CHECK / CLEAR
NOTICE:
When the diagnosis system is changed from normal mode to check mode or vice versa, all DTCs and freeze frame data recorded in normal mode are cleared. Before changing modes, always check and make a note of DTCs and freeze frame data.
HINT:
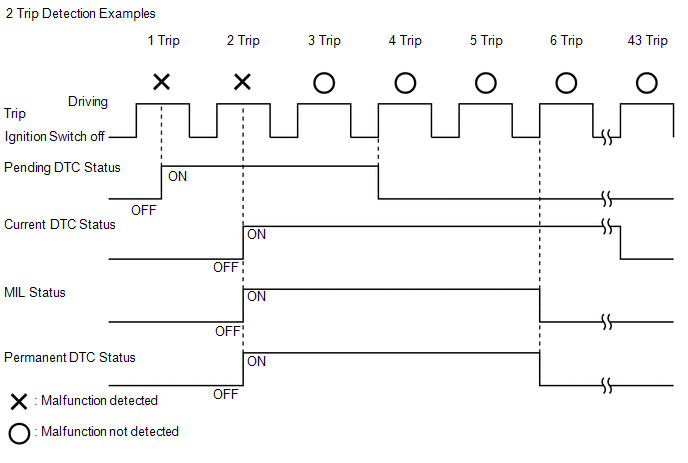
- DTCs which are stored in the ECM can be displayed on the Techstream. The Techstream can display current, pending and permanent DTCs.
- If a malfunction is detected during the current driving cycle, current and permanent DTCs are stored.
- Some DTCs are not stored if the ECM does not detect the same malfunction again during a second consecutive driving cycle. However, such malfunctions, detected on only one occasion, are stored as pending DTCs.
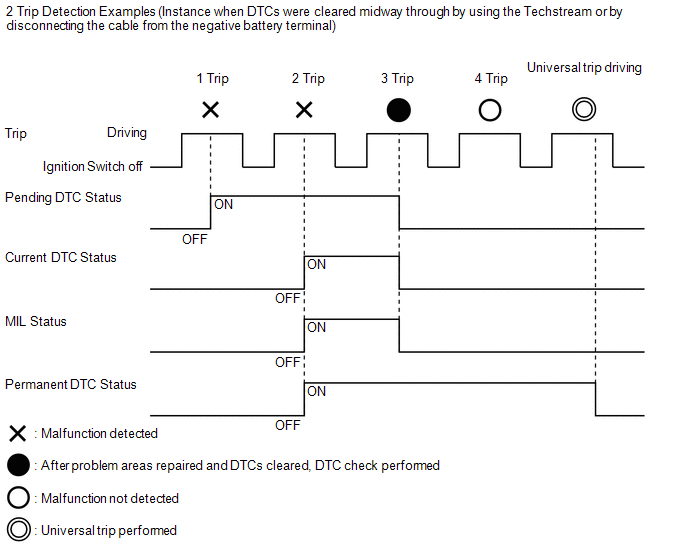
- Current and pending DTCs can be cleared by using the Techstream or by disconnecting the cable from the negative battery terminal. However, permanent DTCs cannot be cleared using either of these two methods.
- After clearing current DTCs using the Techstream (or by disconnecting the cable from the negative battery terminal), permanent DTCs can be cleared when the system is determined to be normal for the relevant DTCs and then the universal trip is performed.
|
Pending DTC |
Store condition |
Malfunction detected |
|
Clear condition |
System determined to be normal or DTCs cleared using Techstream or Cable disconnected from negative battery terminal |
|
|
Current DTC |
Store condition |
Malfunction detected (2nd trip) |
|
Clear condition |
No malfunctions in 40 driving cycles or DTCs cleared using Techstream or Cable disconnected from negative battery terminal |
|
|
Permanent DTC |
Store condition |
Malfunction detected (2nd trip) |
|
Clear condition |
Ignition switch turned to ON after no malfunction is detected in 3 consecutive driving cycles or After DTCs cleared using Techstream or cable disconnected from negative battery terminal, malfunction not detected when universal trip performed |
|
|
MIL |
ON |
Malfunction detected (2nd trip) |
|
OFF |
Ignition switch turned to ON after no malfunction is detected in 3 consecutive driving cycles or DTCs cleared using Techstream or Cable disconnected from negative battery terminal |
CHECK DTC (Using Techstream)
(a) DTCs which are stored in the ECM can be output to the Techstream.
The Techstream can display pending DTCs and current DTCs. Some DTCs are not stored unless a malfunction is detected in consecutive driving cycles. When a malfunction is detected in only one driving cycle, it is stored as a pending DTC.
(1) Connect the Techstream to the DLC3.
(2) Turn the ignition switch to ON.
(3) Turn the Techstream on.
(4) Enter the following menus: Powertrain / Engine and ECT / Trouble Codes.
Powertrain > Engine and ECT > Trouble Codes(5) Confirm the DTCs and freeze frame data, and then write them down.
(6) Confirm the details of the DTCs.
Click here
.gif)
NOTICE:
When simulating a symptom with the Techstream to check for DTCs, use normal mode. For codes on the Diagnostic Trouble Code Chart subject to "2 trip detection logic", perform the following actions:
Turn the ignition switch off after the symptom is simulated once. Then repeat the simulation process. When the symptom has been simulated twice, the MIL illuminates and the DTCs are stored in the ECM.
CLEAR DTC (Pending and Current DTC)
(a) Connect the Techstream to the DLC3.
(b) Turn the ignition switch to ON.
(c) Turn the Techstream on.
(d) Enter the following menus: Powertrain / Engine and ECT / Trouble Codes.
Powertrain > Engine and ECT > Clear DTCs(e) Clear the DTCs.
CLEAR DTC (Pending and Current DTC without using Techstream)
(a) Perform either of the following operations.
NOTICE:
After turning the ignition switch off, waiting time may be required before disconnecting the cable from the negative (-) battery terminal. Therefore, make sure to read the disconnecting the cable from the negative (-) battery terminal notices before proceeding with work.
Click here
(1) Disconnect the cable from the negative (-) battery terminal for more than 1 minute.
(2) Remove the ECU-B NO. 3 and ETCS fuses from the No. 1 engine room relay block located inside the engine compartment for more than 1 minute.
CLEAR PERMANENT DTC
HINT:
Even if the following procedure is not performed, permanent DTCs are cleared if no malfunctions are detected during 3 consecutive driving cycles.
|
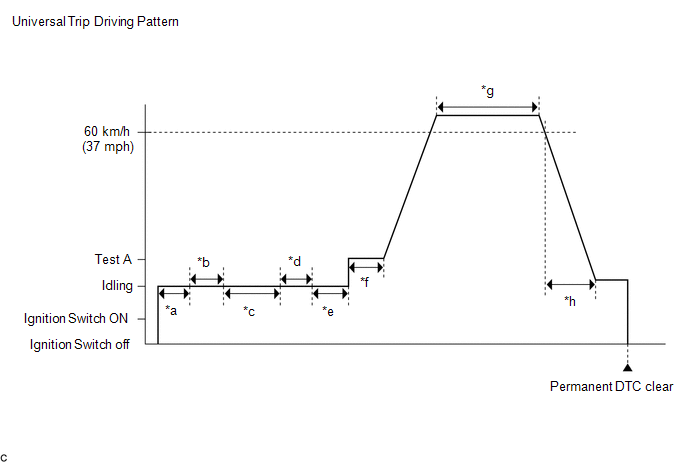
*a |
5 seconds or more |
*b |
Moving shift lever P to N |
|
*c |
30 seconds or more |
*d |
Moving shift lever N to D |
|
*e |
5 seconds or more |
*f |
3 seconds or more |
|
*g |
Total of 3 minutes or more |
*h |
15 seconds or more |
(a) Connect the Techstream to the DLC3.
(b) Turn the ignition switch to ON.
(c) Turn the Techstream on.
(d) Enter the following menus: Powertrain / Engine and ECT / Trouble Codes.
Powertrain > Engine and ECT > Trouble Codes(e) Check if permanent DTCs are stored.
HINT:
If permanent DTCs are not output, it is not necessary to continue this procedure.
(f) Clear the DTCs.
Powertrain > Engine and ECT > Clear DTCs(g) Perform the universal trip.
(1) Start the engine, wait for 5 seconds or more, then move the shift lever from P to N.
(2) Wait for 30 seconds or more.
(3) Move the shift lever to D and wait for 5 seconds or more.
(4) With the brake pedal firmly depressed, slowly depress the accelerator pedal to increase the engine speed to between 1000 and 1500 rpm and hold it for 3 seconds or more. (Test A)
(5) Release the brake pedal to begin driving the vehicle.
(6) Drive the vehicle at a constant speed of 60 km/h (37 mph) or more for 3 minutes or more.
HINT:
- It is possible to complete the drive pattern even if the vehicle decelerates to less than 60 km/h (37 mph) during the driving cycle provided that the vehicle is driven at 60 km/h (37 mph) or more for a total of 3 minutes.
- When accelerating through the gears, make sure the vehicle is driven
so all gears are used in order and no gears are skipped.*
*: w/ Sport Sequential Shiftmatic
(7) While driving at 60 km/h (37 mph), gradually decelerate over a period of 15 seconds or more and stop the vehicle.
(h) Turn the ignition switch off.
(i) Wait for 3 minutes or more.
(j) Turn the ignition switch to ON.
(k) Enter the following menus: Powertrain / Engine and ECT / Trouble Codes.
Powertrain > Engine and ECT > Trouble Codes(l) Check that the permanent DTCs have been cleared.
HINT:
- If permanent DTCs have not been cleared, perform the universal trip again.
- Permanent DTCs are cleared when the universal trip is completed.
 Diagnosis System
DIAGNOSIS SYSTEM
OBD II (w/ Canister Pump Module)
(a) When troubleshooting OBD II (On-Board Diagnostics) vehicles, an OBD II scan
tool (complying with SAE J1978) must be connected to the DLC3 (Dat ...
 Check Mode Procedure
CHECK MODE PROCEDURE
DESCRIPTION
(a) Check mode has a higher sensitivity to malfunctions and can detect malfunctions
that cannot be detected in normal mode. Check mode can also detect all the malf ...
Other materials:
Toyota CH-R Service Manual > Power Window Control System: Operation History List
OPERATION HISTORY LIST
NOTICE:
If the vehicle or vehicle controls are operated (for example, during
initial inspection when the vehicle is brought in for repair) before operation
history has been read out and saved, the operation history information could
be lost.
The funct ...
Toyota CH-R Service Manual > Brake Fluid: Components
COMPONENTS
ILLUSTRATION
*A
for TMC Made
-
-
*1
CENTER NO. 1 COWL TOP VENTILATOR LOUVER
*2
BRAKE MASTER CYLINDER RESERVOIR CAP ASSEMBLY
*3
FRONT DISC BRAKE BLEEDER PLUG
...
Toyota C-HR (AX20) 2023-2026 Owner's Manual
Toyota CH-R Owners Manual
- For safety and security
- Instrument cluster
- Operation of each component
- Driving
- Interior features
- Maintenance and care
- When trouble arises
- Vehicle specifications
- For owners
Toyota CH-R Service Manual
- Introduction
- Maintenance
- Audio / Video
- Cellular Communication
- Navigation / Multi Info Display
- Park Assist / Monitoring
- Brake (front)
- Brake (rear)
- Brake Control / Dynamic Control Systems
- Brake System (other)
- Parking Brake
- Axle And Differential
- Drive Shaft / Propeller Shaft
- K114 Cvt
- 3zr-fae Battery / Charging
- Networking
- Power Distribution
- Power Assist Systems
- Steering Column
- Steering Gear / Linkage
- Alignment / Handling Diagnosis
- Front Suspension
- Rear Suspension
- Tire / Wheel
- Tire Pressure Monitoring
- Door / Hatch
- Exterior Panels / Trim
- Horn
- Lighting (ext)
- Mirror (ext)
- Window / Glass
- Wiper / Washer
- Door Lock
- Heating / Air Conditioning
- Interior Panels / Trim
- Lighting (int)
- Meter / Gauge / Display
- Mirror (int)
- Power Outlets (int)
- Pre-collision
- Seat
- Seat Belt
- Supplemental Restraint Systems
- Theft Deterrent / Keyless Entry

0.0084