Toyota CH-R Owners Manual: Checking and replacing fuses
If any of the electrical components do not operate, a fuse may have blown. If this happens, check and replace the fuses as necessary.
1. Turn the engine switch off.
2. Open the fuse box cover.
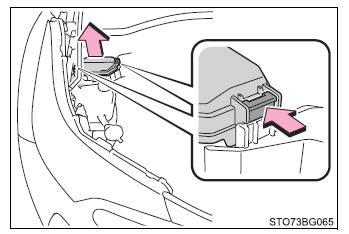
Engine compartment type A fuse box
While pushing the 2 claws, lift up the cover.
When closing the cover, make sure to attach the 2 claws.
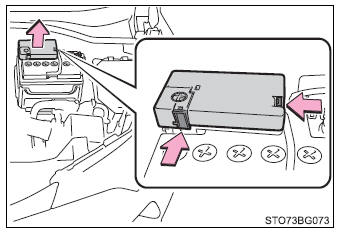
Engine compartment type B fuse box
While pushing the 3 claws, lift up the cover.
When closing the cover, make sure to attach the 3 claws.

Engine compartment type C fuse box
While pushing the 2 claws, lift up the cover.
When closing the cover, make sure to attach the 2 claws.
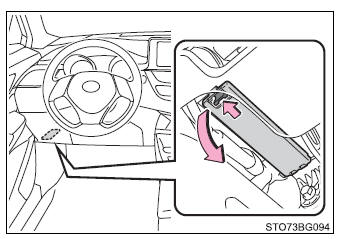
Left side instrument panel
Remove the lid.
Make sure to press the claw during removal or installation.
3. Remove the fuse with the pullout tool.
Only type A fuses can be removed using the pullout tool.
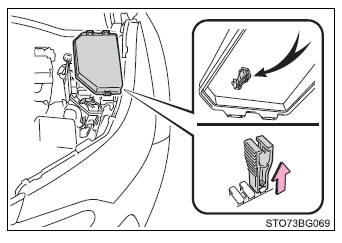
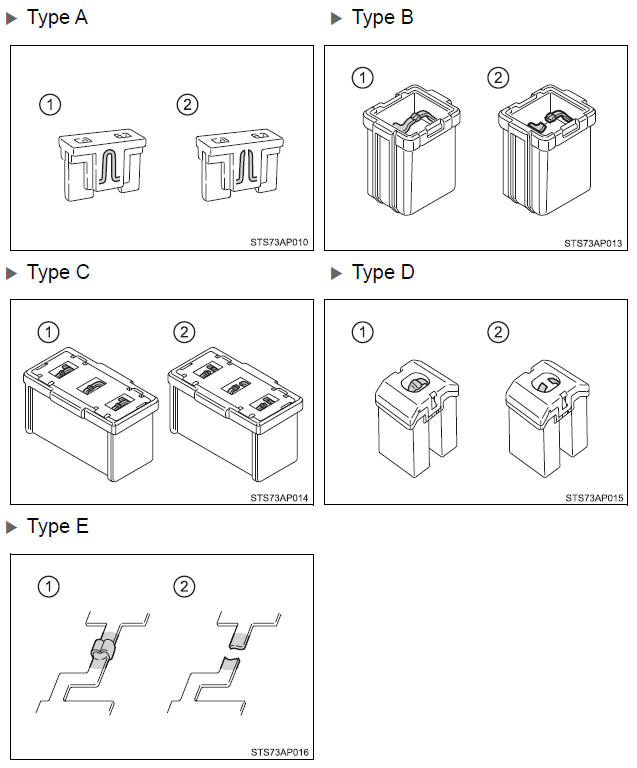
4. Check if the fuse is blown.
- Normal fuse
- Blown fuse
Except for type E: Replace the blown fuse with a new fuse of an appropriate amperage rating.
The amperage rating can be found on the fuse box lid.
Type E: Contact your Toyota dealer.
■After a fuse is replaced
- If the lights do not turn on even after the fuse has been replaced, a bulb may need replacement.
- If the replaced fuse blows again, have the vehicle inspected by your Toyota dealer.
■If there is an overload in a circuit The fuses are designed to blow, protecting the wiring harness from damage.
■When replacing light bulbs Toyota recommends that you use genuine Toyota products designed for this vehicle. Because certain bulbs are connected to circuits designed to prevent overload, non-genuine parts or parts not designed for this vehicle may be unusable.
■To prevent system breakdowns and vehicle fire Observe the following precautions.
Failure to do so may cause damage to the vehicle, and possibly a fire or injury.
- Never use a fuse of a higher amperage rating than that indicated, or use any other object in place of a fuse.
- Always use a genuine Toyota fuse or equivalent.
Never replace a fuse with a wire, even as a temporary fix.
- Do not modify the fuses or fuse boxes.
■Before replacing fuses Have the cause of electrical overload determined and repaired by your Toyota dealer as soon as possible.
 Wireless remote control/electronic key battery
Replace the battery with a new one if it is depleted.
You will need the following items:
Flathead screwdriver
Small flathead screwdriver
Lithium battery
Vehicles without a smart key system ...
 Light bulbs
You may replace the following bulbs yourself. The difficulty level
of replacement varies depending on the bulb. If necessary bulb replacement seems
difficult to perform, contact your Toyota dealer ...
Other materials:
Toyota CH-R Service Manual > Smart Key System(for Start Function): System Voltage or GND Energization Malfunction (B228B)
DESCRIPTION
This DTC is stored when there is a malfunction in the certification ECU (smart
key ECU assembly) battery power supply circuit or ground circuit.
DTC No.
Detection Item
DTC Detection Condition
Trouble Area
Note
B2 ...
Toyota CH-R Service Manual > Power Mirror Control System: Terminals Of Ecu
TERMINALS OF ECU
CHECK MAIN BODY ECU (MULTIPLEX NETWORK BODY ECU) AND INSTRUMENT PANEL JUNCTION
BLOCK ASSEMBLY (w/ Retract Mirror)
(a) Remove the main body ECU (multiplex network body ECU) from the instrument
panel junction block assembly.
Click here
(b) Reconnect the instrument pane ...
Toyota C-HR (AX20) 2023-2026 Owner's Manual
Toyota CH-R Owners Manual
- For safety and security
- Instrument cluster
- Operation of each component
- Driving
- Interior features
- Maintenance and care
- When trouble arises
- Vehicle specifications
- For owners
Toyota CH-R Service Manual
- Introduction
- Maintenance
- Audio / Video
- Cellular Communication
- Navigation / Multi Info Display
- Park Assist / Monitoring
- Brake (front)
- Brake (rear)
- Brake Control / Dynamic Control Systems
- Brake System (other)
- Parking Brake
- Axle And Differential
- Drive Shaft / Propeller Shaft
- K114 Cvt
- 3zr-fae Battery / Charging
- Networking
- Power Distribution
- Power Assist Systems
- Steering Column
- Steering Gear / Linkage
- Alignment / Handling Diagnosis
- Front Suspension
- Rear Suspension
- Tire / Wheel
- Tire Pressure Monitoring
- Door / Hatch
- Exterior Panels / Trim
- Horn
- Lighting (ext)
- Mirror (ext)
- Window / Glass
- Wiper / Washer
- Door Lock
- Heating / Air Conditioning
- Interior Panels / Trim
- Lighting (int)
- Meter / Gauge / Display
- Mirror (int)
- Power Outlets (int)
- Pre-collision
- Seat
- Seat Belt
- Supplemental Restraint Systems
- Theft Deterrent / Keyless Entry

0.0073