
Toyota CH-R Service Manual: Adjustment
ADJUSTMENT
PROCEDURE
1. SECURE VEHICLE
(a) Fully apply the parking brake and chock a wheel.
CAUTION:
- Make sure to apply the parking brake and chock a wheel before performing
this procedure.
.png)
- If the vehicle is not secure and the shift lever is moved to N, the vehicle may suddenly move, possibly resulting in an accident or serious injury.
2. REMOVE SHIFT LEVER KNOB SUB-ASSEMBLY
Click here
.gif)
3. REMOVE REAR CONSOLE BOX ASSEMBLY
Click here
4. ADJUST SHIFT LEVER POSITION
|
(a) Turn the stopper of the adjuster case in the direction shown by the arrow. |
|
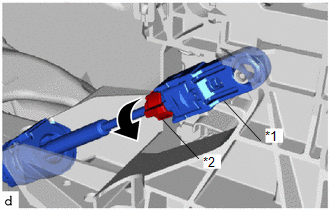
|
(b) Using a precision screwdriver, pull out the lock piece of the adjuster case. |
|
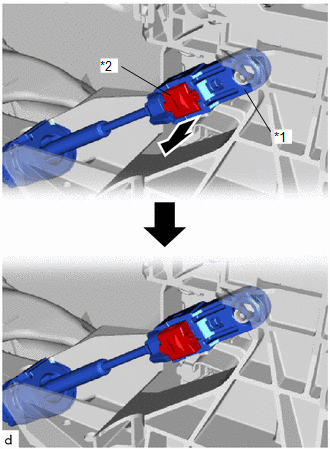
(c) Using your fingers, gently pull the cable rod towards the rear of the vehicle to remove backlash.
|
(d) Push in the lock piece of the adjuster case to lock it. |
|
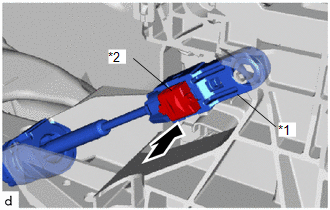
|
(e) Turn the stopper of the adjuster case in the direction shown by the arrow. NOTICE: If the cover is not moved far enough, it will not engage with the lock piece, the cable rod will not be able to lock, and reliable shift operation will not be possible. |
|
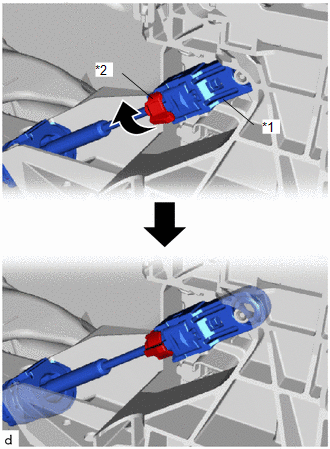
5. INSTALL REAR CONSOLE BOX ASSEMBLY
Click here
6. INSTALL SHIFT LEVER KNOB SUB-ASSEMBLY
Click here
7. INSPECT SHIFT LEVER POSITION
Click here
 Components
COMPONENTS
ILLUSTRATION
*1
NO. 1 ENGINE UNDER COVER
*2
REAR ENGINE UNDER COVER LH
N*m (kgf*cm, ft.*lbf): Specified torque
...
 Removal
REMOVAL
CAUTION / NOTICE / HINT
The necessary procedures (adjustment, calibration, initialization, or registration)
that must be performed after parts are removed, installed, or replaced during th ...
Other materials:
Toyota CH-R Service Manual > Front Door Belt Moulding: Removal
REMOVAL
CAUTION / NOTICE / HINT
The necessary procedures (adjustment, calibration, initialization or registration)
that must be performed after parts are removed and installed, or replaced during
the front door belt moulding removal/installation are shown below.
Necessary Procedure After Part ...
Toyota CH-R Service Manual > Front Bumper: Disassembly
DISASSEMBLY
PROCEDURE
1. REMOVE RADIATOR GRILLE
Click here
2. REMOVE FRONT BUMPER EXTENSION LH
(a) Disengage the claws and guide to remove the front bumper extension
LH.
3. REMOVE FRONT BUMPER EXTENSION RH
HINT:
Use the same ...
Toyota C-HR (AX20) 2023-2026 Owner's Manual
Toyota CH-R Owners Manual
- For safety and security
- Instrument cluster
- Operation of each component
- Driving
- Interior features
- Maintenance and care
- When trouble arises
- Vehicle specifications
- For owners
Toyota CH-R Service Manual
- Introduction
- Maintenance
- Audio / Video
- Cellular Communication
- Navigation / Multi Info Display
- Park Assist / Monitoring
- Brake (front)
- Brake (rear)
- Brake Control / Dynamic Control Systems
- Brake System (other)
- Parking Brake
- Axle And Differential
- Drive Shaft / Propeller Shaft
- K114 Cvt
- 3zr-fae Battery / Charging
- Networking
- Power Distribution
- Power Assist Systems
- Steering Column
- Steering Gear / Linkage
- Alignment / Handling Diagnosis
- Front Suspension
- Rear Suspension
- Tire / Wheel
- Tire Pressure Monitoring
- Door / Hatch
- Exterior Panels / Trim
- Horn
- Lighting (ext)
- Mirror (ext)
- Window / Glass
- Wiper / Washer
- Door Lock
- Heating / Air Conditioning
- Interior Panels / Trim
- Lighting (int)
- Meter / Gauge / Display
- Mirror (int)
- Power Outlets (int)
- Pre-collision
- Seat
- Seat Belt
- Supplemental Restraint Systems
- Theft Deterrent / Keyless Entry

0.0098