
Toyota CH-R Service Manual: Components
COMPONENTS
ILLUSTRATION
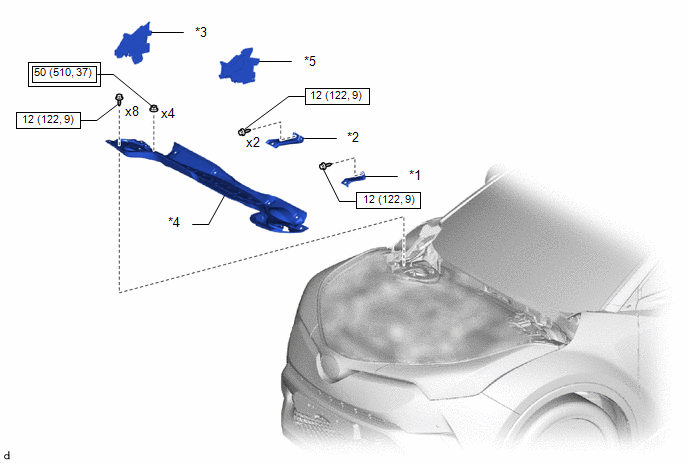
|
*1 |
COWL BODY MOUNTING REINFORCEMENT LH |
*2 |
COWL BODY MOUNTING REINFORCEMENT RH |
|
*3 |
NO. 1 HEATER AIR DUCT SPLASH SHIELD SEAL |
*4 |
OUTER COWL TOP PANEL SUB-ASSEMBLY |
|
*5 |
WATER GUARD PLATE LH |
- |
- |
 |
Tightening torque for "Major areas involving basic vehicle performance such as moving/turning/stopping" : N*m (kgf*cm, ft.*lbf) |
 |
N*m (kgf*cm, ft.*lbf): Specified torque |
ILLUSTRATION
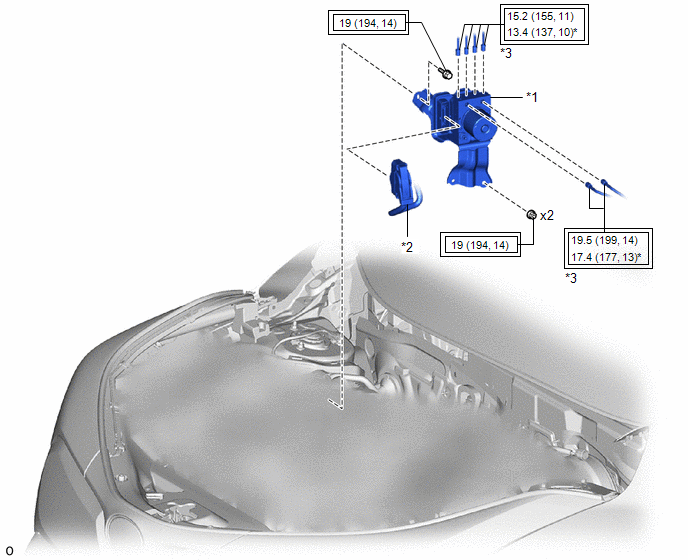
|
*1 |
BRAKE ACTUATOR WITH BRACKET |
*2 |
BRAKE ACTUATOR ASSEMBLY CONNECTOR |
|
*3 |
BRAKE TUBE |
- |
- |
|
|
Tightening torque for "Major areas involving basic vehicle performance such as moving/turning/stopping" : N*m (kgf*cm, ft.*lbf) |
* |
For use with a union nut wrench |
ILLUSTRATION
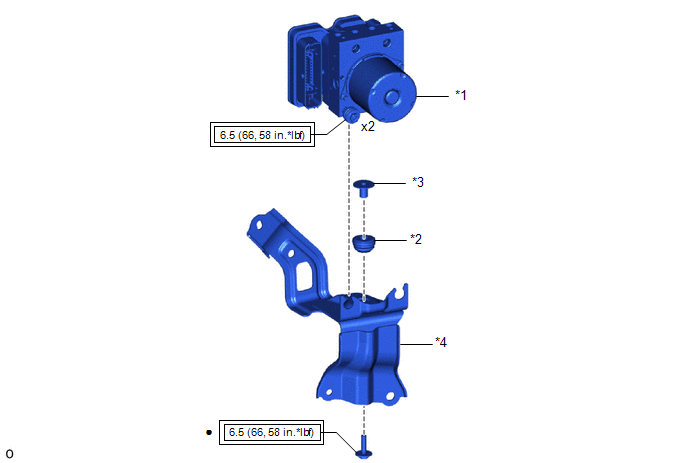
|
*1 |
BRAKE ACTUATOR ASSEMBLY |
*2 |
BRAKE ACTUATOR BRACKET CUSHION |
|
*3 |
NO. 1 BRAKE ACTUATOR CASE COLLAR |
*4 |
BRAKE ACTUATOR BRACKET ASSEMBLY |
|
|
Tightening torque for "Major areas involving basic vehicle performance such as moving/turning/stopping" : N*m (kgf*cm, ft.*lbf) |
- |
- |
 Precaution
PRECAUTION
IGNITION SWITCH EXPRESSIONS
(a) The type of ignition switch used on this model differs depending on the specifications
of the vehicle. The expressions listed in the table below are used ...
 On-vehicle Inspection
ON-VEHICLE INSPECTION
CAUTION / NOTICE / HINT
PROCEDURE
1. CONNECT TECHSTREAM
(a) Connect the Techstream to the DLC3 with the ignition switch off.
(b) Start the engine and run it at idle.
(c) Tu ...
Other materials:
Toyota CH-R Service Manual > Rear Wiper Motor: Removal
REMOVAL
PROCEDURE
1. REMOVE BACK DOOR TRIM UPPER PANEL ASSEMBLY
Click here
2. REMOVE BACK DOOR SIDE GARNISH LH
Click here
3. REMOVE BACK DOOR SIDE GARNISH RH
HINT:
Use the same procedure as for the LH side.
4. REMOVE BACK DOOR TRIM PANEL ASSEMBLY
Click here
5. REMOVE REA ...
Toyota CH-R Service Manual > Back Door Lock: Installation
INSTALLATION
PROCEDURE
1. INSTALL BACK DOOR LOCK ASSEMBLY
HINT:
Make sure to remove the string before installing a new back door lock assembly.
(a) Apply MP grease to the sliding parts of the back door lock assembly.
(b) Install the back door lock assembly with the 3 bolts.
Torque:
7.5 N·m ...
Toyota C-HR (AX20) 2023-2026 Owner's Manual
Toyota CH-R Owners Manual
- For safety and security
- Instrument cluster
- Operation of each component
- Driving
- Interior features
- Maintenance and care
- When trouble arises
- Vehicle specifications
- For owners
Toyota CH-R Service Manual
- Introduction
- Maintenance
- Audio / Video
- Cellular Communication
- Navigation / Multi Info Display
- Park Assist / Monitoring
- Brake (front)
- Brake (rear)
- Brake Control / Dynamic Control Systems
- Brake System (other)
- Parking Brake
- Axle And Differential
- Drive Shaft / Propeller Shaft
- K114 Cvt
- 3zr-fae Battery / Charging
- Networking
- Power Distribution
- Power Assist Systems
- Steering Column
- Steering Gear / Linkage
- Alignment / Handling Diagnosis
- Front Suspension
- Rear Suspension
- Tire / Wheel
- Tire Pressure Monitoring
- Door / Hatch
- Exterior Panels / Trim
- Horn
- Lighting (ext)
- Mirror (ext)
- Window / Glass
- Wiper / Washer
- Door Lock
- Heating / Air Conditioning
- Interior Panels / Trim
- Lighting (int)
- Meter / Gauge / Display
- Mirror (int)
- Power Outlets (int)
- Pre-collision
- Seat
- Seat Belt
- Supplemental Restraint Systems
- Theft Deterrent / Keyless Entry

0.0108