
Toyota CH-R Service Manual: Telephone And Gps Antenna(for Front Side)
Components
COMPONENTS
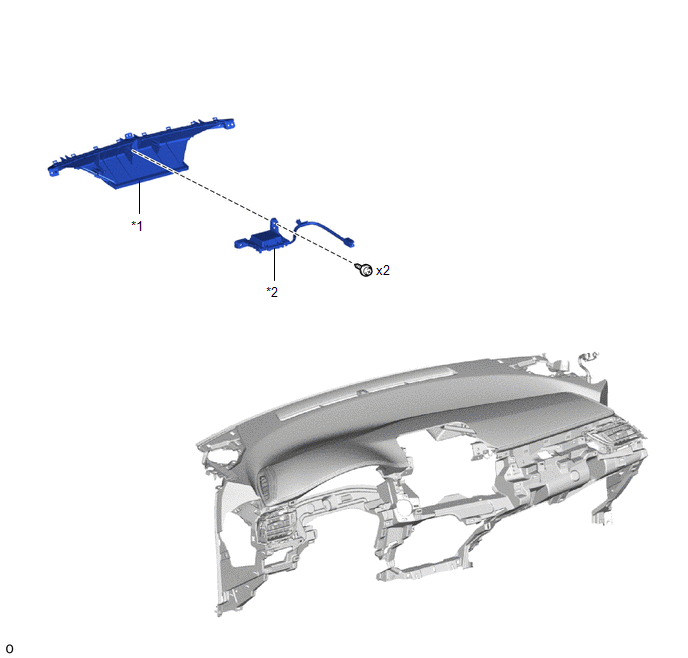
ILLUSTRATION
|
*1 |
DEFROSTER NOZZLE ASSEMBLY |
*2 |
TELEPHONE AND GPS ANTENNA ASSEMBLY |
Removal
REMOVAL
CAUTION / NOTICE / HINT
The necessary procedures (adjustment, calibration, initialization, or registration) that must be performed after parts are removed and installed, or replaced the during telephone and GPS antenna assembly removal/installation are shown below.
Necessary Procedures After Parts Removed/Installed/Replaced|
Replaced Part or Performed Procedure |
Necessary Procedure |
Effect/Inoperative Function when Necessary Procedure not Performed |
Link |
|---|---|---|---|
|
Disconnect cable from negative battery terminal |
Initialize back door lock |
Power door lock control system |
|
|
Memorize steering angle neutral point |
Lane departure alert system (w/ Steering Control) |
|
|
|
Pre-collision system |
CAUTION:
Some of these service operations affect the SRS airbag system. Read the precautionary notices concerning the SRS airbag system before servicing.
.png)
Click here
.gif)
PROCEDURE
1. REMOVE INSTRUMENT PANEL SAFETY PAD SUB-ASSEMBLY
Click here
2. REMOVE DEFROSTER NOZZLE ASSEMBLY
Click here
3. REMOVE TELEPHONE AND GPS ANTENNA ASSEMBLY
|
(a) Remove the 2 screws. |
|
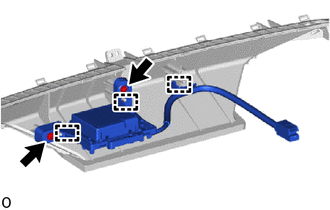
(b) Disengage the guides to remove the telephone and GPS antenna assembly.
Installation
INSTALLATION
PROCEDURE
1. INSTALL TELEPHONE AND GPS ANTENNA ASSEMBLY
|
(a) Engage the guides to install the telephone and GPS antenna assembly. |
|
.png)
(b) Install the 2 screws.
2. INSTALL DEFROSTER NOZZLE ASSEMBLY
Click here
.gif)
3. INSTALL INSTRUMENT PANEL SAFETY PAD SUB-ASSEMBLY
Click here
 Telephone And Gps Antenna Cords
Components
COMPONENTS
ILLUSTRATION
*1
TELEPHONE AND GPS ANTENNA CORD ASSEMBLY
*2
NO. 3 HEATER TO REGISTER DUCT SUB-ASSEMBLY
ILLUSTRATION
...
 Telephone And Gps Antenna(for Roof Side)
Components
COMPONENTS
ILLUSTRATION
*1
TELEPHONE AND GPS ANTENNA ASSEMBLY
*2
ANTENNA OUTER COVER
*3
HOLDER
*4
...
Other materials:
Toyota CH-R Service Manual > Audio And Visual System(for Radio And Display Type): How To Proceed With Troubleshooting
CAUTION / NOTICE / HINT
HINT:
Use the following procedure to troubleshoot the audio and visual system.
*: Use the Techstream.
PROCEDURE
1.
VEHICLE BROUGHT TO WORKSHOP
NEXT
...
Toyota CH-R Service Manual > Ptc Heater Assembly: Components
COMPONENTS
ILLUSTRATION
*A
for VALEO Made
*B
for DENSO Made
*1
COWL SIDE TRIM BOARD LH
*2
FRONT DOOR SCUFF PLATE LH
*3
NO. 1 AIR DUCT
*4
NO. 2 HEATER CO ...
Toyota C-HR (AX20) 2023-2026 Owner's Manual
Toyota CH-R Owners Manual
- For safety and security
- Instrument cluster
- Operation of each component
- Driving
- Interior features
- Maintenance and care
- When trouble arises
- Vehicle specifications
- For owners
Toyota CH-R Service Manual
- Introduction
- Maintenance
- Audio / Video
- Cellular Communication
- Navigation / Multi Info Display
- Park Assist / Monitoring
- Brake (front)
- Brake (rear)
- Brake Control / Dynamic Control Systems
- Brake System (other)
- Parking Brake
- Axle And Differential
- Drive Shaft / Propeller Shaft
- K114 Cvt
- 3zr-fae Battery / Charging
- Networking
- Power Distribution
- Power Assist Systems
- Steering Column
- Steering Gear / Linkage
- Alignment / Handling Diagnosis
- Front Suspension
- Rear Suspension
- Tire / Wheel
- Tire Pressure Monitoring
- Door / Hatch
- Exterior Panels / Trim
- Horn
- Lighting (ext)
- Mirror (ext)
- Window / Glass
- Wiper / Washer
- Door Lock
- Heating / Air Conditioning
- Interior Panels / Trim
- Lighting (int)
- Meter / Gauge / Display
- Mirror (int)
- Power Outlets (int)
- Pre-collision
- Seat
- Seat Belt
- Supplemental Restraint Systems
- Theft Deterrent / Keyless Entry

0.007