Toyota CH-R Service Manual: Brake Fluid
Components
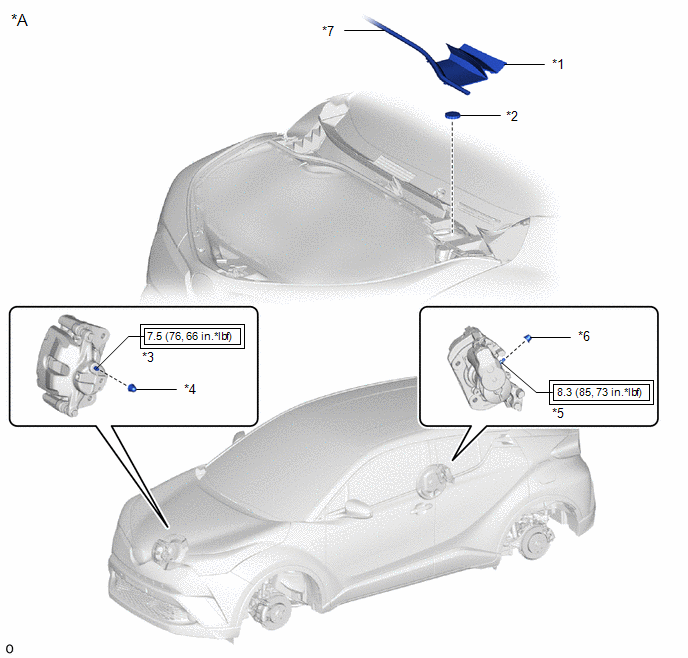
COMPONENTS
ILLUSTRATION
|
*A |
for TMC Made |
- |
- |
|
*1 |
CENTER NO. 1 COWL TOP VENTILATOR LOUVER |
*2 |
BRAKE MASTER CYLINDER RESERVOIR FILLER CAP ASSEMBLY |
|
*3 |
FRONT DISC BRAKE BLEEDER PLUG |
*4 |
FRONT DISC BRAKE BLEEDER PLUG CAP |
|
*5 |
REAR DISC BRAKE BLEEDER PLUG |
*6 |
REAR DISC BRAKE BLEEDER PLUG CAP |
|
*7 |
HOOD TO COWL TOP SEAL |
- |
- |
.png) |
Tightening torque for "Major areas involving basic vehicle performance such as moving/turning/stopping" : N*m (kgf*cm, ft.*lbf) |
- |
- |
ILLUSTRATION
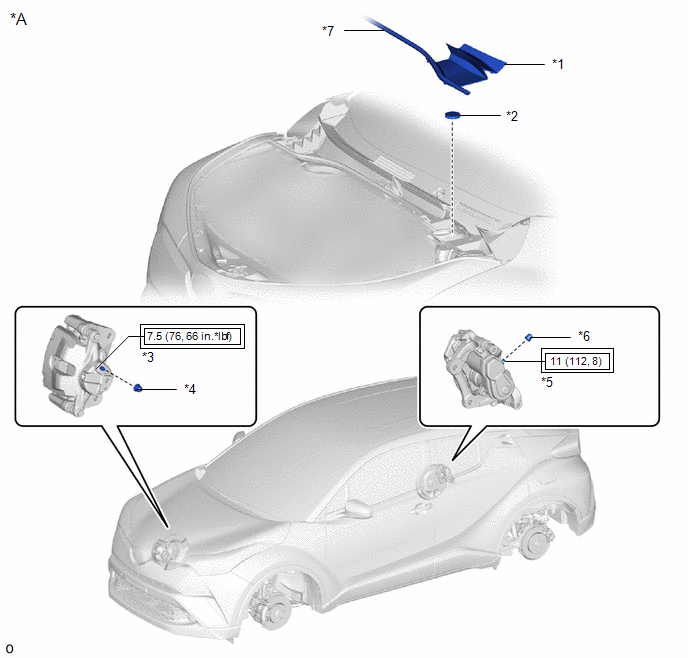
|
*A |
for TMMT Made |
- |
- |
|
*1 |
CENTER NO. 1 COWL TOP VENTILATOR LOUVER |
*2 |
BRAKE MASTER CYLINDER RESERVOIR FILLER CAP ASSEMBLY |
|
*3 |
FRONT DISC BRAKE BLEEDER PLUG |
*4 |
FRONT DISC BRAKE BLEEDER PLUG CAP |
|
*5 |
REAR DISC BRAKE BLEEDER PLUG |
*6 |
REAR DISC BRAKE BLEEDER PLUG CAP |
|
*7 |
HOOD TO COWL TOP SEAL |
- |
- |
|
|
Tightening torque for "Major areas involving basic vehicle performance such as moving/turning/stopping" : N*m (kgf*cm, ft.*lbf) |
- |
- |
Replacement
REPLACEMENT
CAUTION / NOTICE / HINT
NOTICE:
- for Manual Transaxle:
Move the shift lever to neutral and apply the parking brake before replacing the brake fluid.
- for CVT:
Move the shift lever to P and apply the parking brake before replacing the brake fluid.
- Add brake fluid to keep the level between the MIN and MAX lines of the reservoir while replacing the brake fluid.
- If brake fluid leaks onto any painted surface, immediately wash it off.
HINT:
If any work is performed on the brake system or if air in the brake lines is suspected, bleed the brake system.
PROCEDURE
1. REMOVE CENTER NO. 1 COWL TOP VENTILATOR LOUVER
|
(a) Disengage the hook, clip and separate the hood to cowl top seal from the cowl top ventilator louver sub-assembly. |
|
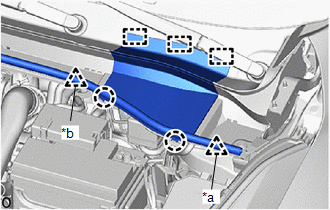
(b) Disengage the 2 claws and 3 guides to remove the center No. 1 cowl top ventilator louver from the cowl top ventilator louver sub-assembly.
2. FILL RESERVOIR WITH BRAKE FLUID
|
(a) Remove the brake master cylinder reservoir filler cap. |
|
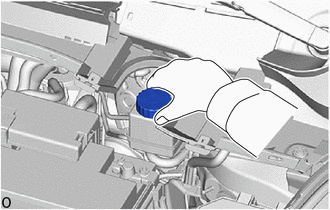
(b) Fill the reservoir with brake fluid.
Brake Fluid:
SAE J1703 or FMVSS No. 116 DOT 3
SAE J1704 or FMVSS No. 116 DOT 4
NOTICE:
- Do not remove the filter from the brake master cylinder reservoir and be sure to fill the brake master cylinder reservoir with new brake fluid to avoid any potential contamination of the brake system. Contamination, for example by dirt particles or mineral oil, could lead to functional brake problems.
- Make sure that there is sufficient brake fluid in the reservoir.
3. BLEED BRAKE LINE
NOTICE:
- Bleed the brake line of the wheel farthest from the master cylinder first.
- Add brake fluid to keep the level between the MIN and MAX lines of the reservoir while bleeding the brake lines.
(a) Connect a vinyl tube to the bleeder plug.
(b) Depress the brake pedal several times, and then loosen the bleeder plug with the pedal depressed.*1
(c) When fluid stops coming out, tighten the bleeder plug and release the brake pedal.*2
(d) Repeat steps *1 and *2 until all the air in the brake fluid is completely bled out and new brake fluid comes out.
(e) Tighten the bleeder plug completely.
Torque:
Front brake :
7.5 N·m {76 kgf·cm, 66 in·lbf}
Rear brake (for TMC Made) :
8.3 N·m {85 kgf·cm, 73 in·lbf}
Rear brake (for TMMT Made) :
11 N·m {112 kgf·cm, 8 ft·lbf}
(f) Repeat the above steps to replace the brake fluid of the brake lines for each wheel.
4. INSPECT FOR BRAKE FLUID LEAK
5. INSPECT BRAKE FLUID LEVEL IN RESERVOIR
Click here
.gif)
6. INSTALL CENTER NO. 1 COWL TOP VENTILATOR LOUVER
(a) Engage the 3 guides and 2 claws to install the center No. 1 cowl top ventilator louver to the cowl top ventilator louver sub-assembly.
(b) Engage the clip, hook and install the hood to cowl top seal to the cowl top ventilator louver sub-assembly.
 Back-up Light Bulb
Components
COMPONENTS
ILLUSTRATION
*1
BACK DOOR SERVICE HOLE COVER LH
*2
BACK UP LIGHT BULB
*3
BACK UP LIGHT SOCKET AND W ...
 Fog Light Bulb
Components
COMPONENTS
ILLUSTRATION
*1
FOG LIGHT BULB
*2
FRONT FENDER LINER
Removal
REMOVAL
CAUTION / NOTICE / HINT
HINT:
Use ...
Other materials:
Toyota CH-R Service Manual > Fog Light Assembly: Removal
REMOVAL
CAUTION / NOTICE / HINT
HINT:
Use the same procedure for the RH side and LH side.
The following procedure is for the LH side.
PROCEDURE
1. REMOVE FRONT BUMPER ASSEMBLY
Click here
2. REMOVE FOG LIGHT ASSEMBLY
(a) Remove the 2 screws.
...
Toyota CH-R Service Manual > Airbag System: Data List / Active Test
DATA LIST / ACTIVE TEST
HINT:
Using the Techstream to read the Data List allows the values or states of switches,
sensors, actuators and other items to be read without removing any parts. This non-intrusive
inspection can be very useful because intermittent conditions or signals may be
disco ...
Toyota C-HR (AX20) 2023-2026 Owner's Manual
Toyota CH-R Owners Manual
- For safety and security
- Instrument cluster
- Operation of each component
- Driving
- Interior features
- Maintenance and care
- When trouble arises
- Vehicle specifications
- For owners
Toyota CH-R Service Manual
- Introduction
- Maintenance
- Audio / Video
- Cellular Communication
- Navigation / Multi Info Display
- Park Assist / Monitoring
- Brake (front)
- Brake (rear)
- Brake Control / Dynamic Control Systems
- Brake System (other)
- Parking Brake
- Axle And Differential
- Drive Shaft / Propeller Shaft
- K114 Cvt
- 3zr-fae Battery / Charging
- Networking
- Power Distribution
- Power Assist Systems
- Steering Column
- Steering Gear / Linkage
- Alignment / Handling Diagnosis
- Front Suspension
- Rear Suspension
- Tire / Wheel
- Tire Pressure Monitoring
- Door / Hatch
- Exterior Panels / Trim
- Horn
- Lighting (ext)
- Mirror (ext)
- Window / Glass
- Wiper / Washer
- Door Lock
- Heating / Air Conditioning
- Interior Panels / Trim
- Lighting (int)
- Meter / Gauge / Display
- Mirror (int)
- Power Outlets (int)
- Pre-collision
- Seat
- Seat Belt
- Supplemental Restraint Systems
- Theft Deterrent / Keyless Entry

0.0093