Toyota CH-R Owners Manual: Installing the spare tire
1. Remove any dirt or foreign matter from the wheel contact surface.
If foreign matter is on the wheel contact surface, the wheel nuts may loosen while the vehicle is in motion, causing the tire to come off.
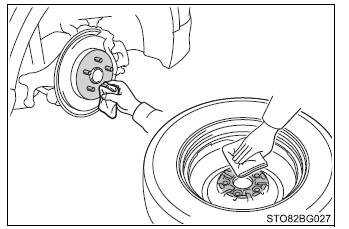
2. Install the tire and loosely tighten each wheel nut by hand by approximately the same amount.
When replacing a steel wheel with a steel wheel, tighten the wheel nuts until the tapered portion comes into loose contact with the disc wheel seat.
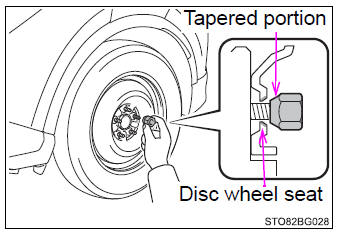
When replacing an aluminum wheel with a steel wheel, tighten the wheel nuts until the tapered portion comes into loose contact with the disc wheel seat.
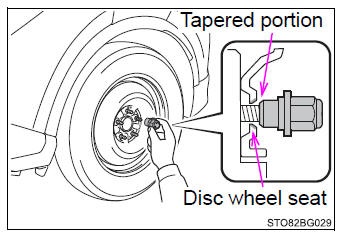
3. Lower the vehicle.
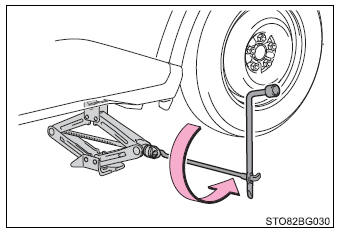
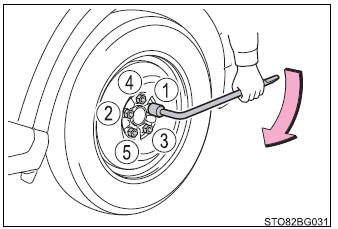
4. Firmly tighten each wheel nut two or three times in the order shown in the illustration.
Tightening torque: 76 ft*lbf (103 N*m, 10.5 kgf*m)
5. Stow the flat tire, tire jack and all tools.
■The compact spare tire
- The compact spare tire is identified by the label "TEMPORARY USE ONLY" on
the tire sidewall.
Use the compact spare tire temporarily, and only in an emergency.
- Make sure to check the tire inflation pressure of the compact spare tire.
■After completing the tire change The tire pressure warning system must be reset.
■When using the compact spare tire As the compact spare tire is not equipped with a tire pressure warning valve and transmitter, low inflation pressure of the spare tire will not be indicated by the tire pressure warning system. Also, if you replace the compact spare tire after the tire pressure warning light comes on, the light remains on.
■When the compact spare tire is equipped The vehicle becomes lower when driving with the compact spare tire compared to when driving with standard tires.
■If you have a flat front tire on a road covered with snow or ice Install the compact spare tire on one of the rear wheels of the vehicle.
Perform the following steps and fit tire chains to the front tires:
- Replace a rear tire with the compact spare tire.
- Replace the flat front tire with the tire removed from the rear of the vehicle.
- Fit tire chains to the front tires.
■When using the compact spare tire
- Remember that the compact spare tire provided is specifically designed for use with your vehicle. Do not use your compact spare tire on another vehicle.
- Do not use more than one compact spare tires simultaneously.
- Replace the compact spare tire with a standard tire as soon as possible.
- Avoid sudden acceleration, abrupt steering, sudden braking and shifting operations that cause sudden engine braking.
■When the compact spare tire is attached The vehicle speed may not be correctly detected, and the following systems may not operate correctly:
- ABS & Brake assist
- VSC
- TRAC
- EPS
- Automatic High Beam
- PCS (Pre-Collision System)
- LDA (Lane Departure Alert with steering control)
- Dynamic radar cruise control with full-speed range
- BSM (Blind Spot Monitor)*
- Rear view monitor system
*: If equipped
■Speed limit when using the compact spare tire Do not drive at speeds in excess of 50 mph (80 km/h) when a compact spare tire is installed on the vehicle.
The compact spare tire is not designed for driving at high speeds. Failure to observe this precaution may lead to an accident causing death or serious injury.
■After using the tools and jack Before driving, make sure all the tools and jack are securely in place in their storage location to reduce the possibility of personal injury during a collision or sudden braking.
■Be careful when driving over bumps with the compact spare tire installed on the vehicle.
The vehicle height may become lower when driving with the compact spare tire, compared to when driving with standard tires. Be careful when driving over uneven road surfaces.
■Driving with tire chains and the compact spare tire Do not fit tire chains to the compact spare tire.
Tire chains may damage the vehicle body and adversely affect driving performance.
■When replacing the tires When removing or fitting the wheels, tires or the tire pressure warning valve and transmitter, contact your Toyota dealer as the tire pressure warning valve and transmitter may be damaged if not handled correctly.
■To avoid damage to the tire pressure warning valves and transmitters When a tire is repaired with liquid sealants, the tire pressure warning valve and transmitter may not operate properly. If a liquid sealant is used, contact your Toyota dealer or other qualified service shop as soon as possible. Make sure to replace the tire pressure warning valve and transmitter when replacing the tire.
 Replacing a flat tire
1. Chock the tires.
Flat tire
Wheel chock positions
Front
Left-hand side
Behind the rear right-hand side tire
Right-hand side
Behind the rear left-hand side t ...
 If the engine will not start
If the engine will not start even though correct starting procedures
are being followed, consider each of the following points:
The engine will not start even though the starter motor operates norm ...
Other materials:
Toyota CH-R Service Manual > Toyota Entune System: Dtc Check / Clear
DTC CHECK / CLEAR
CHECK DTC
(a) Connect the Techstream to the DLC3.
(b) Turn the ignition switch to ON.
(c) Turn the Techstream on.
(d) Enter the following menus: Body Electrical / Telematics / Trouble Codes.
Body Electrical > Telematics > Trouble Codes
(e) Check for DTCs.
Click here
...
Toyota CH-R Service Manual > Key Reminder Warning System: Key Reminder Buzzer does not Sound
DESCRIPTION
The key reminder warning buzzer sounds when the driver door is opened while the
ignition switch is off or ACC. The key reminder warning buzzer is activated when
the main body ECU (multiplex network body ECU) sends an unlock warning switch signal
and driver door courtesy light swit ...
Toyota C-HR (AX20) 2023-2026 Owner's Manual
Toyota CH-R Owners Manual
- For safety and security
- Instrument cluster
- Operation of each component
- Driving
- Interior features
- Maintenance and care
- When trouble arises
- Vehicle specifications
- For owners
Toyota CH-R Service Manual
- Introduction
- Maintenance
- Audio / Video
- Cellular Communication
- Navigation / Multi Info Display
- Park Assist / Monitoring
- Brake (front)
- Brake (rear)
- Brake Control / Dynamic Control Systems
- Brake System (other)
- Parking Brake
- Axle And Differential
- Drive Shaft / Propeller Shaft
- K114 Cvt
- 3zr-fae Battery / Charging
- Networking
- Power Distribution
- Power Assist Systems
- Steering Column
- Steering Gear / Linkage
- Alignment / Handling Diagnosis
- Front Suspension
- Rear Suspension
- Tire / Wheel
- Tire Pressure Monitoring
- Door / Hatch
- Exterior Panels / Trim
- Horn
- Lighting (ext)
- Mirror (ext)
- Window / Glass
- Wiper / Washer
- Door Lock
- Heating / Air Conditioning
- Interior Panels / Trim
- Lighting (int)
- Meter / Gauge / Display
- Mirror (int)
- Power Outlets (int)
- Pre-collision
- Seat
- Seat Belt
- Supplemental Restraint Systems
- Theft Deterrent / Keyless Entry
0.01
