Toyota CH-R Owners Manual: Replacing a flat tire
1. Chock the tires.
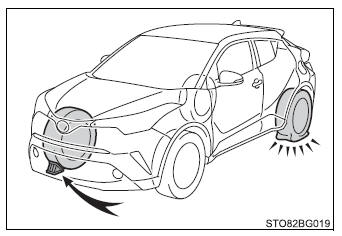
| Flat tire | Wheel chock positions | |
| Front | Left-hand side | Behind the rear right-hand side tire |
| Right-hand side | Behind the rear left-hand side tire | |
| Rear | Left-hand side | In front of the front right-hand side tire |
| Right-hand side | In front of the front left-hand side tire | |
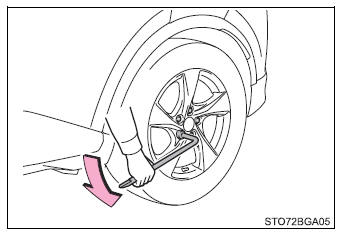
2. Slightly loosen the wheel nuts (one turn).
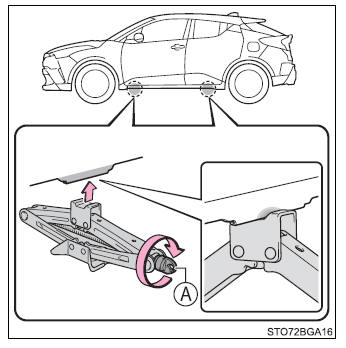
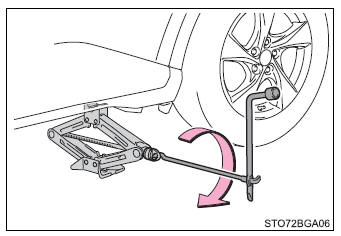
3. Turn the tire jack portion A by hand until the center of the recessed portion of the jack is in contact with the center of the jack point.
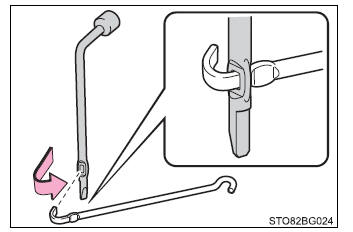
4. Assemble the jack handle and the wheel nut wrench as shown in the illustration.
5. Raise the vehicle until the tire is slightly raised off the ground.
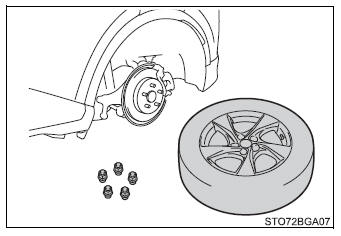
6. Remove all the wheel nuts and the tire.
When resting the tire on the ground, place the tire so that the wheel design faces up to avoid scratching the wheel surface.
■Replacing a flat tire
- Observe the following precautions.
Failure to do so may result in serious injury:
- Do not try to remove the wheel ornament by hand. Take due care in handling the ornament to avoid unexpected personal injury.
- Do not touch the disc wheels or the area around the brakes immediately
after the vehicle has been driven.
After the vehicle has been driven, the disc wheels and the area around the brakes will be extremely hot. Touching these areas with hands, feet or other body parts while changing a tire, etc., may result in burns.
- Failure to follow these precautions could cause the wheel nuts to loosen
and the tire to fall off, resulting in death or serious injury.
- Have the wheel nuts tightened with a torque wrench to 76 ft*lbf (103 N*m, 10.5 kgf*m) as soon as possible after changing wheels.
- Do not attach a heavily damaged wheel ornament, as it may fly off the wheel while the vehicle is moving.
- When installing a tire, only use wheel nuts that have been specifically designed for that wheel.
- If there are any cracks or deformations in the bolt screws, nut threads or bolt holes of the wheel, have the vehicle inspected by your Toyota dealer.
- When installing the wheel nuts, be sure to install them with the tapered ends facing inward.
 Location of the spare tire, jack and tools
Towing eyelet
Wheel nut wrench
Jack
Jack handle
Spare tire
WARNING■Using the tire jack Observe the
following precautions.
Improper use of the tire jack may cause the vehicl ...
 Installing the spare tire
1. Remove any dirt or foreign matter from the wheel contact surface.
If foreign matter is on the wheel contact surface, the wheel nuts may loosen
while the vehicle is in motion, causing the tire to ...
Other materials:
Toyota CH-R Owners Manual > For owners: Seat belt instructions for Canadian owners (in French)
The following is a French explanation of seat belt instructions extracted
from the seat belt section in this manual. See the seat belt section for
more detailed seat belt instructions in English.
Utilisation correcte des ceintures de sécurité
Déroulez la sangle diagonale de telle sorte q ...
Toyota CH-R Service Manual > Vehicle Stability Control System: Check For Intermittent Problems
CHECK FOR INTERMITTENT PROBLEMS
CHECK FOR INTERMITTENT PROBLEMS
HINT:
A momentary interruption (open circuit) in the connectors and/or wire harness
between the sensors and ECUs can be detected using the Data List function of the
Techstream.
(a) Turn the ignition switch off.
(b) Connect the ...
Toyota C-HR (AX20) 2023-2026 Owner's Manual
Toyota CH-R Owners Manual
- For safety and security
- Instrument cluster
- Operation of each component
- Driving
- Interior features
- Maintenance and care
- When trouble arises
- Vehicle specifications
- For owners
Toyota CH-R Service Manual
- Introduction
- Maintenance
- Audio / Video
- Cellular Communication
- Navigation / Multi Info Display
- Park Assist / Monitoring
- Brake (front)
- Brake (rear)
- Brake Control / Dynamic Control Systems
- Brake System (other)
- Parking Brake
- Axle And Differential
- Drive Shaft / Propeller Shaft
- K114 Cvt
- 3zr-fae Battery / Charging
- Networking
- Power Distribution
- Power Assist Systems
- Steering Column
- Steering Gear / Linkage
- Alignment / Handling Diagnosis
- Front Suspension
- Rear Suspension
- Tire / Wheel
- Tire Pressure Monitoring
- Door / Hatch
- Exterior Panels / Trim
- Horn
- Lighting (ext)
- Mirror (ext)
- Window / Glass
- Wiper / Washer
- Door Lock
- Heating / Air Conditioning
- Interior Panels / Trim
- Lighting (int)
- Meter / Gauge / Display
- Mirror (int)
- Power Outlets (int)
- Pre-collision
- Seat
- Seat Belt
- Supplemental Restraint Systems
- Theft Deterrent / Keyless Entry

0.0078