Toyota CH-R Service Manual: Reassembly
REASSEMBLY
CAUTION / NOTICE / HINT
HINT:
- Use the same procedure for the RH and LH sides.
- The procedure listed below is for the LH side.
PROCEDURE
1. INSTALL NO. 2 OUTSIDE MOULDING RETAINER
(a) When using a new rear door rear outside moulding:
(1) Clean the surface of a new rear door rear outside moulding.
(b) When reusing the rear door rear outside moulding:
(1) Remove the double-sided tape from the rear door rear outside moulding.
(2) Wipe off any tape adhesive residue with cleaner.
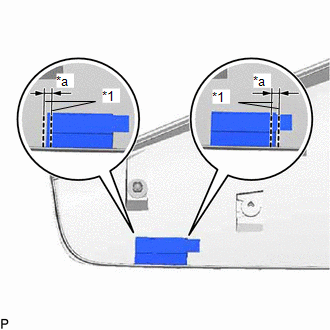
(c) Install a new No.2 outside moulding retainer.
(1) Remove the peeling paper from the face of the No.2 outside moulding retainer.
HINT:
After removing the peeling paper, keep the exposed adhesive free from foreign matter.
|
(2) Install the No.2 outside moulding retainer as shown in the illustration. |
|
2. INSTALL REAR DOOR UPPER OUTSIDE MOULDING PAD
(a) When using a new rear door outside moulding:
(1) Clean the surface of a new rear door outside moulding.
(b) When reusing the rear door lower outside moulding sub-assembly:
(1) Remove the double-sided tape from the rear door outside moulding.
(2) Wipe off any tape adhesive residue with cleaner.
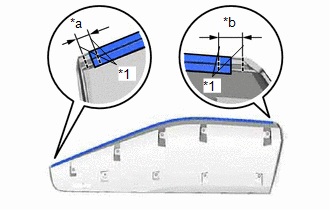
(c) Install a new rear door upper outside moulding pad.
(1) Remove the peeling paper from the face of the rear door upper outside moulding pad.
HINT:
After removing the peeling paper, keep the exposed adhesive free from foreign matter.
|
(2) Install the rear door upper outside moulding pad as shown in the illustration. |
|
 Disassembly
DISASSEMBLY
CAUTION / NOTICE / HINT
HINT:
Use the same procedure for the RH and LH sides.
The procedure listed below is for the LH side.
PROCEDURE
1. REMOVE REAR DOOR UPPER OUTS ...
 Installation
INSTALLATION
CAUTION / NOTICE / HINT
HINT:
Use the same procedure for the RH and LH sides.
The procedures listed below are for the LH side.
PROCEDURE
1. INSTALL REAR DOOR OUTSID ...
Other materials:
Toyota CH-R Service Manual > Safety Connect System: Green Indicator Remains Off
DESCRIPTION
After turning the ignition switch ON, the DCM (Telematics Transceiver) will enter
into self check mode. The manual (SOS) switch red indicator will illuminate for
2 seconds and turn off followed by the manual (SOS) switch green indicator illuminating
and remaining on under normal o ...
Toyota CH-R Service Manual > Front Brake: Disassembly
DISASSEMBLY
PROCEDURE
1. REMOVE FRONT DISC BRAKE PISTON
(a) Place a piece of cloth between the front disc brake piston and front
disc brake cylinder assembly.
*a
Cloth
...
Toyota C-HR (AX20) 2023-2026 Owner's Manual
Toyota CH-R Owners Manual
- For safety and security
- Instrument cluster
- Operation of each component
- Driving
- Interior features
- Maintenance and care
- When trouble arises
- Vehicle specifications
- For owners
Toyota CH-R Service Manual
- Introduction
- Maintenance
- Audio / Video
- Cellular Communication
- Navigation / Multi Info Display
- Park Assist / Monitoring
- Brake (front)
- Brake (rear)
- Brake Control / Dynamic Control Systems
- Brake System (other)
- Parking Brake
- Axle And Differential
- Drive Shaft / Propeller Shaft
- K114 Cvt
- 3zr-fae Battery / Charging
- Networking
- Power Distribution
- Power Assist Systems
- Steering Column
- Steering Gear / Linkage
- Alignment / Handling Diagnosis
- Front Suspension
- Rear Suspension
- Tire / Wheel
- Tire Pressure Monitoring
- Door / Hatch
- Exterior Panels / Trim
- Horn
- Lighting (ext)
- Mirror (ext)
- Window / Glass
- Wiper / Washer
- Door Lock
- Heating / Air Conditioning
- Interior Panels / Trim
- Lighting (int)
- Meter / Gauge / Display
- Mirror (int)
- Power Outlets (int)
- Pre-collision
- Seat
- Seat Belt
- Supplemental Restraint Systems
- Theft Deterrent / Keyless Entry

0.0078