Toyota CH-R Service Manual: Disassembly
DISASSEMBLY
PROCEDURE
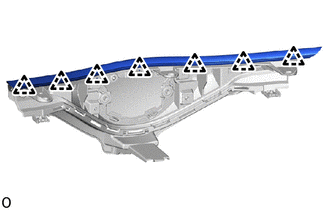
1. REMOVE HOOD TO RADIATOR GRILLE SEAL
|
(a) Disengage the clips to remove hood to radiator grille seal. |
|
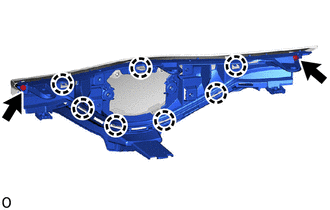
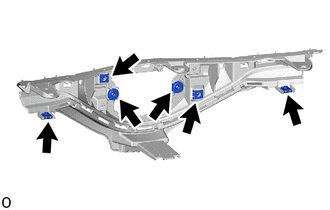
2. REMOVE RADIATOR INSIDE GRILLE
|
(a) Remove the 2 screws. |
|
(b) Disengage the claws to remove the radiator inside grille.
|
(c) Remove the 6 nuts. |
|
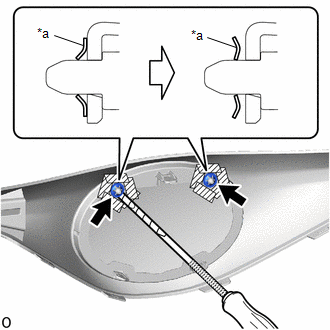
3. REMOVE RADIATOR GRILLE (OR FRONT PANEL) EMBLEM
(a) Apply protective tape around the spring nut.
.png) |
Protective Tape |
|
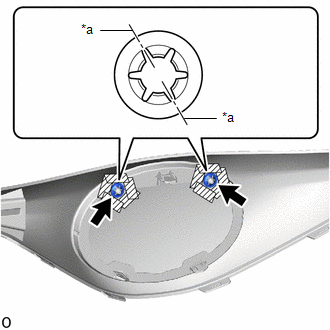
(b) Using a screwdriver, pull out the 2 spring nuts as shown in the illustration. |
|
|
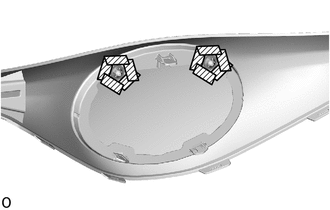
(c) Using a plier nipper (side cutters), cut the 2 spring nuts at the positions shown in the illustration and remove them. |
|
|
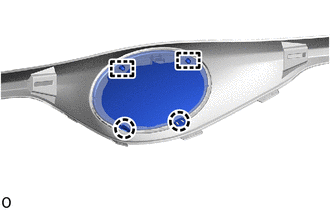
(d) Disengage the claws and guides to remove the radiator grille (or front panel) emblem. |
|
 Removal
REMOVAL
PROCEDURE
1. REMOVE FRONT BUMPER ASSEMBLY (w/o Toyota Safety Sense)
Click here
2. REMOVE MILLIMETER WAVE RADAR SENSOR ASSEMBLY (w/ Toyota Safety Sense)
Click here
3. REMOVE RADIA ...
 Reassembly
REASSEMBLY
PROCEDURE
1. INSTALL RADIATOR GRILLE (OR FRONT PANEL) EMBLEM
(a) Engage the guides and claws to install the radiator grille (or front
panel) emblem.
...
Other materials:
Toyota CH-R Service Manual > Seat Belt Warning System(w/ Occupant Classification System): Problem Symptoms Table
PROBLEM SYMPTOMS TABLE
NOTICE:
When replacing the combination meter assembly, always replace it with a new one.
If a combination meter assembly which was installed to another vehicle is used,
the information stored in it will not match the information from the vehicle and
a DTC may be stored ...
Toyota CH-R Service Manual > Pre-collision System: How To Proceed With Troubleshooting
CAUTION / NOTICE / HINT
HINT:
Use these procedures to troubleshoot the pre-collision system.
*: Use the Techstream.
PROCEDURE
1.
VEHICLE BROUGHT TO WORKSHOP
NEXT
2.
...
Toyota C-HR (AX20) 2023-2026 Owner's Manual
Toyota CH-R Owners Manual
- For safety and security
- Instrument cluster
- Operation of each component
- Driving
- Interior features
- Maintenance and care
- When trouble arises
- Vehicle specifications
- For owners
Toyota CH-R Service Manual
- Introduction
- Maintenance
- Audio / Video
- Cellular Communication
- Navigation / Multi Info Display
- Park Assist / Monitoring
- Brake (front)
- Brake (rear)
- Brake Control / Dynamic Control Systems
- Brake System (other)
- Parking Brake
- Axle And Differential
- Drive Shaft / Propeller Shaft
- K114 Cvt
- 3zr-fae Battery / Charging
- Networking
- Power Distribution
- Power Assist Systems
- Steering Column
- Steering Gear / Linkage
- Alignment / Handling Diagnosis
- Front Suspension
- Rear Suspension
- Tire / Wheel
- Tire Pressure Monitoring
- Door / Hatch
- Exterior Panels / Trim
- Horn
- Lighting (ext)
- Mirror (ext)
- Window / Glass
- Wiper / Washer
- Door Lock
- Heating / Air Conditioning
- Interior Panels / Trim
- Lighting (int)
- Meter / Gauge / Display
- Mirror (int)
- Power Outlets (int)
- Pre-collision
- Seat
- Seat Belt
- Supplemental Restraint Systems
- Theft Deterrent / Keyless Entry
0.0072

