Toyota CH-R Service Manual: Replacement
REPLACEMENT
CAUTION / NOTICE / HINT
The necessary procedures (adjustment, calibration, initialization, or registration) that must be performed after parts are removed, installed, or replaced during the front differential oil seal removal/installation are shown below.
Necessary Procedure After Parts Removed/Installed/Replaced|
Replacement Part or Procedure |
Necessary Procedure |
Effect/Inoperative when not Performed |
Link |
|---|---|---|---|
|
Replacement of CVT fluid |
ATF thermal degradation estimate reset |
The value of the Data List item "ATF Thermal Degradation Estimate" is not estimated correctly |
|
PROCEDURE
1. REMOVE NO. 1 ENGINE UNDER COVER
Click here
.gif)
2. REMOVE REAR ENGINE UNDER COVER LH
Click here
3. REMOVE REAR ENGINE UNDER COVER RH
Click here
4. DRAIN CONTINUOUSLY VARIABLE TRANSAXLE FLUID
|
(a) Remove the refill plug and gasket from the continuously variable transaxle assembly. |
|
.png)
|
(b) Using a 10 mm hexagon socket wrench, remove the drain plug and gasket from the transaxle oil (CVT) pan sub-assembly, and drain the fluid. |
|
.png)
(c) Install a new gasket and the drain plug to the transaxle oil (CVT) pan sub-assembly.
Torque:
49 N·m {500 kgf·cm, 36 ft·lbf}
(d) Temporarily install the gasket and refill plug to the continuously variable transaxle assembly.
HINT:
Reuse the old gasket. The refill plug will be removed again to adjust the fluid level.
5. REMOVE FRONT DRIVE SHAFT ASSEMBLY
Click here
6. REMOVE DRIVE SHAFT BEARING BRACKET
Click here
7. REMOVE FRONT DRIVE SHAFT OIL SEAL LH
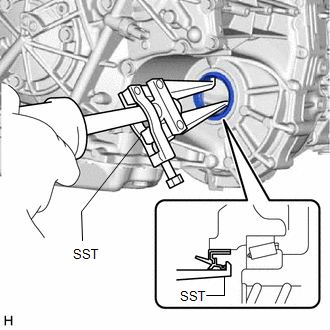
(a) Using SST, remove the front drive shaft oil seal LH from the continuously variable transaxle assembly.
SST: 09308-00010
NOTICE:
Do not damage the continuously variable transaxle assembly.
8. REMOVE FRONT DRIVE SHAFT OIL SEAL RH
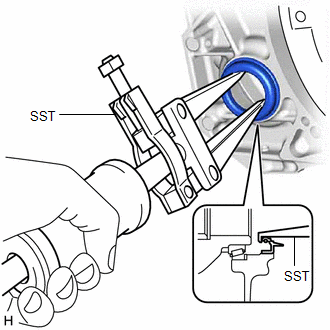
(a) Using SST, remove the front drive shaft oil seal RH from the continuously variable transaxle assembly.
SST: 09308-00010
NOTICE:
Do not damage the continuously variable transaxle assembly.
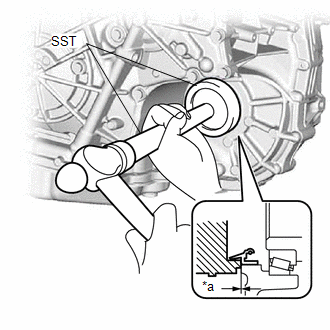
9. INSTALL FRONT DRIVE SHAFT OIL SEAL LH
(a) Apply MP grease to the lip of a new front drive shaft oil seal LH.
|
(b) Using SST and a hammer, install the front drive shaft oil seal LH to the continuously variable transaxle assembly. SST: 09316-10010 SST: 09950-70010 09951-07200 Standard Depth: -0.5 to 0.5 mm (-0.0197 to 0.0197 in.) NOTICE:
|
|
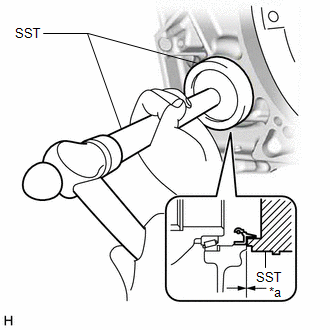
10. INSTALL FRONT DRIVE SHAFT OIL SEAL RH
(a) Apply MP grease to the lip of a new front drive shaft oil seal RH.
|
(b) Using SST and a hammer, install the front drive shaft oil seal RH to the continuously variable transaxle assembly. SST: 09316-10010 SST: 09950-70010 09951-07200 Standard Depth: -0.5 to 0.5 mm (-0.0197 to 0.0197 in.) NOTICE:
|
|
11. INSTALL DRIVE SHAFT BEARING BRACKET
Click here
12. INSTALL FRONT DRIVE SHAFT ASSEMBLY
Click here
13. ADD CONTINUOUSLY VARIABLE TRANSAXLE FLUID
Click here
14. INSPECT FOR FLUID LEAK
15. INSTALL REAR ENGINE UNDER COVER LH
Click here
16. INSTALL REAR ENGINE UNDER COVER RH
Click here
17. INSTALL NO. 1 ENGINE UNDER COVER
Click here
 Components
COMPONENTS
ILLUSTRATION
*1
NO. 1 ENGINE UNDER COVER
*2
REAR ENGINE UNDER COVER LH
*3
REAR ENGINE UNDER COVER RH
- ...
 Oil Cooler
...
Other materials:
Toyota CH-R Service Manual > Continuously Variable Transaxle System: Lost Communication with Lateral Acceleration Sensor Module (U0124)
DESCRIPTION
The ECM receives signals sent from the airbag sensor assembly (yaw rate and acceleration
sensor) via CAN communication. When DTCs indicating a CAN communication system malfunction
are output, repair the CAN communication system before repairing each corresponding
ECU or sensor.
...
Toyota CH-R Service Manual > Power Window Control System: Auto Up Operation does not Fully Close Power Window (Jam Protection Function
is Activated)
DESCRIPTION
If a door glass does not slide smoothly or a power window regulator motor assembly
or door window regulator sub-assembly does not operate smoothly, the jam protection
function may be triggered automatically, resulting in the auto up operation being
unable to fully close the power ...
Toyota C-HR (AX20) 2023-2026 Owner's Manual
Toyota CH-R Owners Manual
- For safety and security
- Instrument cluster
- Operation of each component
- Driving
- Interior features
- Maintenance and care
- When trouble arises
- Vehicle specifications
- For owners
Toyota CH-R Service Manual
- Introduction
- Maintenance
- Audio / Video
- Cellular Communication
- Navigation / Multi Info Display
- Park Assist / Monitoring
- Brake (front)
- Brake (rear)
- Brake Control / Dynamic Control Systems
- Brake System (other)
- Parking Brake
- Axle And Differential
- Drive Shaft / Propeller Shaft
- K114 Cvt
- 3zr-fae Battery / Charging
- Networking
- Power Distribution
- Power Assist Systems
- Steering Column
- Steering Gear / Linkage
- Alignment / Handling Diagnosis
- Front Suspension
- Rear Suspension
- Tire / Wheel
- Tire Pressure Monitoring
- Door / Hatch
- Exterior Panels / Trim
- Horn
- Lighting (ext)
- Mirror (ext)
- Window / Glass
- Wiper / Washer
- Door Lock
- Heating / Air Conditioning
- Interior Panels / Trim
- Lighting (int)
- Meter / Gauge / Display
- Mirror (int)
- Power Outlets (int)
- Pre-collision
- Seat
- Seat Belt
- Supplemental Restraint Systems
- Theft Deterrent / Keyless Entry

0.0065