Toyota CH-R Service Manual: Inspection
INSPECTION
PROCEDURE
1. INSPECT VACUUM PUMP VANE
|
(a) Check that the vacuum pump vane or vacuum pump vane caps are not damaged or excessively worn out. HINT: If the vacuum pump vane or vacuum pump vane caps are damaged or excessively worn out, replace the damaged parts with new ones. |
|
.png)
|
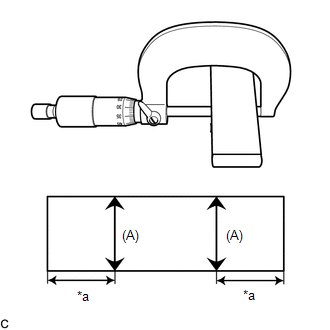
(b) Using a micrometer, measure length (A) of the vacuum pump vane with the vacuum pump vane caps removed. Minimum Length (A): 23.8 mm (0.937 in.) NOTICE: Measure length (A) 10 mm (0.394 in.) in from each end of the vacuum pump vane. HINT: If the length is not as specified, replace the vacuum pump vane and vacuum pump vane caps with new ones. |
|
|
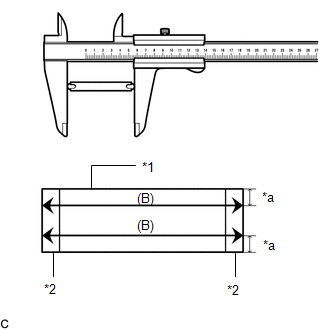
(c) Using a vernier caliper, measure length (B) of the vacuum pump vane with the vacuum pump vane caps installed. Minimum Length (B): 76 mm (2.99 in.) NOTICE: Measure length (B) 5 mm (0.197 in.) in from each end of the vacuum pump vane cap. HINT: If the length is not as specified, replace the vacuum pump vane and vacuum pump vane caps with new ones. |
|
2. INSPECT VACUUM PUMP HOUSING
|
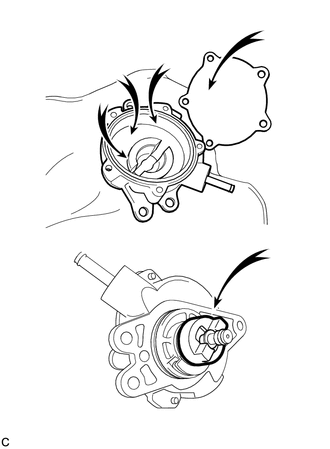
(a) Check that the rotor part, coupling, vacuum pump housing and end cover are not damaged or excessively worn out. HINT: If the rotor part, coupling, vacuum pump housing or end cover are damaged or excessively worn out, replace the vacuum pump assembly. |
|
 Disassembly
DISASSEMBLY
PROCEDURE
1. REMOVE END COVER
(a) Using a T25 "TORX" socket wrench, remove the 5 screws and end cover.
NOTICE:
Hold the vacuum pump assembly so t ...
 Reassembly
REASSEMBLY
PROCEDURE
1. INSTALL VACUUM PUMP VANE
(a) Apply engine oil to the vacuum pump vane and 2 vacuum pump vane caps.
(b) Install the vacuum pump vane caps to the vacuum pump vane. ...
Other materials:
Toyota CH-R Service Manual > Vehicle Stability Control System: Performance Decline of Brake Function (C1441)
DESCRIPTION
The skid control ECU judges brake failure conditions have occurred based on signals
from the brake pedal load sensing switch and master cylinder pressure sensor.
NOTICE:
Do not intentionally stop the engine when driving. Even when no malfunction has
occurred in the brake system, D ...
Toyota CH-R Service Manual > Airbag System: Lost Communication with Front Airbag Sensor RH (B1612/83,B1613/83)
DESCRIPTION
The front airbag sensor RH circuit consists of the airbag sensor assembly and
front airbag sensor RH.
The front airbag sensor RH detects impacts to the vehicle and sends signals to
the airbag sensor assembly to determine if the airbags and pretensioners should
be deployed.
These ...
Toyota C-HR (AX20) 2023-2026 Owner's Manual
Toyota CH-R Owners Manual
- For safety and security
- Instrument cluster
- Operation of each component
- Driving
- Interior features
- Maintenance and care
- When trouble arises
- Vehicle specifications
- For owners
Toyota CH-R Service Manual
- Introduction
- Maintenance
- Audio / Video
- Cellular Communication
- Navigation / Multi Info Display
- Park Assist / Monitoring
- Brake (front)
- Brake (rear)
- Brake Control / Dynamic Control Systems
- Brake System (other)
- Parking Brake
- Axle And Differential
- Drive Shaft / Propeller Shaft
- K114 Cvt
- 3zr-fae Battery / Charging
- Networking
- Power Distribution
- Power Assist Systems
- Steering Column
- Steering Gear / Linkage
- Alignment / Handling Diagnosis
- Front Suspension
- Rear Suspension
- Tire / Wheel
- Tire Pressure Monitoring
- Door / Hatch
- Exterior Panels / Trim
- Horn
- Lighting (ext)
- Mirror (ext)
- Window / Glass
- Wiper / Washer
- Door Lock
- Heating / Air Conditioning
- Interior Panels / Trim
- Lighting (int)
- Meter / Gauge / Display
- Mirror (int)
- Power Outlets (int)
- Pre-collision
- Seat
- Seat Belt
- Supplemental Restraint Systems
- Theft Deterrent / Keyless Entry

0.0079