Toyota CH-R Service Manual: Disassembly
DISASSEMBLY
PROCEDURE
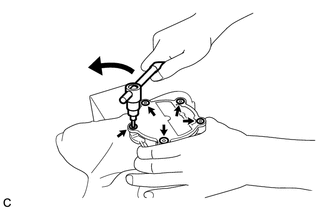
1. REMOVE END COVER
|
(a) Using a T25 "TORX" socket wrench, remove the 5 screws and end cover. NOTICE:
|
|
|
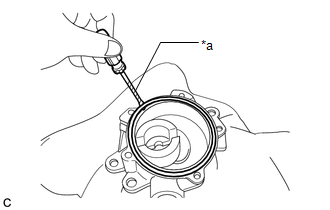
(b) Using a screwdriver with its tip wrapped with protective tape, remove the No. 1 O-ring. NOTICE: Do not damage the installation groove. |
|
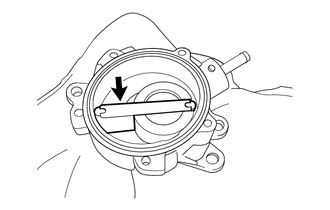
2. REMOVE VACUUM PUMP VANE
|
(a) Remove the vacuum pump vane together with the 2 vacuum pump vane caps. NOTICE:
|
|
|
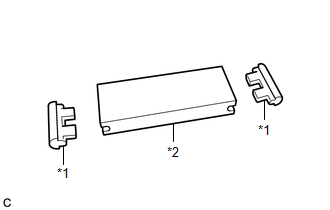
(b) Remove the 2 vacuum pump vane caps from the vacuum pump vane. NOTICE:
|
|
 Removal
REMOVAL
CAUTION / NOTICE / HINT
The necessary procedures (adjustment, calibration, initialization, or registration)
that must be performed after parts are removed, installed, or replaced during va ...
 Inspection
INSPECTION
PROCEDURE
1. INSPECT VACUUM PUMP VANE
(a) Check that the vacuum pump vane or vacuum pump vane caps are not
damaged or excessively worn out.
HINT:
If the vacuum pump ...
Other materials:
Toyota CH-R Service Manual > Immobiliser System(w/ Smart Key System): Antenna Coil Open / Short (B2784)
DESCRIPTION
When an open or short circuit is detected in the transponder key amplifier coil
built into the engine switch, the certification ECU (smart key ECU assembly) stores
this DTC. This DTC is also stored as a history DTC.
DTC No.
Detection Item
DTC Detect ...
Toyota CH-R Owners Manual > Essential information: Emergency flashers
The emergency flashers are used to warn other drivers when the vehicle
has to be stopped in the road due to a breakdown, etc.
Press the switch.
All the turn signal lights will flash.
To turn them off, press the switch once again.
■Emergency flashers If the emergency flashers are used for ...
Toyota C-HR (AX20) 2023-2026 Owner's Manual
Toyota CH-R Owners Manual
- For safety and security
- Instrument cluster
- Operation of each component
- Driving
- Interior features
- Maintenance and care
- When trouble arises
- Vehicle specifications
- For owners
Toyota CH-R Service Manual
- Introduction
- Maintenance
- Audio / Video
- Cellular Communication
- Navigation / Multi Info Display
- Park Assist / Monitoring
- Brake (front)
- Brake (rear)
- Brake Control / Dynamic Control Systems
- Brake System (other)
- Parking Brake
- Axle And Differential
- Drive Shaft / Propeller Shaft
- K114 Cvt
- 3zr-fae Battery / Charging
- Networking
- Power Distribution
- Power Assist Systems
- Steering Column
- Steering Gear / Linkage
- Alignment / Handling Diagnosis
- Front Suspension
- Rear Suspension
- Tire / Wheel
- Tire Pressure Monitoring
- Door / Hatch
- Exterior Panels / Trim
- Horn
- Lighting (ext)
- Mirror (ext)
- Window / Glass
- Wiper / Washer
- Door Lock
- Heating / Air Conditioning
- Interior Panels / Trim
- Lighting (int)
- Meter / Gauge / Display
- Mirror (int)
- Power Outlets (int)
- Pre-collision
- Seat
- Seat Belt
- Supplemental Restraint Systems
- Theft Deterrent / Keyless Entry

0.0111