Toyota CH-R Service Manual: Installation
INSTALLATION
CAUTION / NOTICE / HINT
NOTICE:
- Immediately after installing the brake pads, the braking performance may be reduced. Always perform a road test in a safe place while paying attention to the surroundings.
- After replacing the front disc brake pads, always perform a road test to check the braking performance and check for vibrations.
HINT:
- Use the same procedure for the RH side and LH side.
- The following procedure is for the LH side.
PROCEDURE
1. INSTALL FRONT DISC
|
(a) Align the matchmarks of the front disc and front axle hub sub-assembly, and install the front disc. NOTICE: When replacing the front disc with a new one, select the installation position where the front disc has minimal runout. |
|
.png)
2. INSTALL FRONT DISC BRAKE CYLINDER MOUNTING
(a) Install the front disc brake cylinder mounting to the steering knuckle with the 2 bolts.
Torque:
107 N·m {1091 kgf·cm, 79 ft·lbf}
3. INSTALL FRONT DISC BRAKE BUSHING DUST BOOT
(a) Apply a light layer of lithium soap base glycol grease to the entire circumference of 2 new front disc brake bushing dust boots.
HINT:
Apply more than 0.3 g (0.01 oz.) of lithium soap base glycol grease to each front disc brake bushing dust boot.
.png) |
Lithium Soap Base Glycol Grease |
(b) Install the 2 front disc brake bushing dust boots to the front disc brake cylinder mounting.
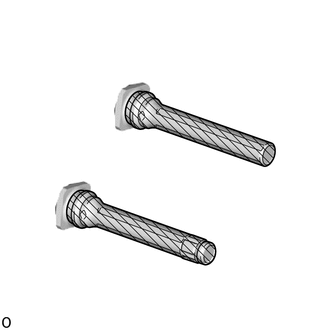
4. INSTALL FRONT DISC BRAKE CYLINDER SLIDE PIN
(a) Apply a light layer of lithium soap base glycol grease to the contact surface of the front disc brake cylinder slide pin (lower side).
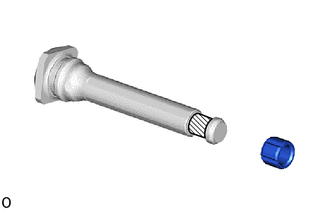
|
|
Lithium Soap Base Glycol Grease |
(b) Install a new front disc brake cylinder slide bushing to the front disc brake cylinder slide pin (lower side).
(c) Apply a light layer of lithium soap base glycol grease to the sliding part and the sealing surfaces of the 2 front disc brake cylinder slide pins.
|
|
Lithium Soap Base Glycol Grease |
(d) Install the 2 front disc brake cylinder slide pins to the front disc brake cylinder mounting.
(e) Push each front disc brake cylinder slide pin into the front disc brake bushing dust boot to engage the pin to the boot.
5. INSTALL FRONT DISC BRAKE PAD SUPPORT PLATE
(a) Install the 4 front disc brake pad support plates to the front disc brake cylinder mounting.
NOTICE:
- Be sure to install each front disc brake pad support plate in the correct position and direction.
- When reusing the brake pad support plates, use the identification marks created during removal to install them to the original positions.
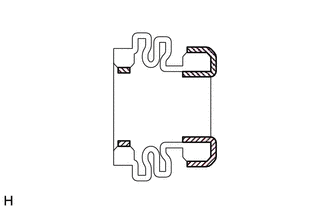
6. INSTALL FRONT DISC BRAKE ANTI-SQUEAL SHIM KIT
Click here
.gif)
7. INSTALL FRONT DISC BRAKE PAD
(a) Install the 2 front disc brake pads to the front disc brake cylinder mounting.
8. INSTALL FRONT DISC BRAKE CYLINDER ASSEMBLY
(a) Hold each front disc brake cylinder slide pin and install the front disc brake cylinder assembly to the front disc brake cylinder mounting with 2 new bolts.
Torque:
31.5 N·m {321 kgf·cm, 23 ft·lbf}
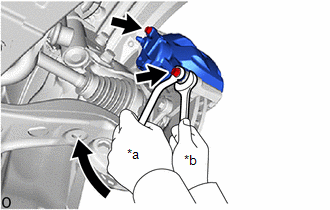
|
*a |
Turn |
|
*b |
Hold |
CAUTION:
- Do not reuse the bolts.
.png)
- If the bolts are reused, the front disc brake cylinder assembly could come off, which could cause an accident.
9. CONNECT FRONT FLEXIBLE HOSE
(a) Connect the front flexible hose to the front disc brake cylinder assembly with a new union bolt and a new gasket.
Torque:
29 N·m {296 kgf·cm, 21 ft·lbf}
NOTICE:
Install the front flexible hose lock securely into the lock hole in the front disc brake cylinder assembly.
10. BLEED BRAKE LINE
Click here
11. INSTALL FRONT WHEEL
Click here
 Reassembly
REASSEMBLY
PROCEDURE
1. TEMPORARILY TIGHTEN FRONT DISC BRAKE BLEEDER PLUG
(a) Temporarily install the front disc brake bleeder plug to the front disc brake
cylinder assembly.
HINT:
Fully tighte ...
 Front Brake Flexible Hose
Components
COMPONENTS
ILLUSTRATION
*1
FRONT FLEXIBLE HOSE
*2
GASKET
*3
BRAKE LINE
*4
FRONT SPEED SE ...
Other materials:
Toyota CH-R Service Manual > Front Door Belt Moulding: Components
COMPONENTS
ILLUSTRATION
*1
FRONT DOOR BELT MOULDING ASSEMBLY
*2
FRONT DOOR GLASS SUB-ASSEMBLY
*3
FRONT DOOR SERVICE HOLE COVER
-
-
N*m (kgf*cm, ft.*lbf) : Specified torque
...
Toyota CH-R Service Manual > Electric Parking Brake System: Test Mode Procedure
TEST MODE PROCEDURE
REAR BRAKE PAD REPLACEMENT MODE
*1
Rear Disc Brake Piston
*2
Nut
*a
The nut moves inward in pad replacement mode
HINT:
When replacing the rear disc brake pad and rear disc, since the nut ...
Toyota C-HR (AX20) 2023-2026 Owner's Manual
Toyota CH-R Owners Manual
- For safety and security
- Instrument cluster
- Operation of each component
- Driving
- Interior features
- Maintenance and care
- When trouble arises
- Vehicle specifications
- For owners
Toyota CH-R Service Manual
- Introduction
- Maintenance
- Audio / Video
- Cellular Communication
- Navigation / Multi Info Display
- Park Assist / Monitoring
- Brake (front)
- Brake (rear)
- Brake Control / Dynamic Control Systems
- Brake System (other)
- Parking Brake
- Axle And Differential
- Drive Shaft / Propeller Shaft
- K114 Cvt
- 3zr-fae Battery / Charging
- Networking
- Power Distribution
- Power Assist Systems
- Steering Column
- Steering Gear / Linkage
- Alignment / Handling Diagnosis
- Front Suspension
- Rear Suspension
- Tire / Wheel
- Tire Pressure Monitoring
- Door / Hatch
- Exterior Panels / Trim
- Horn
- Lighting (ext)
- Mirror (ext)
- Window / Glass
- Wiper / Washer
- Door Lock
- Heating / Air Conditioning
- Interior Panels / Trim
- Lighting (int)
- Meter / Gauge / Display
- Mirror (int)
- Power Outlets (int)
- Pre-collision
- Seat
- Seat Belt
- Supplemental Restraint Systems
- Theft Deterrent / Keyless Entry

0.0067