Toyota CH-R Service Manual: Reassembly
REASSEMBLY
PROCEDURE
1. TEMPORARILY TIGHTEN FRONT DISC BRAKE BLEEDER PLUG
(a) Temporarily install the front disc brake bleeder plug to the front disc brake cylinder assembly.
HINT:
Fully tighten the front disc brake bleeder plug after bleeding the system.
2. INSTALL FRONT DISC BRAKE BLEEDER PLUG CAP
(a) Install the front disc brake bleeder plug cap to the front disc brake bleeder plug.
3. INSTALL PISTON SEAL
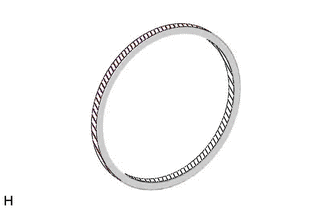
(a) Apply lithium soap base glycol grease to the entire circumference of a new piston seal.
.png) |
Lithium Soap Base Glycol Grease |
|
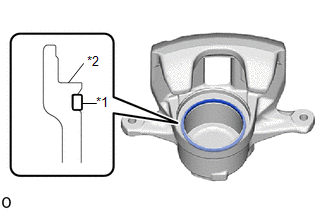
(b) Install the piston seal to the front disc brake cylinder. NOTICE: Securely install the piston seal into the groove of the front disc brake cylinder. |
|
4. INSTALL FRONT DISC BRAKE PISTON
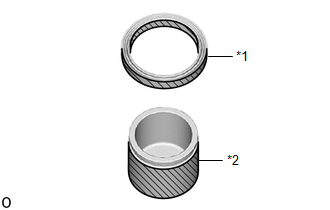
(a) Apply a light layer of lithium soap base glycol grease to the entire circumference of a new cylinder boot.
|
*1 |
Cylinder Boot |
|
*2 |
Front Disc Brake Piston |
|
|
Lithium Soap Base Glycol Grease |
(b) Apply a light layer of lithium soap base glycol grease to the contact surfaces of the front disc brake piston.
(c) Install the cylinder boot to the front disc brake piston.
NOTICE:
Securely install the cylinder boot into the groove of the front disc brake piston.
(d) Install the front disc brake piston to the front disc brake cylinder assembly.
NOTICE:
Do not forcibly install the front disc brake piston into the front disc brake cylinder.
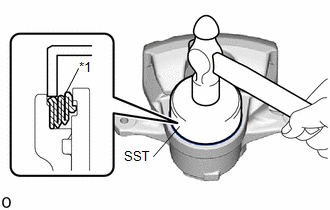
5. INSTALL CYLINDER BOOT
|
(a) Using SST and a hammer, install the cylinder boot to the front disc brake cylinder. SST: 09550-00032 NOTICE:
|
|
 Inspection
INSPECTION
PROCEDURE
1. INSPECT BRAKE CYLINDER AND PISTON
(a) Check the front disc brake cylinder bore and front disc brake piston for
rust and scoring. If necessary, replace the front disc brake ...
 Installation
INSTALLATION
CAUTION / NOTICE / HINT
NOTICE:
Immediately after installing the brake pads, the braking performance
may be reduced. Always perform a road test in a safe place while paying ...
Other materials:
Toyota CH-R Service Manual > Safety Connect System: System Description
SYSTEM DESCRIPTION
DESCRIPTION
(a) Safety Connect performs ACN (Automatic Collision Notification), manual emergency
calling, stolen vehicle tracking and roadside assistance service by, audio and data
communications between the vehicle and call center through a cellular phone network.
As show ...
Toyota CH-R Service Manual > Wireless Door Lock Control System(w/ Smart Key System): System Description
SYSTEM DESCRIPTION
WIRELESS DOOR LOCK CONTROL SYSTEM
The wireless door lock control system can be used to lock and unlock all doors
from a distance. The system is controlled by an electrical key transmitter sub-assembly
which sends radio waves to the electrical key and TPMS receiver assembly. ...
Toyota C-HR (AX20) 2023-2026 Owner's Manual
Toyota CH-R Owners Manual
- For safety and security
- Instrument cluster
- Operation of each component
- Driving
- Interior features
- Maintenance and care
- When trouble arises
- Vehicle specifications
- For owners
Toyota CH-R Service Manual
- Introduction
- Maintenance
- Audio / Video
- Cellular Communication
- Navigation / Multi Info Display
- Park Assist / Monitoring
- Brake (front)
- Brake (rear)
- Brake Control / Dynamic Control Systems
- Brake System (other)
- Parking Brake
- Axle And Differential
- Drive Shaft / Propeller Shaft
- K114 Cvt
- 3zr-fae Battery / Charging
- Networking
- Power Distribution
- Power Assist Systems
- Steering Column
- Steering Gear / Linkage
- Alignment / Handling Diagnosis
- Front Suspension
- Rear Suspension
- Tire / Wheel
- Tire Pressure Monitoring
- Door / Hatch
- Exterior Panels / Trim
- Horn
- Lighting (ext)
- Mirror (ext)
- Window / Glass
- Wiper / Washer
- Door Lock
- Heating / Air Conditioning
- Interior Panels / Trim
- Lighting (int)
- Meter / Gauge / Display
- Mirror (int)
- Power Outlets (int)
- Pre-collision
- Seat
- Seat Belt
- Supplemental Restraint Systems
- Theft Deterrent / Keyless Entry

0.0136