
Toyota CH-R Service Manual: Open in Outer Mirror Indicator(Slave) (C1AB5)
DESCRIPTION
This DTC is stored when the blind spot monitor sensor RH (Slave) detects an open in the outer rear view mirror indicator RH.
|
DTC No. |
Detection Item |
DTC Detection Condition |
Trouble Area |
|---|---|---|---|
|
C1AB5 |
Open in Outer Mirror Indicator(Slave) |
Both of the following conditions are met:
|
|
WIRING DIAGRAM
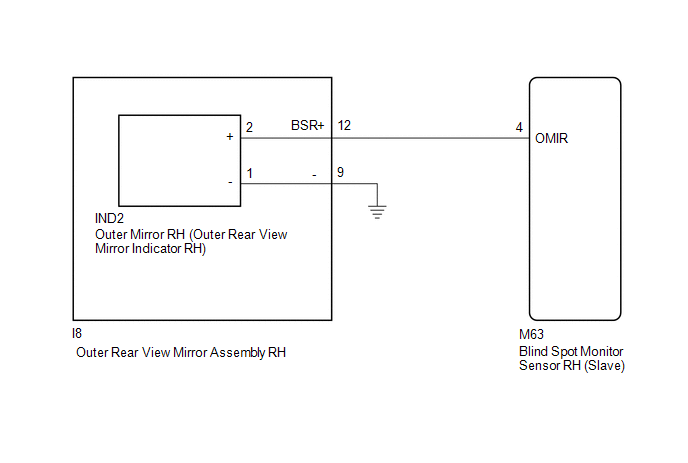
CAUTION / NOTICE / HINT
NOTICE:
When checking for DTCs, make sure that the blind spot monitor system is turned on.
PROCEDURE
|
1. |
CHECK DTC |
(a) Turn the ignition switch off.
(b) Turn the ignition switch to ON.
(c) Recheck for DTCs and check if the same DTC is output again.
Body Electrical > Blind Spot Monitor Slave > Trouble CodesOK:
No DTCs are output.
| OK | .gif) |
USE SIMULATION METHOD TO CHECK
|
|
.gif)
|
2. |
CHECK HARNESS AND CONNECTOR (OUTER REAR VIEW MIRROR ASSEMBLY RH - BLIND SPOT MONITOR SENSOR RH (SLAVE) AND BODY GROUND) |
(a) Disconnect the M63 blind spot monitor sensor RH (Slave) connector.
(b) Disconnect the I8 outer rear view mirror assembly RH connector.
(c) Measure the resistance according to the value(s) in the table below.
Standard Resistance:
|
Tester Connection |
Condition |
Specified Condition |
|---|---|---|
|
M63-4 (OMIR) - I8-12 (BSR+) |
Always |
Below 1 Ω |
|
I8-9 (-) - Body ground |
Always |
Below 1 Ω |
| NG | |
REPAIR OR REPLACE HARNESS OR CONNECTOR |
|
|
3. |
INSPECT OUTER REAR VIEW MIRROR ASSEMBLY RH |
(a) Disconnect the IND2 outer mirror RH connector.
(b) Measure the resistance according to the value(s) in the table below.
Standard Resistance:
|
Tester Connection |
Condition |
Specified Condition |
|---|---|---|
|
I8-12 (BSR+) - IND2-2 (+) |
Always |
Below 1 Ω |
|
I8-9 (-) - IND2-1 (-) |
Always |
Below 1 Ω |
| NG | |
REPLACE OUTER REAR VIEW MIRROR ASSEMBLY RH |
|
|
4. |
INSPECT OUTER MIRROR RH |
(a) Remove the outer mirror RH.
Click here
.gif)
(b) Inspect the outer rear view mirror indicator RH on the outer mirror RH.
Click here
| OK | |
REPLACE BLIND SPOT MONITOR SENSOR RH (SLAVE) |
| NG | |
REPLACE OUTER MIRROR RH |
 Blind Spot Monitor Slave Module (C1AB7)
DESCRIPTION
This DTC is stored when the blind spot monitor sensor RH (Slave) detects an internal
malfunction.
DTC No.
Detection Item
DTC Detection Condition
...
 Open in Outer Mirror Indicator(Master) (C1AB4)
DESCRIPTION
This DTC is stored when the blind spot monitor sensor LH (Master) detects an
open in the outer rear view mirror indicator LH.
DTC No.
Detection Item
DT ...
Other materials:
Toyota CH-R Service Manual > Repair Instruction: Customize Parameters
CUSTOMIZE PARAMETERS
PROCEDURE
1. CUSTOMIZE LANE DEPARTURE ALERT SYSTEM (w/ Steering Control)
Click here
2. CUSTOMIZE BLIND SPOT MONITOR SYSTEM
Click here
3. CUSTOMIZE POWER DOOR LOCK CONTROL SYSTEM
Click here
4. CUSTOMIZE WIRELESS DOOR LOCK CONTROL SYSTEM (w/ Smart Key System)
...
Toyota CH-R Service Manual > Airbag System: Side Airbag Sensor RH Circuit Malfunction (B1620/21)
DESCRIPTION
The side collision sensor RH circuit (bus 1) consists of the airbag sensor assembly,
door side airbag sensor RH, No. 1 side airbag sensor RH and No. 2 side airbag sensor
RH.
The door side airbag sensor RH, No. 1 side airbag sensor RH and No. 2 side airbag
sensor RH detect impacts ...
Toyota C-HR (AX20) 2023-2026 Owner's Manual
Toyota CH-R Owners Manual
- For safety and security
- Instrument cluster
- Operation of each component
- Driving
- Interior features
- Maintenance and care
- When trouble arises
- Vehicle specifications
- For owners
Toyota CH-R Service Manual
- Introduction
- Maintenance
- Audio / Video
- Cellular Communication
- Navigation / Multi Info Display
- Park Assist / Monitoring
- Brake (front)
- Brake (rear)
- Brake Control / Dynamic Control Systems
- Brake System (other)
- Parking Brake
- Axle And Differential
- Drive Shaft / Propeller Shaft
- K114 Cvt
- 3zr-fae Battery / Charging
- Networking
- Power Distribution
- Power Assist Systems
- Steering Column
- Steering Gear / Linkage
- Alignment / Handling Diagnosis
- Front Suspension
- Rear Suspension
- Tire / Wheel
- Tire Pressure Monitoring
- Door / Hatch
- Exterior Panels / Trim
- Horn
- Lighting (ext)
- Mirror (ext)
- Window / Glass
- Wiper / Washer
- Door Lock
- Heating / Air Conditioning
- Interior Panels / Trim
- Lighting (int)
- Meter / Gauge / Display
- Mirror (int)
- Power Outlets (int)
- Pre-collision
- Seat
- Seat Belt
- Supplemental Restraint Systems
- Theft Deterrent / Keyless Entry

0.0097