Toyota CH-R Service Manual: Installation
INSTALLATION
PROCEDURE
1. INSTALL REAR WIPER RUBBER
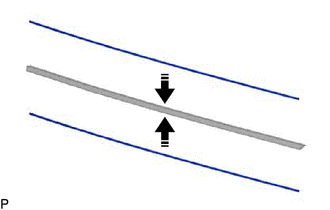
(a) Install the 2 rear wiper rubber backing plates to the rear wiper rubber.
.png) |
Install in this Direction |
NOTICE:
Install the backing plates facing the correct direction.
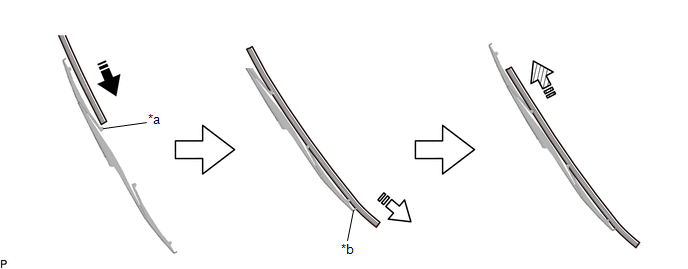
(b) Insert the rear wiper rubber with the 2 rear wiper rubber backing plates through the second claw from the front of the rear wiper blade and then push it through each claw until the rear claw.
|
*a |
Second Claw |
*b |
Stopper |
|
|
Install in this Direction (1) |
.png) |
Install in this Direction (2) |
 |
Install in this Direction (3) |
- |
- |
(c) After pushing the rear wiper rubber through the rear claw, pull it slightly over the rear stopper.
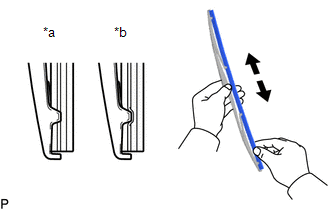
(d) Slide the rear wiper rubber through the front claw.
|
(e) Securely engage the rear wiper blade claw to the rear wiper rubber groove as shown in the illustration. HINT:
|
|
2. INSTALL REAR WIPER BLADE
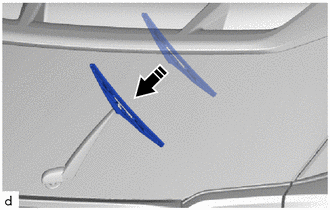
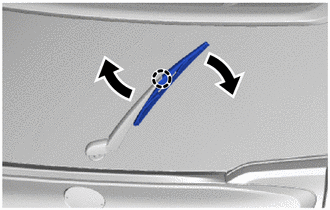
(a) Push the rear wiper blade as shown in the illustration to install it to the rear wiper arm.
|
|
Install in this Direction |
|
(b) Engage the claw to install the rear wiper blade as shown in the illustration. NOTICE: Be careful not to damage the claw. |
|
|
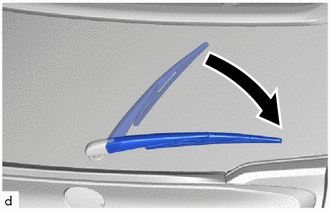
(c) Lower the rear wiper arm and blade assembly as shown in the illustration. |
|
 Removal
REMOVAL
PROCEDURE
1. REMOVE REAR WIPER BLADE
(a) Lift the rear wiper arm and blade assembly as shown in the illustration.
(b) ...
 Tire And Wheel
Components
COMPONENTS
ILLUSTRATION
*A
for Steel Wheel
-
-
*1
WHEEL ASSEMBLY
*2
WHEEL CAP
...
Other materials:
Toyota CH-R Owners Manual > Tire information: Typical DOT and Tire Identification Number (TIN)
Type A
Type B
DOT symbol*
Tire Identification Number (TIN)
Tire manufacturer's identification mark
Tire size code
Manufacturer's optional tire type code (3 or 4 letters)
Manufacturing week
Manufacturing year
Manufacturer's code
*: The DOT symbol certifies th ...
Toyota CH-R Service Manual > Airbag System: Seat Belt Buckle Switch LH Circuit Malfunction (B1656/38)
DESCRIPTION
The seat belt buckle switch LH circuit consists of the airbag sensor assembly
and seat belt buckle switch LH (front seat inner belt assembly LH).
DTC B1656/38 is stored when a malfunction is detected in the seat belt buckle
switch LH circuit.
DTC No.
Detectio ...
Toyota C-HR (AX20) 2023-2026 Owner's Manual
Toyota CH-R Owners Manual
- For safety and security
- Instrument cluster
- Operation of each component
- Driving
- Interior features
- Maintenance and care
- When trouble arises
- Vehicle specifications
- For owners
Toyota CH-R Service Manual
- Introduction
- Maintenance
- Audio / Video
- Cellular Communication
- Navigation / Multi Info Display
- Park Assist / Monitoring
- Brake (front)
- Brake (rear)
- Brake Control / Dynamic Control Systems
- Brake System (other)
- Parking Brake
- Axle And Differential
- Drive Shaft / Propeller Shaft
- K114 Cvt
- 3zr-fae Battery / Charging
- Networking
- Power Distribution
- Power Assist Systems
- Steering Column
- Steering Gear / Linkage
- Alignment / Handling Diagnosis
- Front Suspension
- Rear Suspension
- Tire / Wheel
- Tire Pressure Monitoring
- Door / Hatch
- Exterior Panels / Trim
- Horn
- Lighting (ext)
- Mirror (ext)
- Window / Glass
- Wiper / Washer
- Door Lock
- Heating / Air Conditioning
- Interior Panels / Trim
- Lighting (int)
- Meter / Gauge / Display
- Mirror (int)
- Power Outlets (int)
- Pre-collision
- Seat
- Seat Belt
- Supplemental Restraint Systems
- Theft Deterrent / Keyless Entry

0.0204