Toyota CH-R Service Manual: Installation
INSTALLATION
PROCEDURE
1. INSTALL REAR SEAT INNER WITH CENTER BELT ASSEMBLY LH
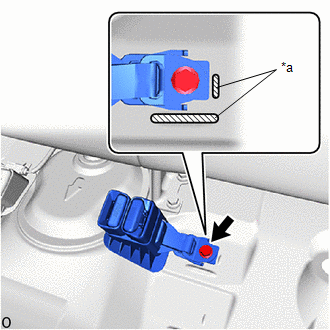
(a) w/o Seat Belt Warning System:
|
(1) Tighten the bolt and install the rear seat inner with center belt assembly LH. Torque: 42 N·m {428 kgf·cm, 31 ft·lbf} NOTICE: Do not allow the anchor part of the rear seat inner with center belt assembly LH to overlap the protruding parts of the vehicle body. |
|
(b) w/ Seat Belt Warning System:
|
(1) Tighten the bolt and install the rear seat inner with center belt assembly LH. Torque: 42 N·m {428 kgf·cm, 31 ft·lbf} NOTICE: Do not allow the anchor part of the rear seat inner with center belt assembly LH to overlap the protruding parts of the vehicle body. |
|
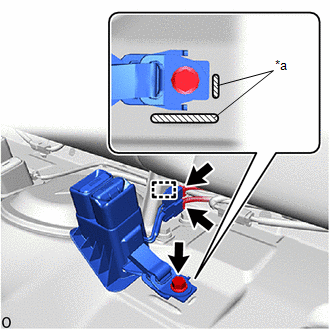
(2) Engage the clamp.
(3) Connect the 2 connectors.
2. INSTALL REAR SEAT CUSHION LOCK HOOK
Click here .gif)
3. INSTALL BENCH TYPE REAR SEAT CUSHION ASSEMBLY
Click here
4. CONNECT REAR CENTER SEAT OUTER BELT ASSEMBLY
Click here
 Removal
REMOVAL
PROCEDURE
1. DISCONNECT REAR CENTER SEAT OUTER BELT ASSEMBLY
Click here
2. REMOVE BENCH TYPE REAR SEAT CUSHION ASSEMBLY
Click here
3. REMOVE REAR SEAT CUSHION LOCK HOOK
Click here ...
 Rear Seat Inner Belt Assembly(for Rh Side)
Components
COMPONENTS
ILLUSTRATION
*A
w/o Seat Belt Warning System
*B
w/ Seat Belt Warning System
*1
BENCH TYPE REAR SEAT ...
Other materials:
Toyota CH-R Service Manual > Airbag System: Trouble in Passenger Airbag ON/OFF Indicator
DESCRIPTION
This circuit detects the airbag cut off switch cylinder sub-assembly status.
The passenger airbag ON/OFF indicator comes on to inform the driver of the instrument
panel passenger without door airbag assembly status (activated or deactivated).
HINT:
Approximately 6 seconds after the ...
Toyota CH-R Service Manual > Vehicle Stability Control System: Open or Short in Brake Pedal Load Sensing Switch (C1429)
DESCRIPTION
The brake pedal load sensing switch turns on when the brake pedal is depressed
with a force exceeding a predetermined level.
The skid control ECU uses this circuit to detect if the brake pedal is depressed
or not.
DTC No.
Detection Item
DTC Detecti ...
Toyota C-HR (AX20) 2023-2026 Owner's Manual
Toyota CH-R Owners Manual
- For safety and security
- Instrument cluster
- Operation of each component
- Driving
- Interior features
- Maintenance and care
- When trouble arises
- Vehicle specifications
- For owners
Toyota CH-R Service Manual
- Introduction
- Maintenance
- Audio / Video
- Cellular Communication
- Navigation / Multi Info Display
- Park Assist / Monitoring
- Brake (front)
- Brake (rear)
- Brake Control / Dynamic Control Systems
- Brake System (other)
- Parking Brake
- Axle And Differential
- Drive Shaft / Propeller Shaft
- K114 Cvt
- 3zr-fae Battery / Charging
- Networking
- Power Distribution
- Power Assist Systems
- Steering Column
- Steering Gear / Linkage
- Alignment / Handling Diagnosis
- Front Suspension
- Rear Suspension
- Tire / Wheel
- Tire Pressure Monitoring
- Door / Hatch
- Exterior Panels / Trim
- Horn
- Lighting (ext)
- Mirror (ext)
- Window / Glass
- Wiper / Washer
- Door Lock
- Heating / Air Conditioning
- Interior Panels / Trim
- Lighting (int)
- Meter / Gauge / Display
- Mirror (int)
- Power Outlets (int)
- Pre-collision
- Seat
- Seat Belt
- Supplemental Restraint Systems
- Theft Deterrent / Keyless Entry

0.0078