Toyota CH-R Service Manual: Front Wiper Rubber
Components
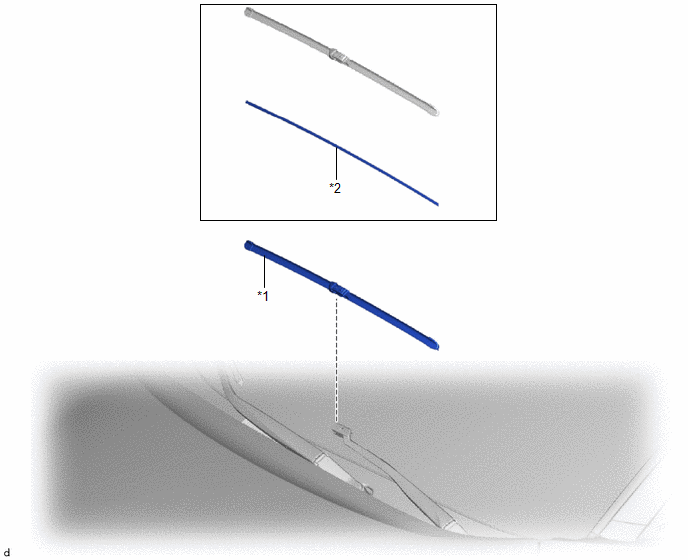
COMPONENTS
ILLUSTRATION
|
*1 |
FRONT WIPER BLADE |
*2 |
FRONT WIPER RUBBER |
Removal
REMOVAL
CAUTION / NOTICE / HINT
NOTICE:
Make sure to hold the front wiper arm while lifting it as lifting the front wiper arm by the front wiper blade may damage or deform the front wiper blade.
HINT:
- Use the same procedure for the LH and RH sides.
- The procedure described below is for the LH side.
PROCEDURE
1. REMOVE FRONT WIPER BLADE
(a) Push the lock button of the front wiper blade to release the lock.
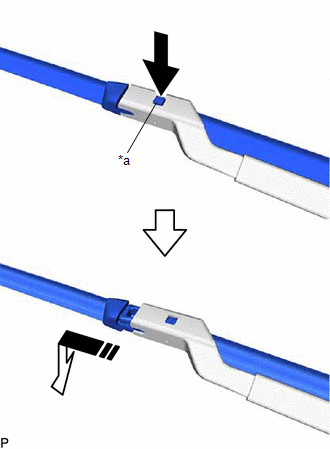
|
*a |
Lock Button |
.png) |
Push |
.png) |
Remove in this Direction |
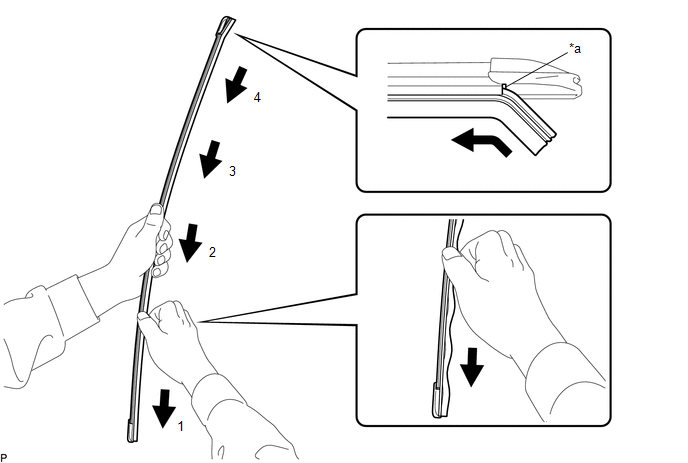
(b) Remove the front wiper blade from the front wiper arm as shown in the illustration.
NOTICE:
Place a piece of cloth between the front wiper arm and windshield glass to avoid damaging the windshield glass.
2. REMOVE FRONT WIPER RUBBER
HINT:
The wiper rubber can be removed from either end of the front wiper blade.
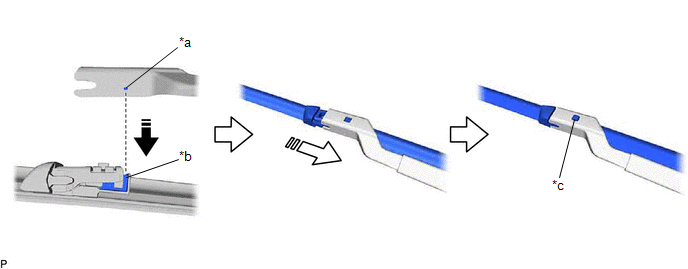
(a) Pull the wiper rubber as indicated by the arrows, in the order shown in the illustration, until its end is aligned with the slits in the front wiper blade.
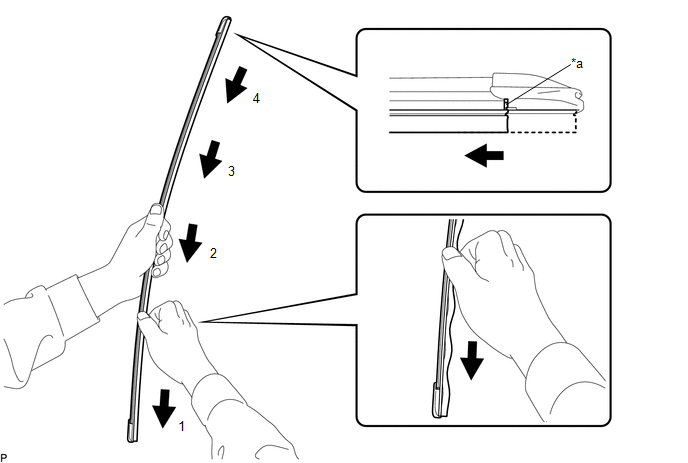
|
*a |
Slit |
- |
- |
(b) Pull the end of the wiper rubber through the slits in the front wiper blade in the direction indicated by the arrow shown in the illustration and remove the wiper rubber.
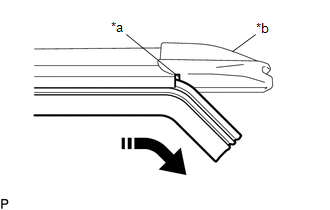
|
*a |
Slit |
|
*b |
Shield Cap |
|
|
Remove in this Direction |
NOTICE:
Make sure not to remove the shield caps. If a shield cap is removed, the wiper rubber may separate from the front wiper blade while driving.
Installation
INSTALLATION
CAUTION / NOTICE / HINT
NOTICE:
Make sure to hold the front wiper arm while lifting it as lifting the front wiper arm by the front wiper blade may damage or deform the front wiper blade.
HINT:
- Use the same procedure for the LH and RH sides.
- The procedure described below is for the LH side.
PROCEDURE
1. INSTALL FRONT WIPER RUBBER
HINT:
The wiper rubber can be installed from either end of the front wiper blade.
(a) Insert the wiper rubber through the slit in the front wiper blade as shown in the illustration.

|
*a |
Slit |
.png) |
Install in this Direction |
(b) Pull the wiper rubber as indicated by the arrows, in the order shown in the illustration, until its end is aligned with the slits in the front wiper blade.
|
*a |
Slit |
- |
- |
|
(c) Slide the wiper rubber in the direction indicated by the arrow shown in the illustration to install it. NOTICE: Make sure that each end of the wiper rubber is fully inserted into each shield cap. |
|

2. INSTALL FRONT WIPER BLADE
(a) Insert the protrusion of the front wiper arm into the groove of the front wiper blade in the direction indicated by the arrow (1) shown in the illustration.
|
*a |
Protrusion of Front Wiper Arm |
*b |
Groove of Front Wiper Blade |
|
*c |
Lock Button |
- |
- |
|
|
Install in this Direction (1) |
.png) |
Install in this Direction (2) |
(b) Slide the front wiper blade in the direction indicated by the arrow (2) shown in the illustration until the lock button locks to install the front wiper blade.
NOTICE:
Make sure that the lock button locks so that it is installed securely.
 Front Turn Signal Light Bulb
Components
COMPONENTS
ILLUSTRATION
*1
FRONT TURN SIGNAL LIGHT BULB
*2
FRONT TURN SIGNAL LIGHT SOCKET AND WIRE SUB-ASSEMBLY
Removal
REMOV ...

Other materials:
Toyota CH-R Service Manual > 3zr-fae Coolant: Components
COMPONENTS
ILLUSTRATION
*1
RESERVE TANK CAP
*2
RADIATOR DRAIN COCK PLUG
*3
NO. 1 ENGINE UNDER COVER
-
-
N*m (kgf*cm, ft.*lbf): Specified torque
-
-
...
Toyota CH-R Owners Manual > Essential information: If your vehicle has to be stopped in an emergency
Only in an emergency, such as if it becomes impossible to stop the
vehicle in the normal way, stop the vehicle using the following procedure:
1. Steadily step on the brake pedal with both feet and firmly depress it.
Do not pump the brake pedal repeatedly as this will increase the effort required ...
Toyota C-HR (AX20) 2023-2026 Owner's Manual
Toyota CH-R Owners Manual
- For safety and security
- Instrument cluster
- Operation of each component
- Driving
- Interior features
- Maintenance and care
- When trouble arises
- Vehicle specifications
- For owners
Toyota CH-R Service Manual
- Introduction
- Maintenance
- Audio / Video
- Cellular Communication
- Navigation / Multi Info Display
- Park Assist / Monitoring
- Brake (front)
- Brake (rear)
- Brake Control / Dynamic Control Systems
- Brake System (other)
- Parking Brake
- Axle And Differential
- Drive Shaft / Propeller Shaft
- K114 Cvt
- 3zr-fae Battery / Charging
- Networking
- Power Distribution
- Power Assist Systems
- Steering Column
- Steering Gear / Linkage
- Alignment / Handling Diagnosis
- Front Suspension
- Rear Suspension
- Tire / Wheel
- Tire Pressure Monitoring
- Door / Hatch
- Exterior Panels / Trim
- Horn
- Lighting (ext)
- Mirror (ext)
- Window / Glass
- Wiper / Washer
- Door Lock
- Heating / Air Conditioning
- Interior Panels / Trim
- Lighting (int)
- Meter / Gauge / Display
- Mirror (int)
- Power Outlets (int)
- Pre-collision
- Seat
- Seat Belt
- Supplemental Restraint Systems
- Theft Deterrent / Keyless Entry

0.0119