
Toyota CH-R Service Manual: Inspection
INSPECTION
PROCEDURE
1. INSPECT NO. 1 COOLER THERMISTOR
(a) Check the resistance.
(1) Measure the resistance according to the value(s) in the table below.
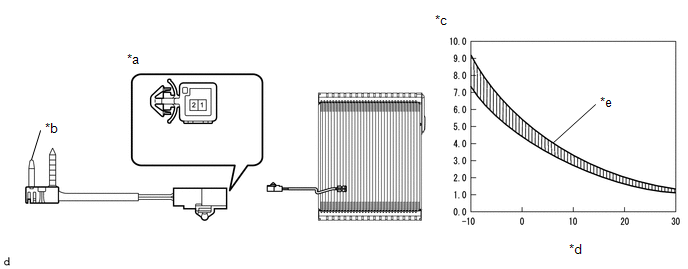
|
*a |
Component without harness connected (No. 1 Cooler Thermistor) |
*b |
Sensing Portion |
|
*c |
Resistance (kΩ) |
*d |
Temperature (°C (°F)) |
|
*e |
Allowable Range |
- |
- |
Standard Resistance:
|
Tester Connection |
Condition |
Specified Condition |
|---|---|---|
|
1 - 2 |
-10°C (14°F) |
7.30 to 9.10 kΩ |
|
-5°C (23°F) |
5.65 to 6.95 kΩ |
|
|
0°C (32°F) |
4.40 to 5.35 kΩ |
|
|
5°C (41°F) |
3.40 to 4.15 kΩ |
|
|
10°C (50°F) |
2.70 to 3.25 kΩ |
|
|
15°C (59°F) |
2.14 to 2.58 kΩ |
|
|
20°C (68°F) |
1.71 to 2.05 kΩ |
|
|
25°C (77°F) |
1.38 to 1.64 kΩ |
|
|
30°C (86°F) |
1.11 to 1.32 kΩ |
If the resistance is not as specified, replace the No. 1 cooler thermistor.
NOTICE:
- Hold the sensor only by its connector. Touching the sensing portion may change the resistance value.
- When measuring, the sensor temperature must be the same as the ambient temperature.
HINT:
As the temperature increases, the resistance decreases (see the graph).
If the specified condition is not met, replace the No. 1 cooler thermistor.
 Removal
REMOVAL
CAUTION / NOTICE / HINT
The necessary procedures (adjustment, calibration, initialization, or registration)
that must be performed after parts are removed, installed, or replaced during th ...
 Installation
INSTALLATION
PROCEDURE
1. INSTALL NO. 1 COOLER THERMISTOR
(a) Install the No. 1 cooler thermistor as shown in the illustration.
Installation Position:
Part
...
Other materials:
Toyota CH-R Service Manual > Can Communication System: Skid Control ECU Communication Stop Mode
DESCRIPTION
Detection Item
Symptom
Trouble Area
Skid Control ECU Communication Stop Mode
Any of the following conditions are met:
Communication stop for "Skid Control (ABS/VSC/TRAC)" is indicated
on the " ...
Toyota CH-R Service Manual > Fog Light Assembly: Removal
REMOVAL
CAUTION / NOTICE / HINT
HINT:
Use the same procedure for the RH side and LH side.
The following procedure is for the LH side.
PROCEDURE
1. REMOVE FRONT BUMPER ASSEMBLY
Click here
2. REMOVE FOG LIGHT ASSEMBLY
(a) Remove the 2 screws.
...
Toyota C-HR (AX20) 2023-2026 Owner's Manual
Toyota CH-R Owners Manual
- For safety and security
- Instrument cluster
- Operation of each component
- Driving
- Interior features
- Maintenance and care
- When trouble arises
- Vehicle specifications
- For owners
Toyota CH-R Service Manual
- Introduction
- Maintenance
- Audio / Video
- Cellular Communication
- Navigation / Multi Info Display
- Park Assist / Monitoring
- Brake (front)
- Brake (rear)
- Brake Control / Dynamic Control Systems
- Brake System (other)
- Parking Brake
- Axle And Differential
- Drive Shaft / Propeller Shaft
- K114 Cvt
- 3zr-fae Battery / Charging
- Networking
- Power Distribution
- Power Assist Systems
- Steering Column
- Steering Gear / Linkage
- Alignment / Handling Diagnosis
- Front Suspension
- Rear Suspension
- Tire / Wheel
- Tire Pressure Monitoring
- Door / Hatch
- Exterior Panels / Trim
- Horn
- Lighting (ext)
- Mirror (ext)
- Window / Glass
- Wiper / Washer
- Door Lock
- Heating / Air Conditioning
- Interior Panels / Trim
- Lighting (int)
- Meter / Gauge / Display
- Mirror (int)
- Power Outlets (int)
- Pre-collision
- Seat
- Seat Belt
- Supplemental Restraint Systems
- Theft Deterrent / Keyless Entry

0.0097