Toyota CH-R Service Manual: Reassembly
REASSEMBLY
CAUTION / NOTICE / HINT
HINT:
- Use the same procedure for the RH and LH sides.
- The procedure listed below is for the LH side.
PROCEDURE
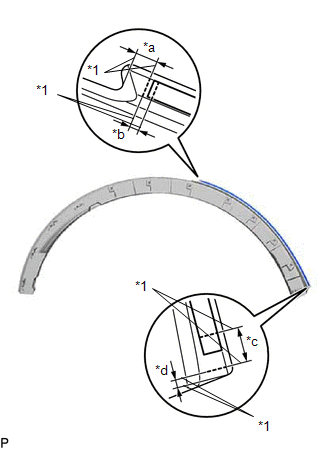
1. INSTALL NO. 1 BODY OUTSIDE MOULDING PAD
HINT:
When installing the No. 1 body outside moulding pad, heat the quarter outside moulding using a heat light.
CAUTION:
- Do not touch the heat light and heated parts, touching the heat light
may result in burns.
.png)
*a
Heated Part
*b
Heat Light
- Touching heated parts for a long time may result in burns.
Standard:
|
Item |
Temperature |
|---|---|
|
Quarter Outside Moulding |
20 to 30°C (68 to 86°F) |
NOTICE:
Do not heat the quarter outside moulding excessively.
(a) Clean the No. 1 body outside moulding pad installation surface with a non-residue solvent.
(b) Apply primer to the No. 1 body outside moulding pad installation area on the quarter outside moulding sub-assembly.
NOTICE:
Apply primer evenly so that there are no uncoated areas.
(c) Remove the peeling paper on a new No. 1 body outside moulding pad while making sure not to touch the adhesive surface.
|
(d) Install a No. 1 body outside moulding pad in the position shown in the illustration. NOTICE:
|
|
 Disassembly
DISASSEMBLY
CAUTION / NOTICE / HINT
HINT:
Use the same procedure for the RH and LH sides.
The procedure listed below is for the LH side.
PROCEDURE
1. REMOVE NO. 1 BODY OUTSIDE M ...
 Installation
INSTALLATION
CAUTION / NOTICE / HINT
HINT:
Use the same procedure for the RH side and LH side.
The following procedure is for the LH side.
PROCEDURE
1. INSTALL QUARTER OUTSIDE M ...
Other materials:
Toyota CH-R Service Manual > Lighting System: Engine Switch Illumination Circuit
DESCRIPTION
The illuminated entry system controls the engine switch illumination.
WIRING DIAGRAM
CAUTION / NOTICE / HINT
NOTICE:
Before replacing the certification ECU (smart key ECU assembly), refer to Registration.
Click here
PROCEDURE
1.
PERFORM ACTIVE TEST USIN ...
Toyota CH-R Service Manual > Vehicle Stability Control System: Calibration
CALIBRATION
DESCRIPTION
(a) Refer to the table below and then perform the necessary operation according
to the part to be replaced in order to perform calibration.
Parts to be Replaced
Necessary Operation
Skid control ECU (brake actuator assembly)
...
Toyota C-HR (AX20) 2023-2026 Owner's Manual
Toyota CH-R Owners Manual
- For safety and security
- Instrument cluster
- Operation of each component
- Driving
- Interior features
- Maintenance and care
- When trouble arises
- Vehicle specifications
- For owners
Toyota CH-R Service Manual
- Introduction
- Maintenance
- Audio / Video
- Cellular Communication
- Navigation / Multi Info Display
- Park Assist / Monitoring
- Brake (front)
- Brake (rear)
- Brake Control / Dynamic Control Systems
- Brake System (other)
- Parking Brake
- Axle And Differential
- Drive Shaft / Propeller Shaft
- K114 Cvt
- 3zr-fae Battery / Charging
- Networking
- Power Distribution
- Power Assist Systems
- Steering Column
- Steering Gear / Linkage
- Alignment / Handling Diagnosis
- Front Suspension
- Rear Suspension
- Tire / Wheel
- Tire Pressure Monitoring
- Door / Hatch
- Exterior Panels / Trim
- Horn
- Lighting (ext)
- Mirror (ext)
- Window / Glass
- Wiper / Washer
- Door Lock
- Heating / Air Conditioning
- Interior Panels / Trim
- Lighting (int)
- Meter / Gauge / Display
- Mirror (int)
- Power Outlets (int)
- Pre-collision
- Seat
- Seat Belt
- Supplemental Restraint Systems
- Theft Deterrent / Keyless Entry

0.0134