Toyota CH-R Service Manual: Adjustment
ADJUSTMENT
CAUTION / NOTICE / HINT
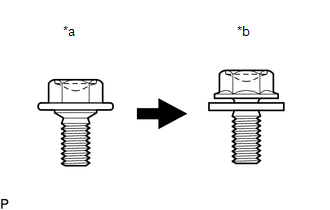
|
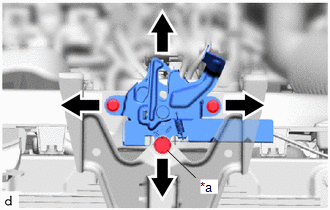
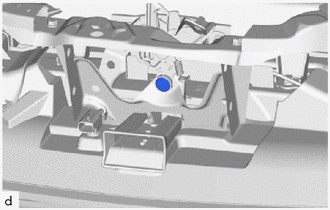
*a |
Centering Bolt |
|
*b |
Standard Bolt |
HINT:
- Centering bolts are used to install the hood hinges and hood lock. The hood and hood lock cannot be adjusted with the centering bolts installed. Substitute the centering bolts with standard bolts with washers when making adjustments.
- The specified torque for standard bolts is shown in the standard bolt
chart.
Click here
.gif)
PROCEDURE
1. INSPECT HOOD SUB-ASSEMBLY
Click here
2. REMOVE FRONT BUMPER ASSEMBLY
Click here
3. ADJUST HOOD SUB-ASSEMBLY
(a) Horizontally and vertically adjust the hood.
|
(1) Loosen the 4 hinge bolts of the hood. |
|
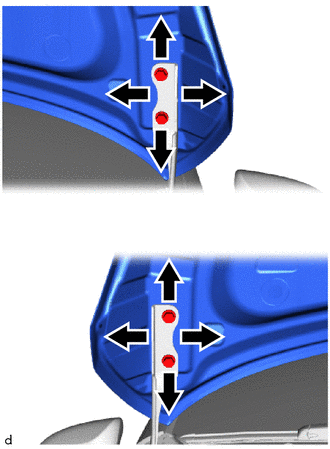
(2) Adjust the clearance between the hood and front fenders by moving the hood.
(3) Tighten the 4 hinge bolts after adjustment.
Torque:
13 N·m {133 kgf·cm, 10 ft·lbf}
|
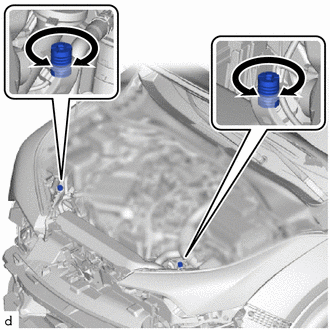
(b) Adjust the height of the front end of the hood using the hood bumper cushions. (1) Adjust the 2 hood bumper cushions so that the heights of the hood and fenders are aligned. HINT: Raise or lower the front end of the hood by turning the 2 hood bumper cushions. |
|
(c) Adjust the hood lock.
|
(1) Using a screwdriver with its tip wrapped in protective tape, remove the hood lock nut cap. |
|
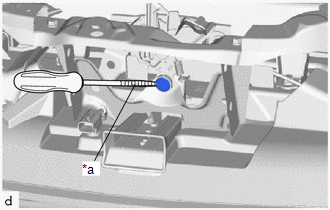
|
(2) Loosen the 2 bolts and hood lock bolt. |
|
(3) Adjust the hood lock assembly and tighten the 2 bolts and hood lock bolt.
Torque:
7.5 N·m {76 kgf·cm, 66 in·lbf}
(4) Check that the striker can engage the hood lock assembly smoothly.
|
(5) Install a new hood lock nut cap. |
|
4. INSTALL FRONT BUMPER ASSEMBLY
Click here
 Disassembly
DISASSEMBLY
PROCEDURE
1. REMOVE HOOD SIDE PANEL LH
(a) Using a clip remover, disengage the clips to remove the hood side
panel LH.
2. ...
 Reassembly
REASSEMBLY
PROCEDURE
1. CONNECT WASHER HOSE ASSEMBLY
(a) Install the 7 clamps.
(b) Connect the washer hose assembly to the cla ...
Other materials:
Toyota CH-R Owners Manual > Do-it-yourself maintenance: Wireless remote control/electronic key battery
Replace the battery with a new one if it is depleted.
You will need the following items:
Flathead screwdriver
Small flathead screwdriver
Lithium battery
Vehicles without a smart key system: CR1620
Vehicles with a smart key system: CR2032
Replacing the battery
Vehicles without a smart ...
Toyota CH-R Service Manual > Air Conditioning System(for Automatic Air Conditioning System With Top-mounted
Air Conditioner Pressure Sensor): Pressure Sensor Circuit (B1423)
DESCRIPTION
This DTC is stored if refrigerant pressure on the high pressure side is extremely
low (176 kPa (1.8 kgf/cm2, 26 psi) or less)*1, (195 kPa (2.0 kgf/cm2, 28 psi) or
less)*2 or extremely high (3025 kPa (30.8 kgf/cm2, 439 psi) or more)*1, (2812 kPa
(28.7 kgf/cm2, 408 psi) or more)*2. ...
Toyota C-HR (AX20) 2023-2026 Owner's Manual
Toyota CH-R Owners Manual
- For safety and security
- Instrument cluster
- Operation of each component
- Driving
- Interior features
- Maintenance and care
- When trouble arises
- Vehicle specifications
- For owners
Toyota CH-R Service Manual
- Introduction
- Maintenance
- Audio / Video
- Cellular Communication
- Navigation / Multi Info Display
- Park Assist / Monitoring
- Brake (front)
- Brake (rear)
- Brake Control / Dynamic Control Systems
- Brake System (other)
- Parking Brake
- Axle And Differential
- Drive Shaft / Propeller Shaft
- K114 Cvt
- 3zr-fae Battery / Charging
- Networking
- Power Distribution
- Power Assist Systems
- Steering Column
- Steering Gear / Linkage
- Alignment / Handling Diagnosis
- Front Suspension
- Rear Suspension
- Tire / Wheel
- Tire Pressure Monitoring
- Door / Hatch
- Exterior Panels / Trim
- Horn
- Lighting (ext)
- Mirror (ext)
- Window / Glass
- Wiper / Washer
- Door Lock
- Heating / Air Conditioning
- Interior Panels / Trim
- Lighting (int)
- Meter / Gauge / Display
- Mirror (int)
- Power Outlets (int)
- Pre-collision
- Seat
- Seat Belt
- Supplemental Restraint Systems
- Theft Deterrent / Keyless Entry

0.0092