Toyota CH-R Service Manual: Back Door Weatherstrip
Components
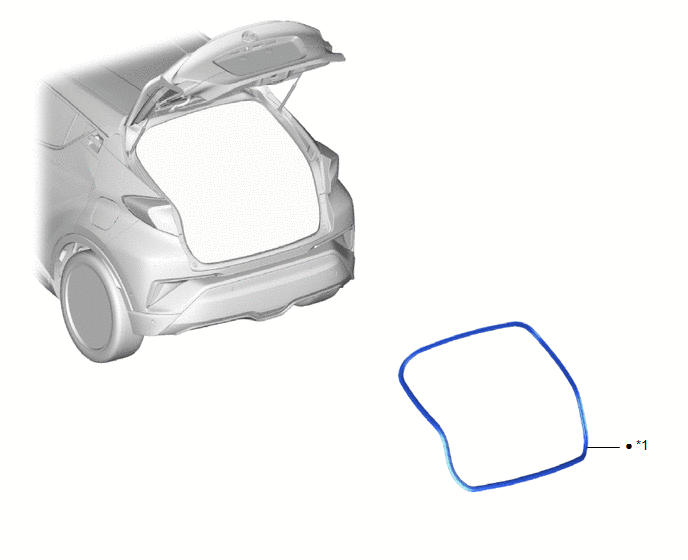
COMPONENTS
ILLUSTRATION
|
*1 |
BACK DOOR WEATHERSTRIP |
- |
- |
|
● |
Non-reusable part |
- |
- |
Removal
REMOVAL
PROCEDURE
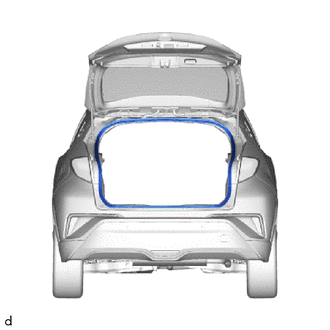
1. REMOVE BACK DOOR WEATHERSTRIP
|
(a) Remove the back door weatherstrip. |
|
Installation
INSTALLATION
PROCEDURE
1. INSTALL BACK DOOR WEATHERSTRIP
|
(a) Remove any non-drying sealer on the body with non-residue solvent. |
|
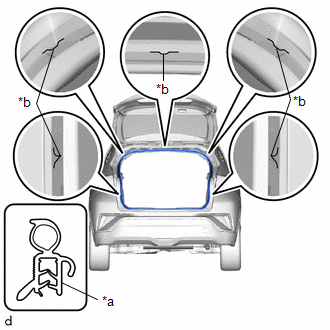
(b) Align the paint marks with the positions on the body flange and install a new back door weatherstrip.
Paint Mark:
|
Location |
Color |
|---|---|
|
Center |
Green |
|
Side |
Blue |
NOTICE:
- Always align the paint mark when installing the part. If the paint mark position is out of place, coolant leaks may occur.
- After the installation, check that the corners are properly installed.
HINT:
To easily install the weatherstrip, first install the area with the paint mark as shown in the illustration. Then install the part toward the corners and push any excess length into the corners.
 Back Door Support
Components
COMPONENTS
ILLUSTRATION
*1
BACK DOOR DAMPER STAY LOWER BRACKET
*2
BACK DOOR DAMPER STAY UPPER BRACKET
*3
BACK ...
 Front Door
...
Other materials:
Toyota CH-R Service Manual > Rear Door Lock: Removal
REMOVAL
CAUTION / NOTICE / HINT
The necessary procedures (adjustment, calibration, initialization, or registration)
that must be performed after parts are removed and installed, or replaced during
the rear door lock with motor assembly removal/installation are shown below.
Necessary Procedure ...
Toyota CH-R Service Manual > How To Troubleshoot Ecu Controlled Systems: General Information
GENERAL INFORMATION
A large number of ECU controlled systems are used in this vehicle. In
general, ECU controlled systems are considered to be very intricate, requiring
a high level of technical knowledge to troubleshoot. However, most problem
checking procedures only involve ins ...
Toyota C-HR (AX20) 2023-2026 Owner's Manual
Toyota CH-R Owners Manual
- For safety and security
- Instrument cluster
- Operation of each component
- Driving
- Interior features
- Maintenance and care
- When trouble arises
- Vehicle specifications
- For owners
Toyota CH-R Service Manual
- Introduction
- Maintenance
- Audio / Video
- Cellular Communication
- Navigation / Multi Info Display
- Park Assist / Monitoring
- Brake (front)
- Brake (rear)
- Brake Control / Dynamic Control Systems
- Brake System (other)
- Parking Brake
- Axle And Differential
- Drive Shaft / Propeller Shaft
- K114 Cvt
- 3zr-fae Battery / Charging
- Networking
- Power Distribution
- Power Assist Systems
- Steering Column
- Steering Gear / Linkage
- Alignment / Handling Diagnosis
- Front Suspension
- Rear Suspension
- Tire / Wheel
- Tire Pressure Monitoring
- Door / Hatch
- Exterior Panels / Trim
- Horn
- Lighting (ext)
- Mirror (ext)
- Window / Glass
- Wiper / Washer
- Door Lock
- Heating / Air Conditioning
- Interior Panels / Trim
- Lighting (int)
- Meter / Gauge / Display
- Mirror (int)
- Power Outlets (int)
- Pre-collision
- Seat
- Seat Belt
- Supplemental Restraint Systems
- Theft Deterrent / Keyless Entry

0.0088