
Toyota CH-R Owners Manual: Engine oil
With the engine at operating temperature and turned off, check the oil level on the dipstick.
■ Checking the engine oil
1. Park the vehicle on level ground. After warming up the engine and turning it off, wait more than 5 minutes for the oil to drain back into the bottom of the engine.
2. Holding a rag under the end, pull the dipstick out.
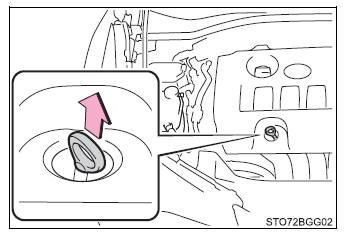
3. Wipe the dipstick clean.
4. Reinsert the dipstick fully with its protruding area (1) in the illustration) pointing towards the engine.
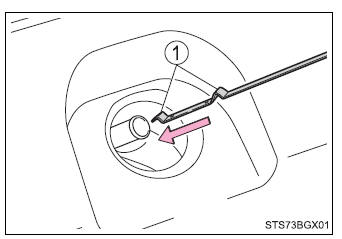
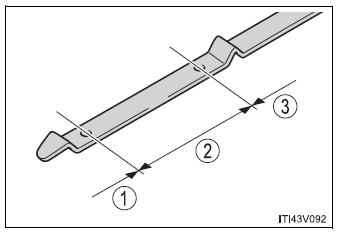
5. Holding a rag under the end, pull the dipstick out and check the oil level.
- Low
- Normal
- Excessive
The shape of the dipstick may differ depending on the type of vehicle or engine.
6. Wipe the dipstick and reinsert it fully.
■ Adding engine oil If the oil level is below or near the low level mark, add engine oil of the same type as that already in the engine.
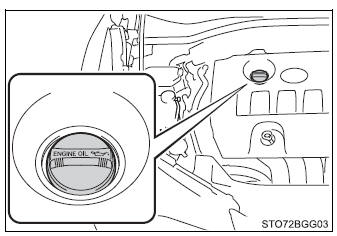
Make sure to check the oil type and prepare the items needed before adding oil.
| Engine oil selection | |
| Oil quantity (Low → Full) | 1.6 qt. (1.5 L, 1.3 Imp.qt.) |
| Items | Clean funnel |
- Remove the oil filler cap by turning it counterclockwise.
- Add engine oil slowly, checking the dipstick.
- Install the oil filler cap by turning it clockwise.
■Engine oil consumption A certain amount of engine oil will be consumed while driving. In the following situations, oil consumption may increase, and engine oil may need to be refilled in between oil maintenance intervals.
- When the engine is new, for example directly after purchasing the vehicle or after replacing the engine
- If low quality oil or oil of an inappropriate viscosity is used
- When driving at high engine speeds or with a heavy load, or when driving while accelerating or decelerating frequently
- When leaving the engine idling for a long time, or when driving frequently through heavy traffic
■Used engine oil
- Used engine oil contains potentially harmful contaminants which may cause skin disorders such as inflammation and skin cancer, so care should be taken to avoid prolonged and repeated contact. To remove used engine oil from your skin, wash thoroughly with soap and water.
- Dispose of used oil and filters only in a safe and acceptable manner.
Do not dispose of used oil and filters in household trash, in sewers or
onto the ground.
Call your Toyota dealer, service station or auto parts store for information concerning recycling or disposal.
- Do not leave used engine oil within the reach of children.
■To prevent serious engine damage Check the oil level on a regular basis.
■When replacing the engine oil
- Be careful not to spill engine oil on the vehicle components.
- Avoid overfilling, or the engine could be damaged.
- Check the oil level on the dipstick every time you refill the vehicle.
- Be sure the engine oil filler cap is properly tightened.
 Engine compartment
Washer fluid tank
Engine coolant reservoir
Fuse boxes
Engine oil filler cap
Engine oil level dipstick
Battery
Brake fluid reservoir
Electric cooling fan
Condenser
Radiator
...
 Engine coolant
The coolant level is satisfactory if it is between the "FULL" and "LOW" lines
on the reservoir when the engine is cold.
Reservoir cap
"FULL" line
"LOW" ...
Other materials:
Toyota CH-R Service Manual > Automatic Headlight Beam Level Control System: Fail-safe Chart
FAIL-SAFE CHART
FAIL-SAFE FUNCTION
(a) Headlight ECU sub-assembly
(1) The headlight ECU sub-assemblies stop light operation if the following malfunctions
are detected.
Malfunction
Multi-information Display Warning
DTC Output
Lighting on/off
...
Toyota CH-R Service Manual > Meter / Gauge / Display: Clock
Components
COMPONENTS
ILLUSTRATION
*A
w/o Display
-
-
*1
CLOCK ASSEMBLY
*2
INSTRUMENT CLUSTER FINISH CENTER PANEL SUB-ASSEMBLY
ILLUSTRATION
*A
w/ Display
...
Toyota C-HR (AX20) 2023-2026 Owner's Manual
Toyota CH-R Owners Manual
- For safety and security
- Instrument cluster
- Operation of each component
- Driving
- Interior features
- Maintenance and care
- When trouble arises
- Vehicle specifications
- For owners
Toyota CH-R Service Manual
- Introduction
- Maintenance
- Audio / Video
- Cellular Communication
- Navigation / Multi Info Display
- Park Assist / Monitoring
- Brake (front)
- Brake (rear)
- Brake Control / Dynamic Control Systems
- Brake System (other)
- Parking Brake
- Axle And Differential
- Drive Shaft / Propeller Shaft
- K114 Cvt
- 3zr-fae Battery / Charging
- Networking
- Power Distribution
- Power Assist Systems
- Steering Column
- Steering Gear / Linkage
- Alignment / Handling Diagnosis
- Front Suspension
- Rear Suspension
- Tire / Wheel
- Tire Pressure Monitoring
- Door / Hatch
- Exterior Panels / Trim
- Horn
- Lighting (ext)
- Mirror (ext)
- Window / Glass
- Wiper / Washer
- Door Lock
- Heating / Air Conditioning
- Interior Panels / Trim
- Lighting (int)
- Meter / Gauge / Display
- Mirror (int)
- Power Outlets (int)
- Pre-collision
- Seat
- Seat Belt
- Supplemental Restraint Systems
- Theft Deterrent / Keyless Entry

0.0155