
Toyota CH-R Service Manual: System Description
SYSTEM DESCRIPTION
BRIEF DESCRIPTION
(a) The Controller Area Network (CAN) is a serial data communication system for real time application. It is a vehicle multiplex communication system which has a high communication speed and the ability to detect malfunctions.
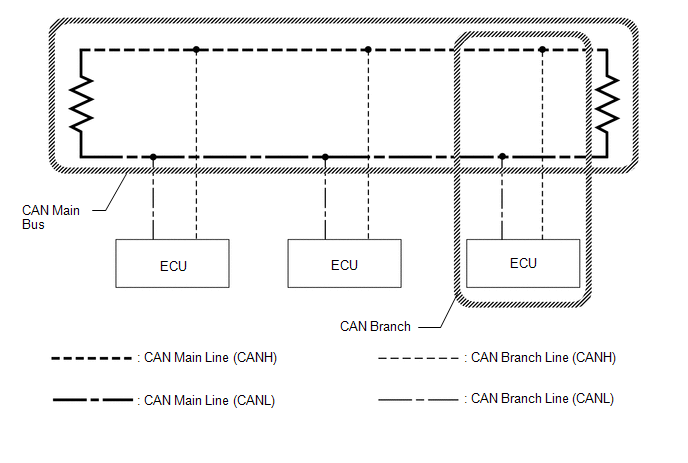
(b) Using the CANH and CANL bus lines as a pair, CAN communication is performed using a voltage differential. (A base voltage is applied to the pair of lines and a voltage differential is created when communicating.)
(c) Many ECUs or sensors installed to the vehicle operate by sharing information and communicating with each other.
(d) 2 resistors which are necessary for communication are used in a CAN bus main line.
DEFINITION OF TERMS
(a) Central bus
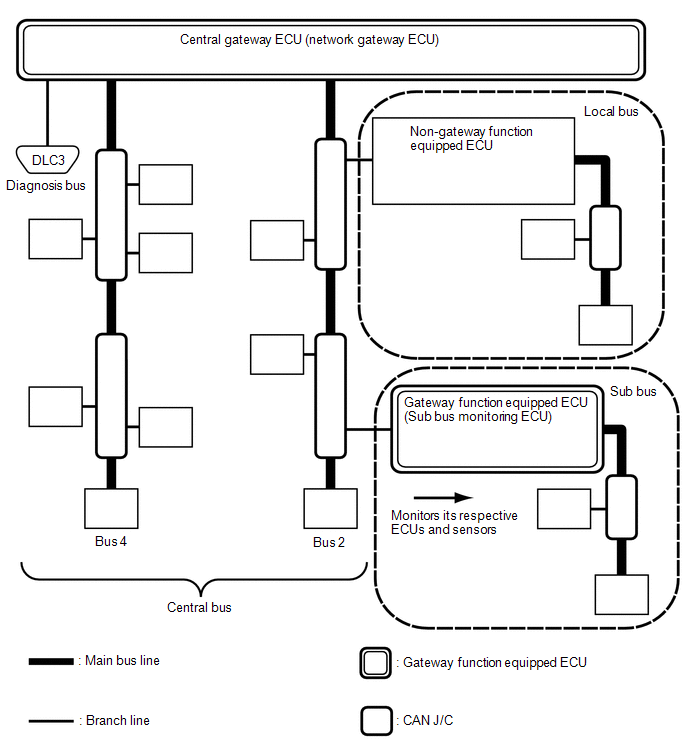
(1) The central bus is a term used to describe all buses directly connected to the central gateway ECU (network gateway ECU).
HINT:
A bus is displayed as Bus on the "Communication Bus Check" screen of the Techstream.
(b) Sub bus
(1) A sub bus is a bus that has a gateway function equipped ECU in order to communicate with the central bus and other sub buses.
HINT:
- A sub bus is displayed as Sub bus on the "Communication Bus Check" screen of the Techstream.
- When Sub bus is selected on the "Communication Bus Check" screen, ECUs and sensors connected to non-CAN networks such as LIN may also be displayed in addition to the ECUs and sensors connected to sub buses in the CAN network.
(c) Local bus
(1) A local bus is a bus that does not have the ability to communicate with other buses. ECUs and sensors on a local bus can only communicate with other ECUs and sensors on the same bus.
(d) CAN J/C
(1) A CAN junction connector is a connector that connects branch lines to a main bus.
(e) Main bus
(1) A main bus line is the wire harness that runs between the 2 terminating resistors of a bus.
(f) Branch
(1) A branch line is a wire harness that connects an ECU or sensor to a main bus line.
(g) Terminating resistors
(1) Terminating resistors which maintain a stable signal inside the CAN bus are installed. 2 resistors of 120 Ω each located at each end of the bus are necessary.
 System Diagram
SYSTEM DIAGRAM
(a) The CAN communication system is composed of 5 buses.
*A
w/ Blind Spot Monitor System
-
-
CAN Main Bus Line
...
 How To Proceed With Troubleshooting
CAUTION / NOTICE / HINT
PRECAUTIONS WHEN TROUBLESHOOTING
NOTICE:
Because the order of diagnosis is important to allow correct diagnosis,
make sure to begin troubleshooting using How to ...
Other materials:
Toyota CH-R Service Manual > Airbag System: Side Airbag Sensor Assembly No.2 (RH) (B162A/2A)
DESCRIPTION
The side collision sensor RH circuit (bus 2) consists of the airbag sensor assembly
and floor side airbag sensor RH.
The floor side airbag sensor RH detects impacts to the vehicle and sends signals
to the airbag sensor assembly to determine if the airbags and pretensioners should
...
Toyota CH-R Service Manual > Audio And Visual System(for Radio And Display Type): Portable Player cannot be Operated Using In-vehicle Device or Track Information
is not Displayed on In-vehicle Device
PROCEDURE
1.
CHECK USING ANOTHER "Bluetooth" AUDIO COMPATIBLE VEHICLE OF SAME MODEL
(a) Check if track information is displayed normally on another "Bluetooth" audio
compatible vehicle of the same model.
OK:
Track information is displayed no ...
Toyota C-HR (AX20) 2023-2026 Owner's Manual
Toyota CH-R Owners Manual
- For safety and security
- Instrument cluster
- Operation of each component
- Driving
- Interior features
- Maintenance and care
- When trouble arises
- Vehicle specifications
- For owners
Toyota CH-R Service Manual
- Introduction
- Maintenance
- Audio / Video
- Cellular Communication
- Navigation / Multi Info Display
- Park Assist / Monitoring
- Brake (front)
- Brake (rear)
- Brake Control / Dynamic Control Systems
- Brake System (other)
- Parking Brake
- Axle And Differential
- Drive Shaft / Propeller Shaft
- K114 Cvt
- 3zr-fae Battery / Charging
- Networking
- Power Distribution
- Power Assist Systems
- Steering Column
- Steering Gear / Linkage
- Alignment / Handling Diagnosis
- Front Suspension
- Rear Suspension
- Tire / Wheel
- Tire Pressure Monitoring
- Door / Hatch
- Exterior Panels / Trim
- Horn
- Lighting (ext)
- Mirror (ext)
- Window / Glass
- Wiper / Washer
- Door Lock
- Heating / Air Conditioning
- Interior Panels / Trim
- Lighting (int)
- Meter / Gauge / Display
- Mirror (int)
- Power Outlets (int)
- Pre-collision
- Seat
- Seat Belt
- Supplemental Restraint Systems
- Theft Deterrent / Keyless Entry

0.0084