Toyota CH-R Service Manual: Dtc Check / Clear
DTC CHECK / CLEAR
CHECK DTC AND FREEZE FRAME DATA (USING TECHSTREAM)
(a) Turn the ignition switch off.
(b) Connect the Techstream to the DLC3.
(c) Turn the ignition switch to ON.
(d) Turn the Techstream on.
(e) Enter the following menus: Chassis / ABS/VSC/TRAC/EPB / Trouble Codes.
Chassis > ABS/VSC/TRAC/EPB > Trouble Codes(f) Check for DTCs.
Click here
.gif)
NOTICE:
The electric parking brake system outputs DTCs for the following system. When DTCs other than those in Diagnostic Trouble Code Chart for the electric parking brake system are output, refer to Diagnostic Trouble Code Chart for the relevant system.
|
System |
Proceed to |
|---|---|
|
Vehicle Stability Control System |
|
(g) Check the freeze frame data.
- If DTCs are output, check the freeze frame data and read the vehicle status when the DTC was stored.
HINT:
for Freeze Frame Data: Click here
CLEAR DTC AND FREEZE FRAME DATA (USING TECHSTREAM)
(a) Turn the ignition switch off.
(b) Connect the Techstream to the DLC3.
(c) Turn the ignition switch to ON.
(d) Turn the Techstream on.
(e) Enter the following menus: Chassis / ABS/VSC/TRAC/EPB / Trouble Codes.
(f) Clear the DTCs.
Chassis > ABS/VSC/TRAC/EPB > Clear DTCsHINT:
When DTCs are cleared, the freeze frame data will also be cleared.
CHECK DTC (USING SST CHECK WIRE)
(a) Turn the ignition switch off.
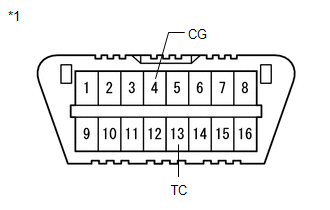
(b) Using SST, connect terminals 13 (TC) and 4 (CG) of the DLC3.
SST: 09843-18040
|
*1 |
DLC3 |
NOTICE:
Do not connect the wrong terminals, as this may damage electrical components.
(c) Turn the ignition switch to ON, and read the DTCs from the number of blinks of the parking brake indicator light (red).
HINT:
- When normal, the light blinks at 0.25 second intervals.
- If one code is detected:
The light repeats the same code after a pause of 4.5 seconds.
- If multiple codes are detected:
The light outputs one code after another with a 2.5-second pause between each code.
When all codes have been output, there is a 4.5-second pause and then the light begins to output the codes again.
- If more than 1 malfunction is detected at the same time, the lowest numbered code will be displayed first.
(d) Check the details of the DTCs.
|
Warning Light Display |
Tester Display |
|---|---|
|
19 |
C13B0 |
|
35 |
C13B4 |
|
41 |
C13A5 |
|
42 |
C13A6 |
|
43 |
C13A7 |
|
71 |
C13AA |
CLEAR DTC (USING SST CHECK WIRE)
(a) Turn the ignition switch off.
(b) Using SST, connect terminals 13 (TC) and 4 (CG) of the DLC3.
SST: 09843-18040
|
*1 |
DLC3 |
NOTICE:
Do not connect the wrong terminals, as this may damage electrical components.
(c) Turn the ignition switch to ON.
(d) Within 5 seconds, pull the electric parking brake switch assembly to the lock side 5 times.
NOTICE:
If the electric parking brake switch (electric parking brake switch assembly) is pulled too quickly, the system may not respond. If the system does not respond, perform the operation again more slowly.
(e) Check that a normal system code is output (the parking brake indicator light blinks (red) at 0.25 second intervals).
HINT:
If the malfunction exists, the DTC cannot be cleared.
 Terminals Of Ecu
TERMINALS OF ECU
CHECK SKID CONTROL ECU (BRAKE ACTUATOR ASSEMBLY)
*a
Component without harness connected
(Skid Control ECU (Brake Actuator Assembly))
-
...
 Freeze Frame Data
FREEZE FRAME DATA
FREEZE FRAME DATA
HINT:
When a DTC is stored, the freeze frame data stores the current vehicle
(sensor) state as.
The freeze frame data cannot be cleared or update ...
Other materials:
Toyota CH-R Service Manual > Vacuum Warning Switch: Installation
INSTALLATION
PROCEDURE
1. INSTALL VACUUM WARNING SWITCH ASSEMBLY
(a) Install a new check valve grommet to the brake booster assembly.
(b) Install the vacuum warning switch assembly to the brake booster assembly
as shown in the illustration.
...
Toyota CH-R Service Manual > Rear Brake(for Tmc Made): Reassembly
REASSEMBLY
PROCEDURE
1. TEMPORARILY TIGHTEN REAR DISC BRAKE BLEEDER PLUG
(a) Temporarily install the rear disc brake bleeder plug to the rear disc brake
cylinder assembly.
HINT:
Fully tighten the rear disc brake bleeder plug after bleeding the system.
2. INSTALL REAR DISC BRAKE BLEEDER PLUG ...
Toyota C-HR (AX20) 2023-2026 Owner's Manual
Toyota CH-R Owners Manual
- For safety and security
- Instrument cluster
- Operation of each component
- Driving
- Interior features
- Maintenance and care
- When trouble arises
- Vehicle specifications
- For owners
Toyota CH-R Service Manual
- Introduction
- Maintenance
- Audio / Video
- Cellular Communication
- Navigation / Multi Info Display
- Park Assist / Monitoring
- Brake (front)
- Brake (rear)
- Brake Control / Dynamic Control Systems
- Brake System (other)
- Parking Brake
- Axle And Differential
- Drive Shaft / Propeller Shaft
- K114 Cvt
- 3zr-fae Battery / Charging
- Networking
- Power Distribution
- Power Assist Systems
- Steering Column
- Steering Gear / Linkage
- Alignment / Handling Diagnosis
- Front Suspension
- Rear Suspension
- Tire / Wheel
- Tire Pressure Monitoring
- Door / Hatch
- Exterior Panels / Trim
- Horn
- Lighting (ext)
- Mirror (ext)
- Window / Glass
- Wiper / Washer
- Door Lock
- Heating / Air Conditioning
- Interior Panels / Trim
- Lighting (int)
- Meter / Gauge / Display
- Mirror (int)
- Power Outlets (int)
- Pre-collision
- Seat
- Seat Belt
- Supplemental Restraint Systems
- Theft Deterrent / Keyless Entry

0.0095