
Toyota CH-R Service Manual: Dcm Power Source Circuit
DESCRIPTION
This is the power source circuit to operate the DCM (Telematics Transceiver).
WIRING DIAGRAM
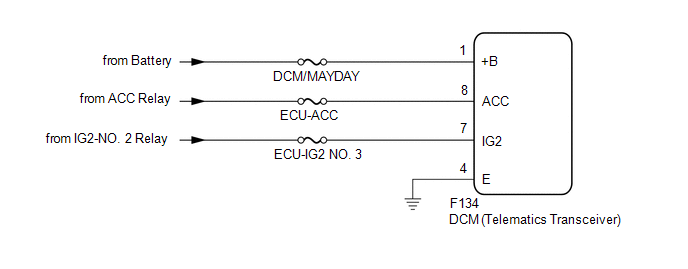
CAUTION / NOTICE / HINT
NOTICE:
Inspect the fuses for circuits related to this system before performing the following procedure.
PROCEDURE
|
1. |
CHECK HARNESS AND CONNECTOR (DCM (TELEMATICS TRANSCEIVER) - BATTERY AND GROUND) |
|
(a) Disconnect the F134 DCM (Telematics Transceiver) connector. |
|
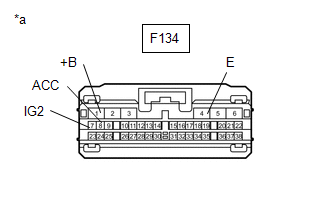
(b) Measure the resistance according to the value(s) in the table below.
Standard Resistance:
|
Tester Connection |
Condition |
Specified Condition |
|---|---|---|
|
F134-4 (E) - Body ground |
Always |
Below 1 Ω |
(c) Measure the voltage according to the value(s) in the table below.
Standard Voltage:
|
Tester Connection |
Condition |
Specified Condition |
|---|---|---|
|
F134-1 (+B) - F134-4 (E) |
Always |
11 to 14 V |
|
F134-7 (IG2) - F134-4 (E) |
Ignition switch ON |
11 to 14 V |
|
F134-8 (ACC) - F134-4 (E) |
Ignition switch ACC |
11 to 14 V |
| OK | .gif) |
PROCEED TO NEXT SUSPECTED AREA SHOWN IN PROBLEM SYMPTOMS TABLE |
| NG | |
REPAIR OR REPLACE HARNESS OR CONNECTOR |
 Manual (SOS) Switch Red Indicator Malfunction (B1570)
DESCRIPTION
This DTC is stored when the DCM (Telematics Transceiver) detects an open or short
in the manual (SOS) switch red indicator circuit of the manual (SOS) switch.
The manual (SOS) switch r ...
 Green And Red Indicators Do Not Come On When Ig-on
DESCRIPTION
If the red and green indicators fail to illuminate after the ignition switch
turned to ON, the vehicle does not recognize the DCM (Telematics Transceiver). The
DCM (Telematics Transce ...
Other materials:
Toyota CH-R Service Manual > Air Conditioning Pressure Sensor: Components
COMPONENTS
ILLUSTRATION
*A
for VALEO Made
-
-
*1
AIR CONDITIONER PRESSURE SENSOR
-
-
N*m (kgf*cm, ft.*lbf): Specified torque
●
Non-reusable part
...
Toyota CH-R Service Manual > Airbag System: Lost Communication with Front Airbag Sensor RH (B1612/83,B1613/83)
DESCRIPTION
The front airbag sensor RH circuit consists of the airbag sensor assembly and
front airbag sensor RH.
The front airbag sensor RH detects impacts to the vehicle and sends signals to
the airbag sensor assembly to determine if the airbags and pretensioners should
be deployed.
These ...
Toyota C-HR (AX20) 2023-2026 Owner's Manual
Toyota CH-R Owners Manual
- For safety and security
- Instrument cluster
- Operation of each component
- Driving
- Interior features
- Maintenance and care
- When trouble arises
- Vehicle specifications
- For owners
Toyota CH-R Service Manual
- Introduction
- Maintenance
- Audio / Video
- Cellular Communication
- Navigation / Multi Info Display
- Park Assist / Monitoring
- Brake (front)
- Brake (rear)
- Brake Control / Dynamic Control Systems
- Brake System (other)
- Parking Brake
- Axle And Differential
- Drive Shaft / Propeller Shaft
- K114 Cvt
- 3zr-fae Battery / Charging
- Networking
- Power Distribution
- Power Assist Systems
- Steering Column
- Steering Gear / Linkage
- Alignment / Handling Diagnosis
- Front Suspension
- Rear Suspension
- Tire / Wheel
- Tire Pressure Monitoring
- Door / Hatch
- Exterior Panels / Trim
- Horn
- Lighting (ext)
- Mirror (ext)
- Window / Glass
- Wiper / Washer
- Door Lock
- Heating / Air Conditioning
- Interior Panels / Trim
- Lighting (int)
- Meter / Gauge / Display
- Mirror (int)
- Power Outlets (int)
- Pre-collision
- Seat
- Seat Belt
- Supplemental Restraint Systems
- Theft Deterrent / Keyless Entry

0.0111