Toyota CH-R Service Manual: CD Sound Skips
PROCEDURE
|
1. |
CHECK CD |
|
(a) Check that the CD is not deformed or cracked. OK: No deformation or cracks on the CD |
|
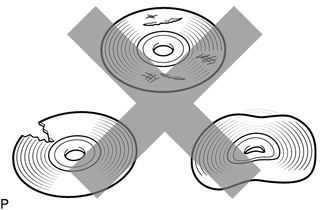
| NG | .gif) |
END (CD IS FAULTY) |
|
.gif)
|
2. |
CHECK CD |
|
(a) Check the CD. OK: The CD is clean. NOTICE: Do not use a conventional record cleaner or anti-static preservative. HINT: If dirt is on the CD surface, wipe it clean with a soft cloth from the inside to the outside in a radial direction. |
|
.png)
| NG | |
CLEAN CD |
|
|
3. |
REPLACE CD AND RECHECK |
(a) Replace the CD with a known good one and recheck that the malfunction disappears.
OK:
Malfunction disappears.
| OK | |
END (CD WAS FAULTY) |
|
|
4. |
CHECK RADIO RECEIVER ASSEMBLY |
(a) Check the radio receiver assembly installation condition.
(1) Check that the radio receiver assembly is properly installed.
OK:
Radio receiver assembly is properly installed.
| OK | |
REPLACE RADIO RECEIVER ASSEMBLY |
| NG | |
REINSTALL RADIO RECEIVER ASSEMBLY PROPERLY |
 CD cannot be Inserted / Played or CD is Ejected Right After Insertion
PROCEDURE
1.
CHECK IF A PROPER CD IS INSERTED
(a) Make sure that the CD is an audio CD or a CD with an MP3 or WMA file, and
that it is not deformed, flawed, stained ...
 Radio Broadcast cannot be Received or Poor Reception
PROCEDURE
1.
CHECK RADIO RECEIVER ASSEMBLY
(a) Check the radio automatic station search function.
(1) Check the radio automatic station search function by activating ...
Other materials:
Toyota CH-R Owners Manual > Driving: Driving tips
Winter driving tips
Carry out the necessary preparations and inspections before driving
the vehicle in winter. Always drive the vehicle in a manner appropriate to the prevailing
weather conditions.
Preparation for winter
Use fluids that are appropriate to the prevailing outside temperature ...
Toyota CH-R Service Manual > Immobiliser System(w/ Smart Key System): Diagnostic Trouble Code Chart
DIAGNOSTIC TROUBLE CODE CHART
Immobiliser System
DTC No.
Detection Item
Link
B2779
Engine Starter Communication Malfunction
B2784
Antenna Coil Open / Short
B278A
...
Toyota C-HR (AX20) 2023-2026 Owner's Manual
Toyota CH-R Owners Manual
- For safety and security
- Instrument cluster
- Operation of each component
- Driving
- Interior features
- Maintenance and care
- When trouble arises
- Vehicle specifications
- For owners
Toyota CH-R Service Manual
- Introduction
- Maintenance
- Audio / Video
- Cellular Communication
- Navigation / Multi Info Display
- Park Assist / Monitoring
- Brake (front)
- Brake (rear)
- Brake Control / Dynamic Control Systems
- Brake System (other)
- Parking Brake
- Axle And Differential
- Drive Shaft / Propeller Shaft
- K114 Cvt
- 3zr-fae Battery / Charging
- Networking
- Power Distribution
- Power Assist Systems
- Steering Column
- Steering Gear / Linkage
- Alignment / Handling Diagnosis
- Front Suspension
- Rear Suspension
- Tire / Wheel
- Tire Pressure Monitoring
- Door / Hatch
- Exterior Panels / Trim
- Horn
- Lighting (ext)
- Mirror (ext)
- Window / Glass
- Wiper / Washer
- Door Lock
- Heating / Air Conditioning
- Interior Panels / Trim
- Lighting (int)
- Meter / Gauge / Display
- Mirror (int)
- Power Outlets (int)
- Pre-collision
- Seat
- Seat Belt
- Supplemental Restraint Systems
- Theft Deterrent / Keyless Entry

0.0083