Toyota CH-R Service Manual: On-vehicle Inspection
ON-VEHICLE INSPECTION
PROCEDURE
1. INSPECT DRIVER SEAT BELT WARNING LIGHT
HINT:
The seat belt warning light on the combination meter assembly is used for both the driver seat and front passenger seat.
(a) Turn the ignition switch to ON.
(b) When the driver seat belt is not fastened, check that the seat belt warning light on the combination meter assembly blinks.
(c) Lift the vehicle using a swing arm type lift.
Click here .gif)
(d) Start the engine.
(e) When the driver seat belt is not fastened and the vehicle is driven at approximately 20 km/h (12 mph) or more, check that the seat belt warning light on the combination meter assembly blinks at an interval of 1.2 seconds for 30 seconds.
After that, check that the seat belt warning light on the combination meter assembly blinks at an interval of 0.4 seconds.
(f) When the driver seat belt is fastened, check that the seat belt warning light on the combination meter assembly turns off.
2. INSPECT FRONT PASSENGER SEAT BELT WARNING LIGHT
HINT:
The seat belt warning light on the combination meter assembly is used for both the driver seat and front passenger seat.
(a) Place a weight of 20 kg (44.0 lb) on the front passenger seat.
NOTICE:
Place the weight on the seat cushion and allow it to come into contact with the seatback.
(b) Fasten the driver seat belt.
(c) Turn the ignition switch to ON.
(d) When the front passenger seat belt is not fastened, check that the seat belt warning light on the combination meter assembly blinks.
(e) Lift the vehicle using a swing arm type lift.
Click here
(f) Start the engine.
(g) When the front passenger seat is occupied, the front passenger seat belt is not fastened and the vehicle is driven at approximately 20 km/h (12 mph) or more, check that the seat belt warning light on the combination meter assembly blinks at an interval of 1.2 seconds for 30 seconds.
After that, check that the seat belt warning light on the combination meter assembly blinks at an interval of 0.4 seconds.
(h) When the front passenger seat belt is fastened, check that the seat belt warning light on the combination meter assembly turns off.
3. INSPECT REAR SEAT BELT WARNING LIGHT
|
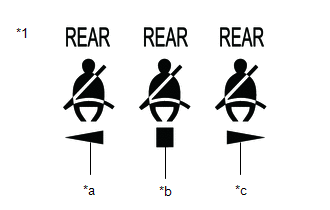
(a) Check the state of the rear seat belt warning light on the clock assembly: (1) Turn the ignition switch off. (2) Open and then close either rear door. (3) Turn the ignition switch to ON. (4) When a rear seat belt is not fastened, check that the rear seat belt warning light on the clock assembly is illuminated. (5) After 34 seconds, check that the rear seat belt warning light on the clock assembly turns off. (6) When one of the rear seat belts is unfastened from being fastened, check that the rear seat belt warning light on the clock assembly illuminates. |
|
4. INSPECT SEAT BELT WARNING BUZZER
HINT:
The seat belt warning buzzer can be customized. Make sure that this function is ON.
Click here
(a) Place a weight of 20 kg (44.0 lb) on the front passenger seat.
NOTICE:
Place the weight on the seat cushion and allow it to come into contact with the seatback.
(b) Lift the vehicle using a swing arm type lift.
Click here
(c) Start the engine.
(d) Check that the seat belt warning buzzer in the combination meter assembly sounds at an interval of 1.2 seconds for 30 seconds.
(e) After the seat belt warning buzzer has been sounding for 30 seconds at an interval of 1.2 seconds, check that the seat belt warning buzzer in the combination meter assembly sounds at an interval of 0.4 seconds for 90 seconds.
(f) Check that the seat belt warning buzzer in the combination meter assembly stops 2 minutes after it started sounding at an interval of 1.2 seconds.
(g) After the buzzer has stopped, turn the ignition switch off and then start the engine again. Drive the vehicle at approximately 20 km/h (12 mph) or more while the driver, front passenger or a rear seat belt is not fastened, and check that the buzzer sounds again.
(h) After the buzzer has stopped, fasten the driver, front passenger or rear seat belt. Drive the vehicle at approximately 20 km/h (12 mph) or more, unfasten the driver, front passenger or a rear seat belt and check that the buzzer sounds again.
(i) After the buzzer has stopped, stop the vehicle, move the shift lever to R, and then move it to D. Drive the vehicle at approximately 20 km/h (12 mph) or more, and check that the buzzer sounds again.
 Data List / Active Test
DATA LIST / ACTIVE TEST
DATA LIST
HINT:
Using the Techstream to read the Data List allows the values or states of switches,
sensors, actuators and other items to be read without removing any part ...
 Driver Side Seat Belt Warning Light does not Operate
DESCRIPTION
The seat belt warning light on the combination meter assembly illuminates, blinks
or turns off in accordance with the state of the front seat inner belt assembly
LH.
WIRING DIAGRAM
...
Other materials:
Toyota CH-R Service Manual > Headlight Dimmer Switch: Components
COMPONENTS
ILLUSTRATION
*1
HEADLIGHT DIMMER SWITCH ASSEMBLY
*2
WINDSHIELD WIPER SWITCH ASSEMBLY
...
Toyota CH-R Service Manual > Navigation System: Problem Symptoms Table
PROBLEM SYMPTOMS TABLE
NOTICE:
Depending on the parts that are replaced during vehicle inspection or
maintenance, performing initialization, registration or calibration may
be needed. Refer to Precaution for Navigation System.
Click here
When replacing the radio a ...
Toyota C-HR (AX20) 2023-2026 Owner's Manual
Toyota CH-R Owners Manual
- For safety and security
- Instrument cluster
- Operation of each component
- Driving
- Interior features
- Maintenance and care
- When trouble arises
- Vehicle specifications
- For owners
Toyota CH-R Service Manual
- Introduction
- Maintenance
- Audio / Video
- Cellular Communication
- Navigation / Multi Info Display
- Park Assist / Monitoring
- Brake (front)
- Brake (rear)
- Brake Control / Dynamic Control Systems
- Brake System (other)
- Parking Brake
- Axle And Differential
- Drive Shaft / Propeller Shaft
- K114 Cvt
- 3zr-fae Battery / Charging
- Networking
- Power Distribution
- Power Assist Systems
- Steering Column
- Steering Gear / Linkage
- Alignment / Handling Diagnosis
- Front Suspension
- Rear Suspension
- Tire / Wheel
- Tire Pressure Monitoring
- Door / Hatch
- Exterior Panels / Trim
- Horn
- Lighting (ext)
- Mirror (ext)
- Window / Glass
- Wiper / Washer
- Door Lock
- Heating / Air Conditioning
- Interior Panels / Trim
- Lighting (int)
- Meter / Gauge / Display
- Mirror (int)
- Power Outlets (int)
- Pre-collision
- Seat
- Seat Belt
- Supplemental Restraint Systems
- Theft Deterrent / Keyless Entry

0.0078