
Toyota CH-R Service Manual: Removal
REMOVAL
PROCEDURE
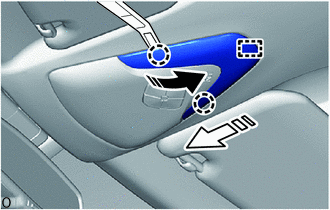
1. REMOVE NO. 1 MAP LIGHT LENS
(a) Using a molding remover A, disengage the claws and guide to remove the No. 1 map light lens as shown in the illustration.
.png) |
Remove in this Direction (1) |
.png) |
Remove in this Direction (2) |
2. REMOVE MAP LIGHT BULB
Click here .gif)
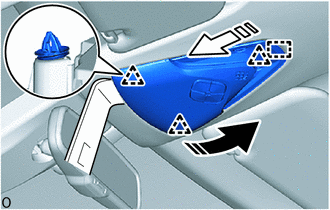
3. REMOVE MAP LIGHT ASSEMBLY
(a) Using a molding remover D, disengage the clips and guide to remove the map light assembly as shown in the illustration.
|
|
Remove in this Direction (1) |
|
|
Remove in this Direction (2) |
(b) Disconnect each connector.
 Components
COMPONENTS
ILLUSTRATION
*1
MAP LIGHT ASSEMBLY
*2
MAP LIGHT BULB
*3
NO. 1 MAP LIGHT LENS
-
-
...
 Inspection
INSPECTION
PROCEDURE
1. INSPECT MAP LIGHT ASSEMBLY
(a) Check the map light.
(1) Apply battery voltage to the map light assembly and check that the
map light comes on.
OK:
...
Other materials:
Toyota CH-R Service Manual > Headlight Dimmer Switch: Components
COMPONENTS
ILLUSTRATION
*1
HEADLIGHT DIMMER SWITCH ASSEMBLY
*2
WINDSHIELD WIPER SWITCH ASSEMBLY
...
Toyota CH-R Service Manual > Steering Column Assembly: Disassembly
DISASSEMBLY
CAUTION / NOTICE / HINT
NOTICE:
Do not drop the power steering ECU assembly, strike it with tools or
subject it to impacts.
If the power steering ECU assembly is subjected to an impact, replace
it with a new one.
Do not pull the wire harness.
Do not allow a ...
Toyota C-HR (AX20) 2023-2026 Owner's Manual
Toyota CH-R Owners Manual
- For safety and security
- Instrument cluster
- Operation of each component
- Driving
- Interior features
- Maintenance and care
- When trouble arises
- Vehicle specifications
- For owners
Toyota CH-R Service Manual
- Introduction
- Maintenance
- Audio / Video
- Cellular Communication
- Navigation / Multi Info Display
- Park Assist / Monitoring
- Brake (front)
- Brake (rear)
- Brake Control / Dynamic Control Systems
- Brake System (other)
- Parking Brake
- Axle And Differential
- Drive Shaft / Propeller Shaft
- K114 Cvt
- 3zr-fae Battery / Charging
- Networking
- Power Distribution
- Power Assist Systems
- Steering Column
- Steering Gear / Linkage
- Alignment / Handling Diagnosis
- Front Suspension
- Rear Suspension
- Tire / Wheel
- Tire Pressure Monitoring
- Door / Hatch
- Exterior Panels / Trim
- Horn
- Lighting (ext)
- Mirror (ext)
- Window / Glass
- Wiper / Washer
- Door Lock
- Heating / Air Conditioning
- Interior Panels / Trim
- Lighting (int)
- Meter / Gauge / Display
- Mirror (int)
- Power Outlets (int)
- Pre-collision
- Seat
- Seat Belt
- Supplemental Restraint Systems
- Theft Deterrent / Keyless Entry

0.0089