Toyota CH-R Service Manual: Installation
INSTALLATION
PROCEDURE
1. INSTALL AIR CONDITIONER PRESSURE SENSOR (for VALEO Made)
(a) Remove the vinyl tape from the cooler refrigerant liquid pipe A.
(b) Sufficiently apply compressor oil to a new air conditioner pressure sensor and the fitting surface of the air conditioner pressure sensor.
Compressor Oil:
VC100YF or equivalent
|
(c) Using a 27 mm deep socket wrench, install the air conditioner pressure sensor as shown in the illustration. Torque: 9.8 N·m {100 kgf·cm, 87 in·lbf} |
|
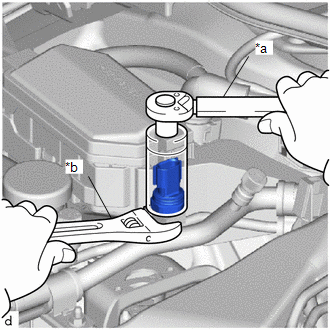
(d) Connect the connector.
2. INSTALL AIR CONDITIONER PRESSURE SENSOR (for DENSO Made)
(a) Remove the vinyl tape from the cooler refrigerant liquid pipe A.
(b) Sufficiently apply compressor oil to a new air conditioner pressure sensor and the fitting surface of the air conditioner pressure sensor.
Compressor Oil:
ND-OIL 12 or equivalent
|
(c) Using a 27 mm deep socket wrench, install the air conditioner pressure sensor as shown in the illustration. Torque: 10.8 N·m {110 kgf·cm, 8 ft·lbf} |
|
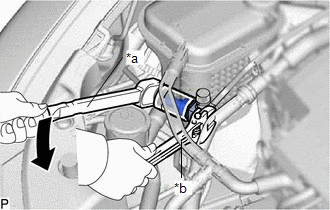
(d) Connect the connector.
3. CHARGE AIR CONDITIONING SYSTEM WITH REFRIGERANT (for HFC-134a(R134a))
Click here
.gif)
4. CHARGE AIR CONDITIONING SYSTEM WITH REFRIGERANT (for HFO-1234yf(R1234yf))
Click here
5. WARM UP ENGINE (for HFC-134a(R134a))
Click here
6. WARM UP ENGINE (for HFO-1234yf(R1234yf))
Click here
7. INSPECT FOR REFRIGERANT LEAK (for HFC-134a(R134a))
Click here
8. INSPECT FOR REFRIGERANT LEAK (for HFO-1234yf(R1234yf))
Click here
 Removal
REMOVAL
PROCEDURE
1. RECOVER REFRIGERANT FROM REFRIGERATION SYSTEM (for HFC-134a(R134a))
Click here
2. RECOVER REFRIGERANT FROM REFRIGERATION SYSTEM (for HFO-1234yf(R1234yf))
Click here
...

Other materials:
Toyota CH-R Owners Manual > Tire information: Typical DOT and Tire Identification Number (TIN)
Type A
Type B
DOT symbol*
Tire Identification Number (TIN)
Tire manufacturer's identification mark
Tire size code
Manufacturer's optional tire type code (3 or 4 letters)
Manufacturing week
Manufacturing year
Manufacturer's code
*: The DOT symbol certifies th ...
Toyota CH-R Service Manual > Tire Pressure Warning System: No Signal from Transmitter ID1 (C2121/21-C2125/25,C2181/81-C2185/85)
DESCRIPTION
The tire pressure warning valve and transmitters that are installed in the tire
and wheel assemblies measure the tire pressures. The measured values are transmitted
to the tire pressure warning ECU and receiver in the vehicle as radio waves. The
ECU compares the measured tire pres ...
Toyota C-HR (AX20) 2023-2026 Owner's Manual
Toyota CH-R Owners Manual
- For safety and security
- Instrument cluster
- Operation of each component
- Driving
- Interior features
- Maintenance and care
- When trouble arises
- Vehicle specifications
- For owners
Toyota CH-R Service Manual
- Introduction
- Maintenance
- Audio / Video
- Cellular Communication
- Navigation / Multi Info Display
- Park Assist / Monitoring
- Brake (front)
- Brake (rear)
- Brake Control / Dynamic Control Systems
- Brake System (other)
- Parking Brake
- Axle And Differential
- Drive Shaft / Propeller Shaft
- K114 Cvt
- 3zr-fae Battery / Charging
- Networking
- Power Distribution
- Power Assist Systems
- Steering Column
- Steering Gear / Linkage
- Alignment / Handling Diagnosis
- Front Suspension
- Rear Suspension
- Tire / Wheel
- Tire Pressure Monitoring
- Door / Hatch
- Exterior Panels / Trim
- Horn
- Lighting (ext)
- Mirror (ext)
- Window / Glass
- Wiper / Washer
- Door Lock
- Heating / Air Conditioning
- Interior Panels / Trim
- Lighting (int)
- Meter / Gauge / Display
- Mirror (int)
- Power Outlets (int)
- Pre-collision
- Seat
- Seat Belt
- Supplemental Restraint Systems
- Theft Deterrent / Keyless Entry

0.0108