Toyota CH-R Service Manual: On-vehicle Inspection
ON-VEHICLE INSPECTION
PROCEDURE
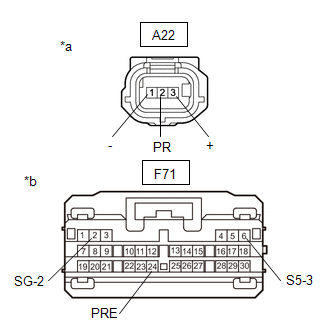
1. INSPECT AIR CONDITIONER PRESSURE SENSOR (for DENSO Made)
(a) Check the wire harness.
(1) Disconnect the A22 air conditioner pressure sensor connector.
(2) Disconnect the F71 air conditioning amplifier assembly connector.
|
(3) Measure the resistance according to the value(s) in the table below. Standard Resistance:
If the resistance is not as specified, repair the wire harness. |
|
(4) Reconnect the F71 air conditioning amplifier assembly connector.
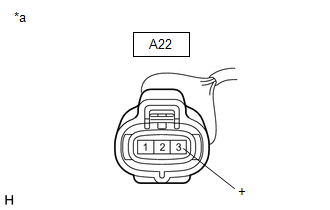
(5) Ignition switch ON.
|
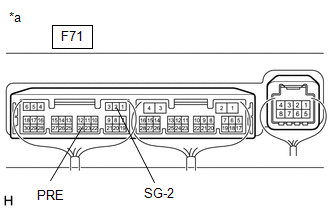
(6) Measure the voltage according to the value(s) in the table below. Standard Voltage:
If the voltage is not as specified, repair the wire harness or replace air conditioning amplifier assembly. |
|
(b) Check the air conditioner pressure sensor.
(1) Connect the connector to the air conditioner pressure sensor.
(2) Install a manifold gauge set.
(3) Turn the A/C switch on.
|
(4) Measure the voltage according to the value(s) in the table below. HINT: Check from the rear of the connector while it is connected to the air conditioning amplifier assembly. Standard Voltage:
If the voltage is not as specified, replace the air conditioner pressure sensor. |
|
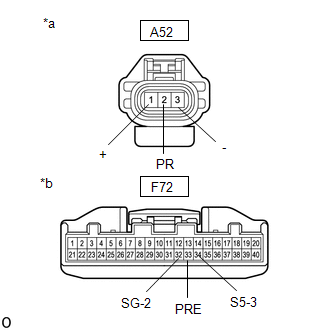
2. INSPECT AIR CONDITIONER PRESSURE SENSOR (for VALEO Made)
(a) Check the wire harness.
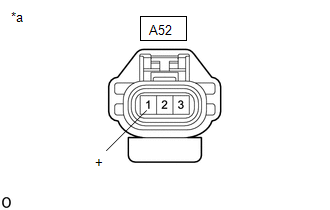
(1) Disconnect the A52 air conditioner pressure sensor connector.
(2) Disconnect the F72 air conditioning amplifier assembly connector.
|
(3) Measure the resistance according to the value(s) in the table below. Standard Resistance:
If the resistance is not as specified, repair the wire harness. |
|
(4) Reconnect the F72 air conditioning amplifier assembly connector.
(5) Ignition switch ON.
|
(6) Measure the voltage according to the value(s) in the table below. Standard Voltage:
If the voltage is not as specified, repair the wire harness or replace air conditioning amplifier assembly. |
|
(b) Check the air conditioner pressure sensor.
(1) Install a manifold gauge set.
(2) Connect the A52 air conditioner pressure sensor connector.
(3) Start the engine.
(4) Measure the voltage according to the value(s) in the table below.
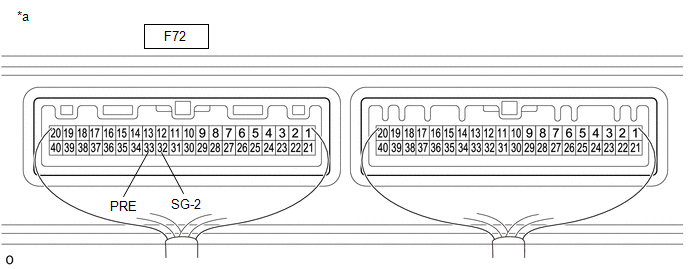
|
*a |
Component with harness connected (Air Conditioning Amplifier Assembly) |
- |
- |
Standard Voltage:
|
Tester Connection |
Condition |
Specified Condition |
|---|---|---|
|
F72-33 (PRE) - F72-32 (SG-2) |
Refrigerant pressure: Normal pressure (less than 3025 kPa (30.8 kgf/cm2, 439 psi) and more than 176 kPa (1.8 kgf/cm2, 26 psi)) |
0.63 to 4.72 V |
If the voltage is not as specified, replace the air conditioner pressure sensor.
 Components
COMPONENTS
ILLUSTRATION
*A
for VALEO Made
-
-
*1
AIR CONDITIONER PRESSURE SENSOR
-
-
...
 Removal
REMOVAL
PROCEDURE
1. RECOVER REFRIGERANT FROM REFRIGERATION SYSTEM (for HFC-134a(R134a))
Click here
2. RECOVER REFRIGERANT FROM REFRIGERATION SYSTEM (for HFO-1234yf(R1234yf))
Click here
...
Other materials:
Toyota CH-R Service Manual > Vacuum Warning Switch: Removal
REMOVAL
CAUTION / NOTICE / HINT
The necessary procedures (adjustment, calibration, initialization, or registration)
that must be performed after parts are removed, installed, or replaced during vacuum
warning switch assembly removal/installation are shown below.
Necessary Procedure After Part ...
Toyota CH-R Service Manual > Safety Connect System: Dcm Operation History
DCM OPERATION HISTORY
DCM OPERATION HISTORY
This function shows the telematics network status when the DCM (Telematics Transceiver)
was operated. Use this when no DTC is present but this telematics system was unable
to connect to the call center. This symptom may occur if cell phone signal str ...
Toyota C-HR (AX20) 2023-2026 Owner's Manual
Toyota CH-R Owners Manual
- For safety and security
- Instrument cluster
- Operation of each component
- Driving
- Interior features
- Maintenance and care
- When trouble arises
- Vehicle specifications
- For owners
Toyota CH-R Service Manual
- Introduction
- Maintenance
- Audio / Video
- Cellular Communication
- Navigation / Multi Info Display
- Park Assist / Monitoring
- Brake (front)
- Brake (rear)
- Brake Control / Dynamic Control Systems
- Brake System (other)
- Parking Brake
- Axle And Differential
- Drive Shaft / Propeller Shaft
- K114 Cvt
- 3zr-fae Battery / Charging
- Networking
- Power Distribution
- Power Assist Systems
- Steering Column
- Steering Gear / Linkage
- Alignment / Handling Diagnosis
- Front Suspension
- Rear Suspension
- Tire / Wheel
- Tire Pressure Monitoring
- Door / Hatch
- Exterior Panels / Trim
- Horn
- Lighting (ext)
- Mirror (ext)
- Window / Glass
- Wiper / Washer
- Door Lock
- Heating / Air Conditioning
- Interior Panels / Trim
- Lighting (int)
- Meter / Gauge / Display
- Mirror (int)
- Power Outlets (int)
- Pre-collision
- Seat
- Seat Belt
- Supplemental Restraint Systems
- Theft Deterrent / Keyless Entry
0.0111

