Toyota CH-R Service Manual: Dcm Operation History
DCM OPERATION HISTORY
DCM OPERATION HISTORY
This function shows the telematics network status when the DCM (Telematics Transceiver) was operated. Use this when no DTC is present but this telematics system was unable to connect to the call center. This symptom may occur if cell phone signal strength is very weak.
(a) Connect the Techstream to the DLC3.
(b) Turn the ignition switch ON.
(c) Turn the Techstream on.
(d) Choose "Telematics" from the System Selection Menu, and then click "Utility".
(e) Click "DCM Operation History" on the Utility Selection Menu.
Body Electrical > Telematics > Utility|
Tester Display |
|---|
|
DCM Operation History |
(f) Follow the instructions on the Techstream.
|
*a |
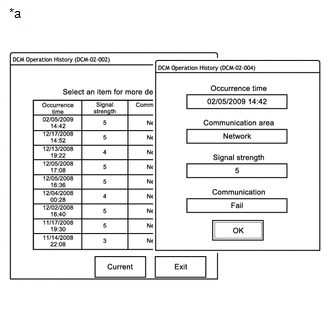
Example |
HINT:
- "Occurrence time" indicates date of the DCM (Telematics Transceiver) operation.
- "Communication area" indicates which communication network was used: Network (Verizon) or Roaming.
- "Signal strength" indicates the strength of the cellular signal received by the vehicle: 0 (no signal) to 5 (strong).
- "Communication" indicates connecting to the call center: Success or
Fail*2.
Result
Description
Success
A successfully call made using the manual (SOS) switch or the navigation system (Destination Assist-If available)
Fail*1
A call that was unsuccessful.
NOTICE:
*1: A failure can also be caused by manually ending an SOS call, and does not necessarily indicate a device malfunction.
HINT:
*2: When communication to the call center fails, "Fail" is displayed.
 How To Proceed With Troubleshooting
CAUTION / NOTICE / HINT
HINT:
Use the following procedure to troubleshoot the safety connect system.
*: Use the Techstream.
PROCEDURE
1.
VEHICLE BROUGHT ...
 Dcm Activation
DCM ACTIVATION
DCM ACTIVATION
This function should be used to activate the DCM (Telematics Transceiver) after
a new DCM (Telematics Transceiver) has been installed. During the DCM Activation
pro ...
Other materials:
Toyota CH-R Service Manual > Power Mirror Control System: Power Retractable Mirrors do not Operate with Power Retract Mirror Switch
DESCRIPTION
The outer mirror switch assembly sends a mirror retract/return signal to the
main body ECU (multiplex network body ECU) when the retractable outer mirror switch
on the outer mirror switch assembly is operated. The main body ECU (multiplex network
body ECU) retracts or returns the ...
Toyota CH-R Service Manual > Electric Parking Brake Actuator: Inspection
INSPECTION
PROCEDURE
1. INSPECT PARKING BRAKE ACTUATOR ASSEMBLY
(a) Parking brake actuator assembly LH operation inspection
(1) Apply voltage to the terminals of the parking brake actuator assembly
and check that it operates as specified.
Standard Resistance (LH Side):
...
Toyota C-HR (AX20) 2023-2026 Owner's Manual
Toyota CH-R Owners Manual
- For safety and security
- Instrument cluster
- Operation of each component
- Driving
- Interior features
- Maintenance and care
- When trouble arises
- Vehicle specifications
- For owners
Toyota CH-R Service Manual
- Introduction
- Maintenance
- Audio / Video
- Cellular Communication
- Navigation / Multi Info Display
- Park Assist / Monitoring
- Brake (front)
- Brake (rear)
- Brake Control / Dynamic Control Systems
- Brake System (other)
- Parking Brake
- Axle And Differential
- Drive Shaft / Propeller Shaft
- K114 Cvt
- 3zr-fae Battery / Charging
- Networking
- Power Distribution
- Power Assist Systems
- Steering Column
- Steering Gear / Linkage
- Alignment / Handling Diagnosis
- Front Suspension
- Rear Suspension
- Tire / Wheel
- Tire Pressure Monitoring
- Door / Hatch
- Exterior Panels / Trim
- Horn
- Lighting (ext)
- Mirror (ext)
- Window / Glass
- Wiper / Washer
- Door Lock
- Heating / Air Conditioning
- Interior Panels / Trim
- Lighting (int)
- Meter / Gauge / Display
- Mirror (int)
- Power Outlets (int)
- Pre-collision
- Seat
- Seat Belt
- Supplemental Restraint Systems
- Theft Deterrent / Keyless Entry

0.0121