Toyota CH-R Service Manual: Diagnosis System
DIAGNOSIS SYSTEM
CHECK DLC3
(a) Check the DLC3.
Click here
.gif)
INSPECT BATTERY VOLTAGE
(a) Measure the vehicle battery voltage.
Standard Voltage:
11 to 14 V
If the voltage is below 11 V, recharge or replace the battery.
SELF-DIAGNOSTIC MODE (USING TECHSTREAM)
(a) Connect the Techstream to the DLC3.
(b) Turn the ignition switch to ON.
(c) Turn the Techstream on.
(d) Enter the following menus: Body Electrical / Main Body / Wireless Door Lock Diagnosis Mode.
Body Electrical > Main Body > Utility|
Tester Display |
|---|
|
Wireless Door Lock Diagnosis Mode |
(e) Proceed to the next step in accordance with the prompts on the Techstream screen.
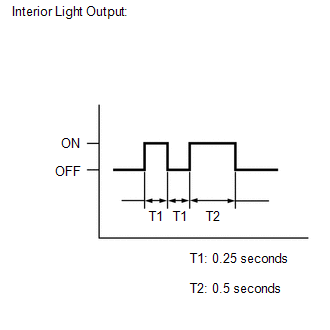
(f) Check that the system has switched to self-diagnostic mode by checking the interior light output pattern.

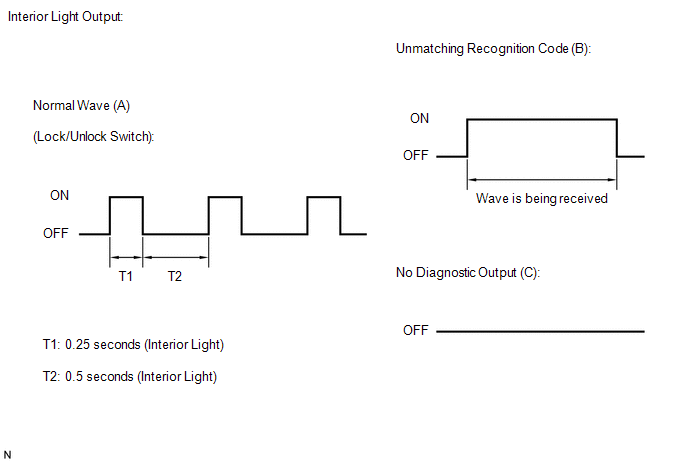
(g) Check the diagnostic outputs when a door control transmitter assembly switch is pressed. The diagnostic outputs can be checked by the interior light patterns.
 Result
|
Interior Light Output |
Suspected Area |
|---|---|
|
A |
Normal (No malfunction) |
|
B |
Register wireless code |
|
C |
Wave interference or malfunction of a related component |
 Problem Symptoms Table
PROBLEM SYMPTOMS TABLE
HINT:
Use the table below to help determine the cause of problem symptoms.
If multiple suspected areas are listed, the potential causes of the symptoms
are lis ...
 Terminals Of Ecu
TERMINALS OF ECU
CHECK INSTRUMENT PANEL JUNCTION BLOCK ASSEMBLY AND MAIN BODY ECU (MULTIPLEX NETWORK
BODY ECU)
*A
Main Body ECU (Multiplex Network Body ECU) with 2 Connecto ...
Other materials:
Toyota CH-R Service Manual > Lighting System: Fail-safe Chart
FAIL-SAFE CHART
FAIL-SAFE FUNCTION (for LED Headlight)
(a) Headlight ECU sub-assembly
(1) The headlight ECU sub-assemblies stop light operation if any of the following
malfunctions are detected.
Malfunction
Multi-information Display Warning
DTC Output
...
Toyota CH-R Service Manual > Meter / Gauge System: Parts Location
PARTS LOCATION
ILLUSTRATION
*A
w/ Toyota Safety Sense P
*B
for LED Headlight
*1
THERMISTOR ASSEMBLY (AMBIENT TEMPERATURE SENSOR)
*2
SKID CONTROL ECU (BRAKE ACTUATOR ASSEMBLY)
*3
...
Toyota C-HR (AX20) 2023-2026 Owner's Manual
Toyota CH-R Owners Manual
- For safety and security
- Instrument cluster
- Operation of each component
- Driving
- Interior features
- Maintenance and care
- When trouble arises
- Vehicle specifications
- For owners
Toyota CH-R Service Manual
- Introduction
- Maintenance
- Audio / Video
- Cellular Communication
- Navigation / Multi Info Display
- Park Assist / Monitoring
- Brake (front)
- Brake (rear)
- Brake Control / Dynamic Control Systems
- Brake System (other)
- Parking Brake
- Axle And Differential
- Drive Shaft / Propeller Shaft
- K114 Cvt
- 3zr-fae Battery / Charging
- Networking
- Power Distribution
- Power Assist Systems
- Steering Column
- Steering Gear / Linkage
- Alignment / Handling Diagnosis
- Front Suspension
- Rear Suspension
- Tire / Wheel
- Tire Pressure Monitoring
- Door / Hatch
- Exterior Panels / Trim
- Horn
- Lighting (ext)
- Mirror (ext)
- Window / Glass
- Wiper / Washer
- Door Lock
- Heating / Air Conditioning
- Interior Panels / Trim
- Lighting (int)
- Meter / Gauge / Display
- Mirror (int)
- Power Outlets (int)
- Pre-collision
- Seat
- Seat Belt
- Supplemental Restraint Systems
- Theft Deterrent / Keyless Entry
0.0078
