Toyota CH-R Service Manual: Vehicle Lift And Support Locations
VEHICLE LIFT AND SUPPORT LOCATIONS
NOTICE ABOUT VEHICLE CONDITION WHEN RAISING VEHICLE
(a) The vehicle must be unloaded before jacking up or raising the vehicle. Never jack up or raise a heavily loaded vehicle.
(b) When removing any heavy components like the engine or transaxle, the vehicle center of gravity will shift. To stabilize the vehicle, place a balance weight in a location that will prevent the vehicle from rolling or shifting, or place a transmission jack under the appropriate jack position at the opposite end of the vehicle.
NOTICE FOR USING 4 POST LIFT
(a) Follow the safety procedures outlined in the lift's instruction manual.
(b) Do not damage the tires or wheels while driving onto the lift.
(c) Use wheel chocks to secure the vehicle.
NOTICE FOR USING JACK AND SAFETY STANDS
(a) Work on a level surface. Use wheel chocks at all times.
(b) Use safety stands with rubber attachments as shown in the illustration.
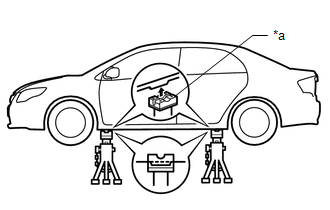
|
*a |
Rubber Attachment |
(c) Set the jack and safety stands exactly under the specified locations on the vehicle.
Never set the jack or safety stands under suspension parts, such as a front lower arm, when jacking up the vehicle.
(d) Do not work on or leave the vehicle supported only by a jack. Be sure to support the vehicle with safety stands.
(e) When jacking up the vehicle, first release the parking brake, then move the shift lever to N and confirm that neutral (N) has been selected.
(f) When jacking up the entire vehicle:
(1) When jacking up the front wheels first, make sure wheel chocks are behind the rear wheels.
(2) When jacking up the rear wheels first, make sure wheel chocks are in front of the front wheels.
(g) When jacking up only the front or rear wheels of the vehicle:
(1) Before jacking up the front wheels, place wheel chocks on both sides of the rear wheels.
(2) Before jacking up the rear wheels, place wheel chocks on both sides of the front wheels.
(h) When lowering a vehicle that only has its front or rear wheels jacked up.
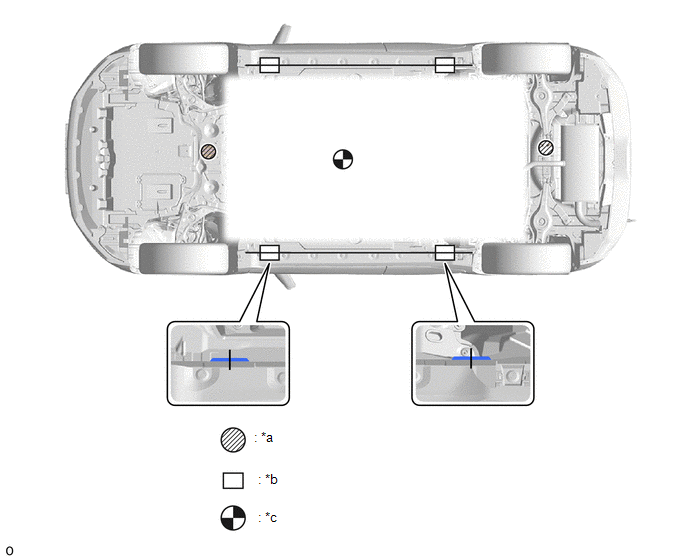
|
*a |
JACK POSITION |
*b |
SUPPORT POSITION - Safety stand - Swing arm type lift - Plate type lift |
|
*c |
VEHICLE CENTER OF GRAVITY (Unloaded Condition) |
- |
- |
(1) Before lowering the front wheels, make sure wheel chocks are in front of the rear wheels.
(2) Before lowering the rear wheels, make sure wheel chocks are behind the front wheels.
NOTICE FOR USING A SWING ARM TYPE LIFT
(a) Follow the safety procedures outlined in the lift's instruction manual.
(b) Use swing arms equipped with rubber attachments as shown in the illustration.
(c) Position the vehicle so that its center of gravity is centered on the lift (length of "L" in the illustration should be as short as possible).
(d) Ensure that the rubber cushions or swing arms do not contact the body cladding or lower mouldings.
(e) Be sure to lock the swing arms before raising the vehicle (if equipped with arm locks).
(f) Use the lift to raise the vehicle until the tires are off the ground, then stop the lift and shake the front and rear of the vehicle to make sure that it is stable.
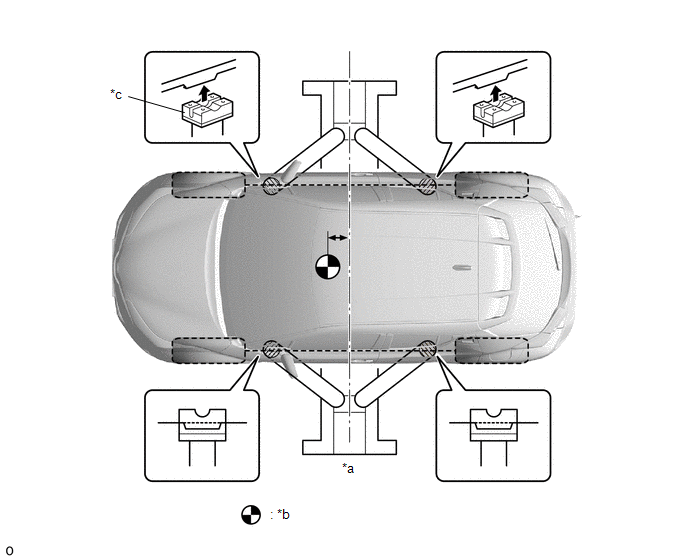
|
*a |
Center of lift |
*b |
VEHICLE CENTER OF GRAVITY (Unloaded Condition) |
|
*c |
Rubber Attachment |
- |
- |
NOTICE FOR USING PLATE TYPE LIFT
(a) Follow the safety procedures outlined in the lift's instruction manual.
(b) Use plate lift attachments (rubber lifting blocks) on top of the plates.
(c) Be sure to set the vehicle to the specified position described in the following chart and shown in the following illustration.
|
Right and left set position |
Center the vehicle on the lift. |
|
Front and rear set position |
|
(d) Ensure that the plate lift or rubber lifting blocks do not contact the body cladding or lower mouldings.
(e) Use the lift to raise the vehicle until the tires are off the ground, then stop the lift and shake the front and rear of the vehicle to make sure that it is stable.
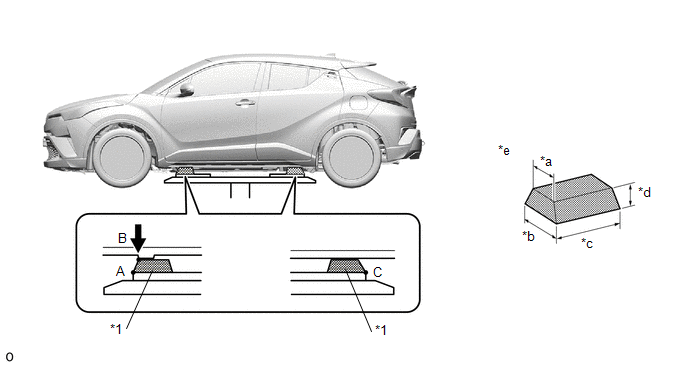
|
*1 |
Attachment |
- |
- |
|
*a |
85 mm (3.35 in.) |
*b |
100 mm (3.94 in.) |
|
*c |
200 mm (7.87 in.) |
*d |
70 mm (2.76 in.) |
|
*e |
Attachment Dimensions |
- |
- |
 Precaution
PRECAUTION
BASIC REPAIR HINT
(a) HINTS ON OPERATIONS
1
Attire
Always wear a clean uniform.
A hat and safety shoes must be worn.
...
 Customize Parameters
CUSTOMIZE PARAMETERS
PROCEDURE
1. CUSTOMIZE LANE DEPARTURE ALERT SYSTEM (w/ Steering Control)
Click here
2. CUSTOMIZE BLIND SPOT MONITOR SYSTEM
Click here
3. CUSTOMIZE POWER DOOR LOCK CO ...
Other materials:
Toyota CH-R Service Manual > Steering Pad: On-vehicle Inspection
ON-VEHICLE INSPECTION
CAUTION / NOTICE / HINT
CAUTION:
Be sure to correctly follow the removal and installation procedures for the horn
button assembly.
PROCEDURE
1. INSPECT HORN BUTTON ASSEMBLY (for Vehicle not Involved in Collision)
(a) Perform a diagnostic system check.
Click here
(b) ...
Toyota CH-R Service Manual > Air Conditioning System(for Automatic Air Conditioning System With Top-mounted
Air Conditioner Pressure Sensor): Problem Symptoms Table
PROBLEM SYMPTOMS TABLE
HINT:
Use the table below to help determine the cause of problem symptoms.
If multiple suspected areas are listed, the potential causes of the symptoms
are listed in order of probability in the "Suspected Area" column of the
table. Check each sy ...
Toyota C-HR (AX20) 2023-2026 Owner's Manual
Toyota CH-R Owners Manual
- For safety and security
- Instrument cluster
- Operation of each component
- Driving
- Interior features
- Maintenance and care
- When trouble arises
- Vehicle specifications
- For owners
Toyota CH-R Service Manual
- Introduction
- Maintenance
- Audio / Video
- Cellular Communication
- Navigation / Multi Info Display
- Park Assist / Monitoring
- Brake (front)
- Brake (rear)
- Brake Control / Dynamic Control Systems
- Brake System (other)
- Parking Brake
- Axle And Differential
- Drive Shaft / Propeller Shaft
- K114 Cvt
- 3zr-fae Battery / Charging
- Networking
- Power Distribution
- Power Assist Systems
- Steering Column
- Steering Gear / Linkage
- Alignment / Handling Diagnosis
- Front Suspension
- Rear Suspension
- Tire / Wheel
- Tire Pressure Monitoring
- Door / Hatch
- Exterior Panels / Trim
- Horn
- Lighting (ext)
- Mirror (ext)
- Window / Glass
- Wiper / Washer
- Door Lock
- Heating / Air Conditioning
- Interior Panels / Trim
- Lighting (int)
- Meter / Gauge / Display
- Mirror (int)
- Power Outlets (int)
- Pre-collision
- Seat
- Seat Belt
- Supplemental Restraint Systems
- Theft Deterrent / Keyless Entry

0.0074