Toyota CH-R Service Manual: Installation
INSTALLATION
PROCEDURE
1. INSTALL RAIN SENSOR TAPE
HINT:
The rain sensor tape is reusable. Only replace the tape if it is damaged or contaminated with foreign matter.
(a) Remove the rain sensor tape.
(b) Clean the rain sensor sensing portion with a piece of cloth.
|
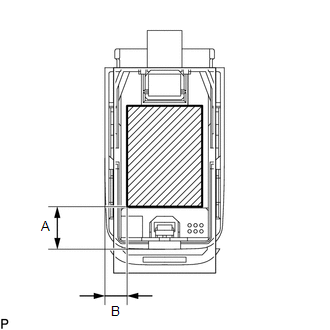
(c) Peel off the smaller release sheet, and then attach the rain sensor tape to the rain sensor sensing portion as shown in the illustration. HINT: Use your fingers to push out any air bubbles from under the tape. Standard Clearance
|
|
2. INSTALL RAIN SENSOR
(a) Clean the windshield glass with a piece of cloth.
NOTICE:
- Make sure that there is no rain sensor tape residue remaining on the windshield glass. If there is, remove the residue.
- If there is any rain sensor tape residue remaining on the windshield glass, replace the tape.
(b) When installing a new rain sensor or when the rain sensor tape has been replaced:
(1) Peel off the release sheet.
HINT:
Do not touch the silicone surface.
(c) Connect the connector.
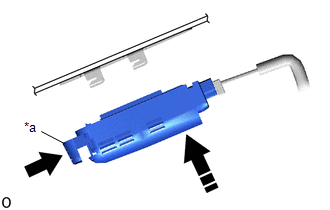
(d) Gradually attach the rain sensor to the windshield glass surface as shown in the illustration to prevent air bubbles from forming between them.
|
*a |
Stopper |
.png) |
Lock |
.png) |
Install in this Direction |
HINT:
Do not touch the silicone or glass surfaces.
(e) Push in the stopper to install the rain sensor as shown in the illustration.
3. INSTALL RAIN SENSOR COVER
|
(a) Engage the guide and claws to install the rain sensor cover. |
|
 Removal
REMOVAL
PROCEDURE
1. REMOVE RAIN SENSOR COVER
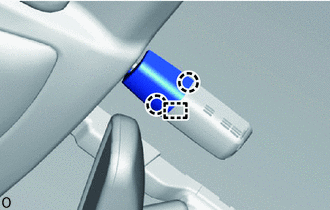
(a) Release the stopper by pulling it out as shown in the illustration.
*a
Stopper
Release
...
 Rear Wiper Motor
...
Other materials:
Toyota CH-R Service Manual > Theft Deterrent / Keyless Entry: Electrical Key Oscillator(for Outside Luggage Compartment)
Components
COMPONENTS
ILLUSTRATION
*1
ELECTRICAL KEY ANTENNA
-
-
N*m (kgf*cm, ft.*lbf): Specified torque
-
-
Installation
INSTALLATION
PROCEDURE
1. INSTALL ELECTRICAL KEY ANTENNA
(a) En ...
Toyota CH-R Service Manual > Airbag System: Occupant Classification System Malfunction (B1650/32,B165A/32)
DESCRIPTION
The airbag sensor assembly and occupant detection ECU communicate via CAN communication.
When the occupant detection ECU stores DTC B1771, B1780, B1782, B1795, B1798,
B1799, U0125 or U0129, the airbag sensor assembly receives this information and
stores DTC B1650/32.
When the occu ...
Toyota C-HR (AX20) 2023-2026 Owner's Manual
Toyota CH-R Owners Manual
- For safety and security
- Instrument cluster
- Operation of each component
- Driving
- Interior features
- Maintenance and care
- When trouble arises
- Vehicle specifications
- For owners
Toyota CH-R Service Manual
- Introduction
- Maintenance
- Audio / Video
- Cellular Communication
- Navigation / Multi Info Display
- Park Assist / Monitoring
- Brake (front)
- Brake (rear)
- Brake Control / Dynamic Control Systems
- Brake System (other)
- Parking Brake
- Axle And Differential
- Drive Shaft / Propeller Shaft
- K114 Cvt
- 3zr-fae Battery / Charging
- Networking
- Power Distribution
- Power Assist Systems
- Steering Column
- Steering Gear / Linkage
- Alignment / Handling Diagnosis
- Front Suspension
- Rear Suspension
- Tire / Wheel
- Tire Pressure Monitoring
- Door / Hatch
- Exterior Panels / Trim
- Horn
- Lighting (ext)
- Mirror (ext)
- Window / Glass
- Wiper / Washer
- Door Lock
- Heating / Air Conditioning
- Interior Panels / Trim
- Lighting (int)
- Meter / Gauge / Display
- Mirror (int)
- Power Outlets (int)
- Pre-collision
- Seat
- Seat Belt
- Supplemental Restraint Systems
- Theft Deterrent / Keyless Entry

0.0105