
Toyota CH-R Owners Manual: Using an anchor bracket (for top tether strap)
■ Anchor brackets (for top tether strap) Anchor brackets are provided for each rear seat.
Use anchor brackets when fixing the top tether strap.
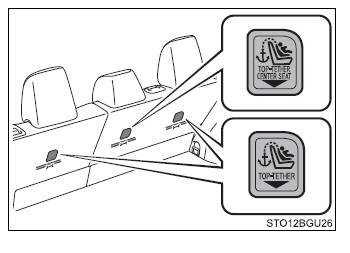
■ Fixing the top tether strap to the anchor bracket Install the child restraint system in accordance to the operation manual enclosed with the child restraint system.
Rear outboard seats
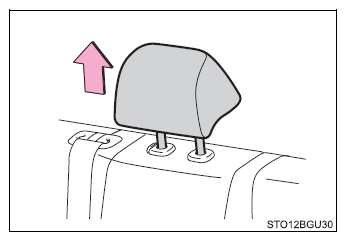
1. Remove the head restraint.
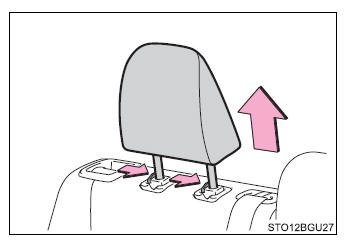
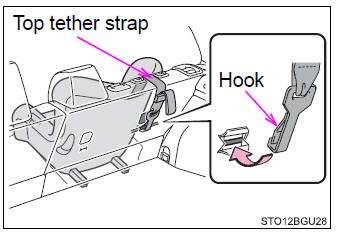
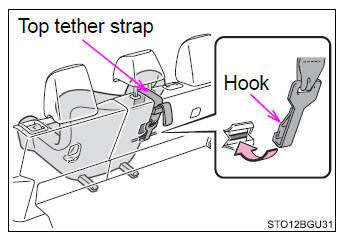
2. Latch the hook onto the anchor bracket and tighten the top tether strap.
Make sure the top tether strap is securely latched.
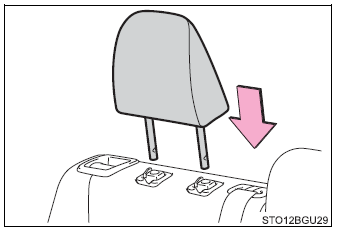
3. If the head restraint does not interfere with the child restraint system installation, install the head restraint.
Rear center seat
1. Adjust the head restraint to the upmost position.
If the head restraint interferes with your child restraint system, and the head restraint can be removed, remove the head restraint.
2. Latch the hook onto the anchor bracket and tighten the top tether strap.
Make sure the top tether strap is securely latched.
When installing the child restraint system with the head restraint being raised, be sure to have the top tether strap pass underneath the head restraint.
■Laws and regulations pertaining to anchors The LATCH system conforms to FMVSS225 or CMVSS210.2.
Child restraint systems conforming to FMVSS213 or CMVSS213 specifications can be used.
This vehicle is designed to conform to SAE J1819.
■When installing a child restraint system Observe the following precautions.
Failure to do so may result in death or serious injury.
- Firmly attach the top tether strap and make sure that the belt is not twisted.
- Do not attach the top tether strap to anything other than the anchor bracket.
- After securing a child restraint system, never adjust the seat.
- Follow all installation instructions provided by the child restraint system manufacturer.
- Rear center seat: When installing the child restraint system with the head restraint being raised, after the head restraint has been raised and then the anchor bracket has been fixed, do not lower the head restraint.
 Child restraint system fixed with a child restraint LATCH anchor
■ Child restraint LATCH anchors LATCH anchors are provided for
the rear outboard seats.
(Buttons displaying the location of the anchors are attached to the seats.)
■ When installing in the ...

Other materials:
Toyota CH-R Service Manual > Rear Center Seat Outer Belt Assembly: Components
COMPONENTS
ILLUSTRATION
*1
REAR SEAT CENTER HEADREST ASSEMBLY
*2
REAR SEAT HEADREST ASSEMBLY
*3
REAR SEATBACK ASSEMBLY RH
-
-
Tightening torque for "Major areas involving ...
Toyota CH-R Service Manual > Wheel Opening Moulding(for Rear): Removal
REMOVAL
CAUTION / NOTICE / HINT
HINT:
Use the same procedure for the RH and LH sides.
The procedure listed below is for the LH side.
PROCEDURE
1. REMOVE QUARTER OUTSIDE MOULDING
HINT:
When removing the quarter outside moulding, if the No. 1 body outside moulding
pad (doubl ...
Toyota C-HR (AX20) 2023-2026 Owner's Manual
Toyota CH-R Owners Manual
- For safety and security
- Instrument cluster
- Operation of each component
- Driving
- Interior features
- Maintenance and care
- When trouble arises
- Vehicle specifications
- For owners
Toyota CH-R Service Manual
- Introduction
- Maintenance
- Audio / Video
- Cellular Communication
- Navigation / Multi Info Display
- Park Assist / Monitoring
- Brake (front)
- Brake (rear)
- Brake Control / Dynamic Control Systems
- Brake System (other)
- Parking Brake
- Axle And Differential
- Drive Shaft / Propeller Shaft
- K114 Cvt
- 3zr-fae Battery / Charging
- Networking
- Power Distribution
- Power Assist Systems
- Steering Column
- Steering Gear / Linkage
- Alignment / Handling Diagnosis
- Front Suspension
- Rear Suspension
- Tire / Wheel
- Tire Pressure Monitoring
- Door / Hatch
- Exterior Panels / Trim
- Horn
- Lighting (ext)
- Mirror (ext)
- Window / Glass
- Wiper / Washer
- Door Lock
- Heating / Air Conditioning
- Interior Panels / Trim
- Lighting (int)
- Meter / Gauge / Display
- Mirror (int)
- Power Outlets (int)
- Pre-collision
- Seat
- Seat Belt
- Supplemental Restraint Systems
- Theft Deterrent / Keyless Entry

0.0085