
Toyota CH-R Service Manual: Removal
REMOVAL
CAUTION / NOTICE / HINT
HINT:
- Use the same procedure for the RH side and LH side.
- The following procedure is for the LH side.
PROCEDURE
1. REMOVE FRONT BUMPER ASSEMBLY
Click here
.gif)
2. REMOVE HEADLIGHT ASSEMBLY
(a) Apply protective tape around the headlight assembly as shown in the illustration.
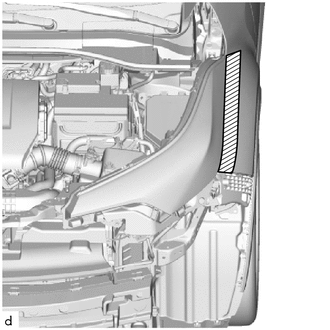
.png) |
Protective Tape |
|
(b) Disconnect the 3 connectors. |
|
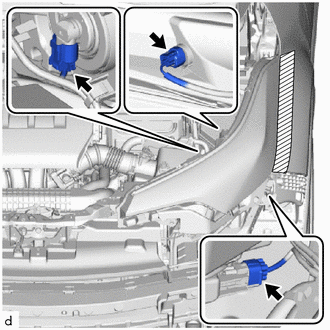
|
(c) Remove the bolt and 3 screws. |
|
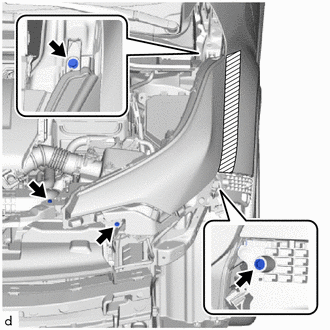
(d) Remove the headlight assembly as shown in the illustration.
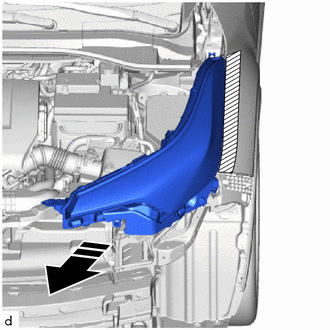
.png) |
Remove in this Direction |
 Components
COMPONENTS
ILLUSTRATION
*1
HEADLIGHT ASSEMBLY
-
-
N*m (kgf*cm, ft.*lbf): Specified torque
-
-
...
 Disassembly
DISASSEMBLY
CAUTION / NOTICE / HINT
HINT:
Use the same procedure for the RH side and LH side.
The following procedure is for the LH side.
PROCEDURE
1. REMOVE HEADLIGHT PROTECTOR ...
Other materials:
Toyota CH-R Service Manual > Door / Hatch: Back Door Weatherstrip
Components
COMPONENTS
ILLUSTRATION
*1
BACK DOOR WEATHERSTRIP
-
-
●
Non-reusable part
-
-
Removal
REMOVAL
PROCEDURE
1. REMOVE BACK DOOR WEATHERSTRIP
(a) Remove the back do ...
Toyota CH-R Service Manual > Black Out Tape(for Front Door): Installation
INSTALLATION
CAUTION / NOTICE / HINT
HINT:
Use the same procedure for the RH side and LH side.
The following procedure is for the LH side.
PROCEDURE
1. REPAIR INSTRUCTION
(a) Clean the vehicle body surface.
(1) Using a heat light, heat the vehicle body surface.
Heating Temp ...
Toyota C-HR (AX20) 2023-2026 Owner's Manual
Toyota CH-R Owners Manual
- For safety and security
- Instrument cluster
- Operation of each component
- Driving
- Interior features
- Maintenance and care
- When trouble arises
- Vehicle specifications
- For owners
Toyota CH-R Service Manual
- Introduction
- Maintenance
- Audio / Video
- Cellular Communication
- Navigation / Multi Info Display
- Park Assist / Monitoring
- Brake (front)
- Brake (rear)
- Brake Control / Dynamic Control Systems
- Brake System (other)
- Parking Brake
- Axle And Differential
- Drive Shaft / Propeller Shaft
- K114 Cvt
- 3zr-fae Battery / Charging
- Networking
- Power Distribution
- Power Assist Systems
- Steering Column
- Steering Gear / Linkage
- Alignment / Handling Diagnosis
- Front Suspension
- Rear Suspension
- Tire / Wheel
- Tire Pressure Monitoring
- Door / Hatch
- Exterior Panels / Trim
- Horn
- Lighting (ext)
- Mirror (ext)
- Window / Glass
- Wiper / Washer
- Door Lock
- Heating / Air Conditioning
- Interior Panels / Trim
- Lighting (int)
- Meter / Gauge / Display
- Mirror (int)
- Power Outlets (int)
- Pre-collision
- Seat
- Seat Belt
- Supplemental Restraint Systems
- Theft Deterrent / Keyless Entry

0.0066