Toyota CH-R Service Manual: Installation
INSTALLATION
CAUTION / NOTICE / HINT
HINT:
- Use the same procedure for the RH side and LH side.
- The following procedure is for the LH side.
PROCEDURE
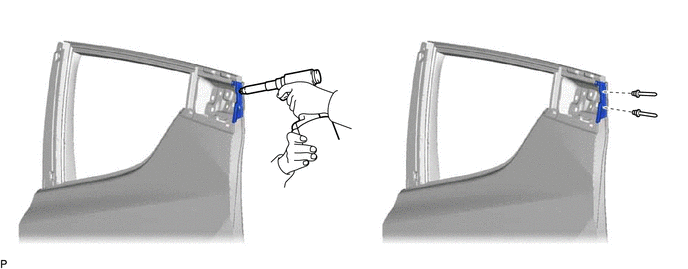
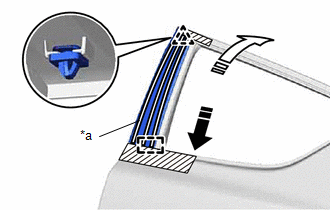
1. INSTALL REAR DOOR REAR WINDOW FRAME MOULDING
(a) Using an air riveter or hand riveter with a nose piece, install the rear door rear window frame moulding with 2 new rivets.
HINT:
If the mandrel of the rivet does not come off on the first operation of the rivet gun, slide the rivet gun forward on the mandrel and operate it again.
NOTICE:
- Do not pry the rivet with the riveter, as this will cause damage to
the riveter and mandrel.
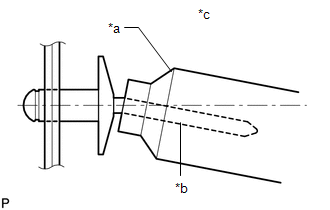
*a
Riveter
*b
Mandrel
*c
Incorrect
- Confirm that the rivets are seated properly against the moulding.
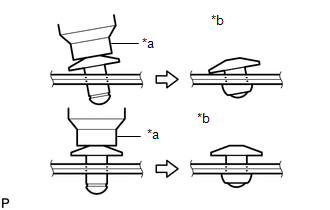
*a
Riveter
*b
Incorrect
- Do not tilt the riveter when installing the rivet to the moulding.
- Do not leave any space between the rivet head and moulding.
- Do not leave any space between the moulding and door frame. Firmly hold
the 2 items together while installing the rivet.
.png)
*a
Riveter
*b
Incorrect
2. INSTALL REAR DOOR UPPER WINDOW FRAME MOULDING
(a) Engage the guides to temporarily install the rear door upper window frame moulding to the door frame.
(b) Using an air riveter or hand riveter with a nose piece, install the rear door upper window frame moulding with 5 new rivets.
HINT:
If the mandrel of the rivet does not come off on the first operation of the rivet gun, slide the rivet gun forward on the mandrel and operate it again.
NOTICE:
- Do not pry the rivet with the riveter, as this will cause damage to
the riveter and mandrel.
*a
Riveter
*b
Mandrel
*c
Incorrect
- Confirm that the rivets are seated properly against the moulding.
*a
Riveter
*b
Incorrect
- Do not tilt the riveter when installing the rivet to the moulding.
- Do not leave any space between the rivet head and moulding.
- Do not leave any space between the moulding and door frame. Firmly hold
the 2 items together while installing the rivet.
*a
Riveter
*b
Incorrect
3. INSTALL REAR DOOR OUTSIDE MOULDING SUB-ASSEMBLY
HINT:
When installing a new rear door outside moulding sub-assembly, heat the vehicle body and rear door outside moulding sub-assembly using a heat light.
Heating Temperature|
Item |
Temperature |
|---|---|
|
Vehicle Body |
40 to 60°C (104 to 140°F) |
|
Rear Door Outside Moulding Sub-assembly |
20 to 30°C (68 to 86°F) |
CAUTION:
- Do not touch the heat light and heated parts, touching the heat light may result in burns.
- Touching heated parts for a long time may result in burns.
.png)
|
*a |
Heated Part |
|
*b |
Heat Light |
NOTICE:
Do not heat the vehicle body or rear door outside moulding sub-assembly excessively.
(a) Clean the vehicle body surface.
(1) Using a heat light, heat the vehicle body surface.
(2) Remove any double-sided tape from the vehicle body.
(3) Wipe off any tape adhesive residue with cleaner.
(b) Install a new rear door outside moulding sub-assembly.
(1) Using a heat light, heat the vehicle body and rear door outside moulding sub-assembly.
(2) Remove the release paper from the rear door outside moulding sub-assembly.
HINT:
After removing the release paper, keep the exposed adhesive free from foreign matter.
(3) Engage the guide and clip and attach the double-sided tape and caulking sponge to install the rear door outside moulding sub-assembly.
|
*a |
Double-sided Tape |
.png) |
Install in this Direction (1) |
.png) |
Install in this Direction (2) |
HINT:
Press the rear door outside moulding sub-assembly firmly to install it.
(c) Remove the protective tape.
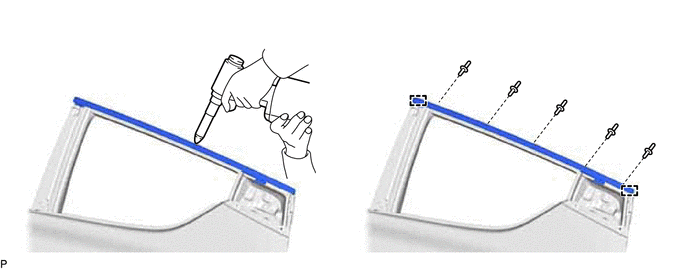
4. INSTALL REAR DOOR WEATHERSTRIP
Click here
.gif)
5. INSTALL REAR DOOR BELT MOULDING ASSEMBLY
Click here
 Removal
REMOVAL
CAUTION / NOTICE / HINT
The necessary procedures (adjustment, calibration, initialization, or registration)
that must be performed after parts are removed and installed, or replaced during ...
 Rear Spoiler
...
Other materials:
Toyota CH-R Service Manual > Air Conditioning System(for Automatic Air Conditioning System With Side-mounted
Air Conditioner Pressure Sensor): Diagnostic Trouble Code Chart
DIAGNOSTIC TROUBLE CODE CHART
AIR CONDITIONING SYSTEM
DTC No.
Detection Item
DTC Detection Condition
Link
B1411
Room Temperature Sensor Circuit
Any of the following conditions is met:
Open in cooler th ...
Toyota CH-R Service Manual > Rear Seat Inner Belt Assembly(for Lh Side): Removal
REMOVAL
PROCEDURE
1. DISCONNECT REAR CENTER SEAT OUTER BELT ASSEMBLY
Click here
2. REMOVE BENCH TYPE REAR SEAT CUSHION ASSEMBLY
Click here
3. REMOVE REAR SEAT CUSHION LOCK HOOK
Click here
4. REMOVE REAR SEAT INNER WITH CENTER BELT ASSEMBLY LH
(a) w/o Seat Belt Warning System:
...
Toyota C-HR (AX20) 2023-2026 Owner's Manual
Toyota CH-R Owners Manual
- For safety and security
- Instrument cluster
- Operation of each component
- Driving
- Interior features
- Maintenance and care
- When trouble arises
- Vehicle specifications
- For owners
Toyota CH-R Service Manual
- Introduction
- Maintenance
- Audio / Video
- Cellular Communication
- Navigation / Multi Info Display
- Park Assist / Monitoring
- Brake (front)
- Brake (rear)
- Brake Control / Dynamic Control Systems
- Brake System (other)
- Parking Brake
- Axle And Differential
- Drive Shaft / Propeller Shaft
- K114 Cvt
- 3zr-fae Battery / Charging
- Networking
- Power Distribution
- Power Assist Systems
- Steering Column
- Steering Gear / Linkage
- Alignment / Handling Diagnosis
- Front Suspension
- Rear Suspension
- Tire / Wheel
- Tire Pressure Monitoring
- Door / Hatch
- Exterior Panels / Trim
- Horn
- Lighting (ext)
- Mirror (ext)
- Window / Glass
- Wiper / Washer
- Door Lock
- Heating / Air Conditioning
- Interior Panels / Trim
- Lighting (int)
- Meter / Gauge / Display
- Mirror (int)
- Power Outlets (int)
- Pre-collision
- Seat
- Seat Belt
- Supplemental Restraint Systems
- Theft Deterrent / Keyless Entry

0.0074