
Toyota CH-R Service Manual: Installation
INSTALLATION
CAUTION / NOTICE / HINT
HINT:
- Use the same procedure for the RH side and LH side.
- The following procedure is for the LH side.
PROCEDURE
1. INSTALL REAR DOOR BELT MOULDING ASSEMBLY
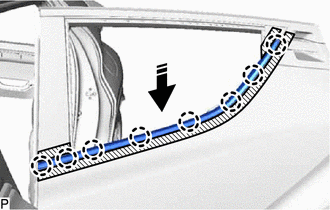
(a) Engage the claws to install a new rear door belt moulding assembly as shown in the illustration.
.png) |
Install in this Direction |
(b) Remove the protective tape.
2. INSTALL REAR DOOR QUARTER WINDOW GLASS
Click here
.gif)
3. INSTALL REAR DOOR GLASS RUN
Click here
4. INSTALL REAR DOOR FRAME GARNISH
Click here
5. INSTALL REAR DOOR GLASS SUB-ASSEMBLY
Click here
6. INSTALL REAR DOOR WINDOW REAR LOWER FRAME SUB-ASSEMBLY
Click here
7. INSTALL REAR DOOR SERVICE HOLE COVER
Click here
8. CONNECT REAR DOOR WEATHERSTRIP
(a) Connect the rear door weatherstrip.
9. INSTALL REAR DOOR BELT SEAL
Click here
10. INSTALL REAR DOOR GLASS INNER WEATHERSTRIP
Click here
11. INSTALL REAR DOOR BELT REAR SEAL
Click here
12. INSTALL REAR DOOR TRIM BOARD SUB-ASSEMBLY
Click here
13. INSTALL REAR DOOR REAR FRAME BRACKET
Click here
14. INSTALL REAR POWER WINDOW REGULATOR SWITCH ASSEMBLY WITH REAR DOOR ARMREST BASE UPPER PANEL
Click here
15. INSTALL REAR DOOR INSIDE HANDLE BEZEL PLUG
Click here
16. CONNECT CABLE TO NEGATIVE BATTERY TERMINAL
Click here
NOTICE:
When disconnecting the cable, some systems need to be initialized after the cable is reconnected.
Click here
17. INITIALIZE POWER WINDOW CONTROL SYSTEM
Click here
18. INSPECT POWER WINDOW OPERATION
Click here
 Removal
REMOVAL
CAUTION / NOTICE / HINT
The necessary procedures (adjustment, calibration, initialization, or registration)
that must be performed after parts are removed and installed, or replaced during ...

Other materials:
Toyota CH-R Service Manual > Maintenance: Fog Light Bulb
Components
COMPONENTS
ILLUSTRATION
*1
FOG LIGHT BULB
*2
FRONT FENDER LINER
Removal
REMOVAL
CAUTION / NOTICE / HINT
HINT:
Use the same procedure for the RH and LH sides.
The procedure listed below is for the LH side.
...
Toyota CH-R Service Manual > Meter / Gauge System: Operating Light Control Rheostat does not Change Light Brightness
DESCRIPTION
The illumination intensity of the combination meter is increased by turning the
knob of the light control rheostat upward, and decreased by turning the knob downward.
WIRING DIAGRAM
CAUTION / NOTICE / HINT
NOTICE:
When replacing the combination meter assembly, always replace it ...
Toyota C-HR (AX20) 2023-2026 Owner's Manual
Toyota CH-R Owners Manual
- For safety and security
- Instrument cluster
- Operation of each component
- Driving
- Interior features
- Maintenance and care
- When trouble arises
- Vehicle specifications
- For owners
Toyota CH-R Service Manual
- Introduction
- Maintenance
- Audio / Video
- Cellular Communication
- Navigation / Multi Info Display
- Park Assist / Monitoring
- Brake (front)
- Brake (rear)
- Brake Control / Dynamic Control Systems
- Brake System (other)
- Parking Brake
- Axle And Differential
- Drive Shaft / Propeller Shaft
- K114 Cvt
- 3zr-fae Battery / Charging
- Networking
- Power Distribution
- Power Assist Systems
- Steering Column
- Steering Gear / Linkage
- Alignment / Handling Diagnosis
- Front Suspension
- Rear Suspension
- Tire / Wheel
- Tire Pressure Monitoring
- Door / Hatch
- Exterior Panels / Trim
- Horn
- Lighting (ext)
- Mirror (ext)
- Window / Glass
- Wiper / Washer
- Door Lock
- Heating / Air Conditioning
- Interior Panels / Trim
- Lighting (int)
- Meter / Gauge / Display
- Mirror (int)
- Power Outlets (int)
- Pre-collision
- Seat
- Seat Belt
- Supplemental Restraint Systems
- Theft Deterrent / Keyless Entry

0.0084