Toyota CH-R Service Manual: Reassembly
REASSEMBLY
PROCEDURE
1. INSTALL NO. 1 BACK DOOR EMBLEM
Click here
.gif)
2. INSTALL NO. 2 BACK DOOR NAME PLATE
Click here
3. INSTALL NO. 1 BACK DOOR NAME PLATE
Click here
4. INSTALL BACK DOOR OUTSIDE GARNISH SEAL
HINT:
- Using the same procedure, install every back door outside garnish seal.
- When installing the back door outside garnish seal, heat the rear spoiler using a heat light.
Heating Temperature:
|
Item |
Temperature |
|---|---|
|
Back Door Outside Garnish |
20 to 30°C (68 to 86°F) |
CAUTION:
- Do not touch the heat light and heated parts, touching the heat light
may result in burns.
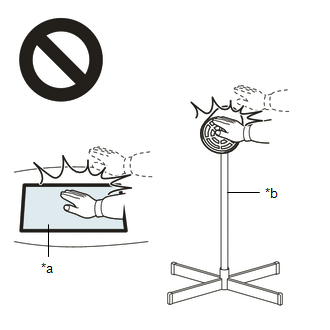
*a
Heated Part
*b
Heat Light
- Touching heated parts for a long time may result in burns.
NOTICE:
Do not heat the back door outside garnish excessively.
(a) Clean the back door outside garnish surface.
(1) Using a heat light, heat the back door outside garnish surface.
(2) Remove the double-sided tape from the back door outside garnish.
(3) Wipe off any tape adhesive residue with cleaner.
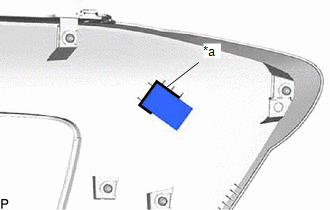
(b) Using a heat light, heat the back door outside garnish.
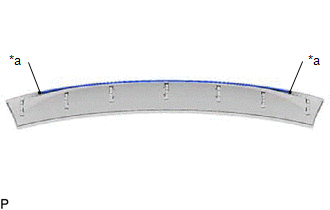
(c) Remove the release paper from a new back door outside garnish seal.
HINT:
After removing the release paper, keep the exposed adhesive free from foreign matter.
|
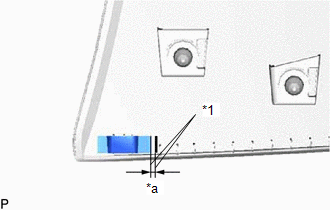
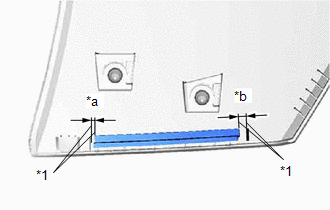
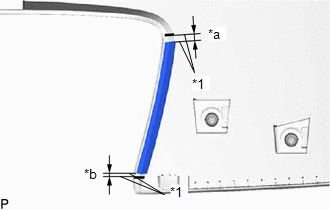
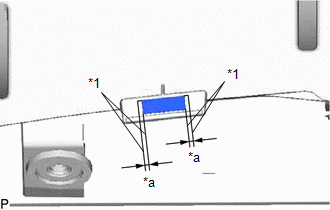
(d) Install the back door outside garnish seal as shown in the illustration. HINT: Align the back door outside garnish seal with the mark-off line of the back door outside garnish. |
|
5. INSTALL BACK DOOR GARNISH MOULDING LOWER PROTECTOR
HINT:
- Using the same procedure, install every back door garnish moulding lower protector.
- When installing the back door garnish moulding lower protector, heat the rear spoiler using a heat light.
Heating Temperature:
|
Item |
Temperature |
|---|---|
|
Back Door Outside Garnish |
20 to 30°C (68 to 86°F) |
CAUTION:
- Do not touch the heat light and heated parts, touching the heat light
may result in burns.
*a
Heated Part
*b
Heat Light
- Touching heated parts for a long time may result in burns.
NOTICE:
Do not heat the back door outside garnish excessively.
(a) Clean the back door outside garnish surface.
(1) Using a heat light, heat the back door outside garnish surface.
(2) Remove the double-sided tape from the back door outside garnish.
(3) Wipe off any tape adhesive residue with cleaner.
(b) Using a heat light, heat the back door outside garnish.
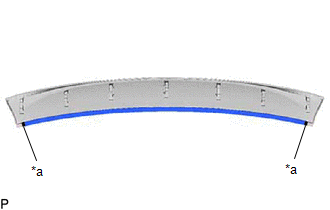
(c) Remove the release paper from a new back door garnish moulding lower protector.
HINT:
After removing the release paper, keep the exposed adhesive free from foreign matter.
|
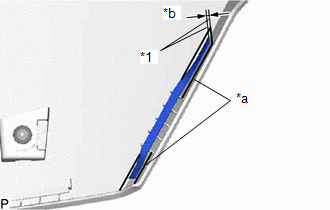
(d) Install the back door garnish moulding lower protector as shown in the illustration. HINT: Align the back door garnish moulding lower protector with the mark-off line of the back door outside garnish. |
|
6. INSTALL NO. 2 BACK DOOR OUTSIDE GARNISH PROTECTOR
HINT:
- Using the same procedure, install every No. 2 back door outside garnish protector.
- When installing the No. 2 back door outside garnish protector, heat the rear spoiler using a heat light.
Heating Temperature:
|
Item |
Temperature |
|---|---|
|
Back Door Outside Garnish |
20 to 30°C (68 to 86°F) |
CAUTION:
- Do not touch the heat light and heated parts, touching the heat light
may result in burns.
*a
Heated Part
*b
Heat Light
- Touching heated parts for a long time may result in burns.
NOTICE:
Do not heat the back door outside garnish excessively.
(a) Clean the back door outside garnish surface.
(1) Using a heat light, heat the back door outside garnish surface.
(2) Remove the double-sided tape from the back door outside garnish.
(3) Wipe off any tape adhesive residue with cleaner.
(b) Using a heat light, heat the back door outside garnish.
(c) Remove the release paper from a new No. 2 back door outside garnish protector.
HINT:
After removing the release paper, keep the exposed adhesive free from foreign matter.
|
(d) Install the No. 2 back door outside garnish protector as shown in the illustration. HINT: Align the No. 2 back door outside garnish protector with the mark-off line of the back door outside garnish. |
|
7. INSTALL BACK DOOR OUTSIDE GARNISH PAD
HINT:
- Using the same procedure, install every back door outside garnish pad.
- When installing the back door outside garnish pad, heat the rear spoiler using a heat light.
Heating Temperature:
|
Item |
Temperature |
|---|---|
|
Back Door Outside Garnish |
20 to 30°C (68 to 86°F) |
CAUTION:
- Do not touch the heat light and heated parts, touching the heat light
may result in burns.
*a
Heated Part
*b
Heat Light
- Touching heated parts for a long time may result in burns.
NOTICE:
Do not heat the back door outside garnish excessively.
(a) Clean the back door outside garnish surface.
(1) Using a heat light, heat the back door outside garnish surface.
(2) Remove the double-sided tape from the back door outside garnish.
(3) Wipe off any tape adhesive residue with cleaner.
(b) Using a heat light, heat the back door outside garnish.
(c) Remove the release paper from a new back door outside garnish pad.
HINT:
After removing the release paper, keep the exposed adhesive free from foreign matter.
|
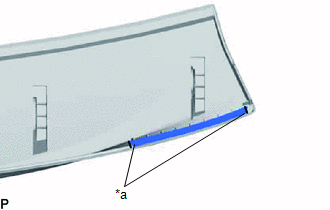
(d) Install the back door outside garnish pad as shown in the illustration. HINT: Install each back door outside garnish pad along the line on the back door outside garnish. |
|
8. INSTALL NO. 1 BACK DOOR OUTSIDE GARNISH PROTECTOR
HINT:
- Using the same procedure, install every No. 1 back door outside garnish protector.
- When installing the No. 1 back door outside garnish protector, heat the rear spoiler using a heat light.
Heating Temperature:
|
Item |
Temperature |
|---|---|
|
Back Door Outside Garnish |
20 to 30°C (68 to 86°F) |
CAUTION:
- Do not touch the heat light and heated parts, touching the heat light
may result in burns.
*a
Heated Part
*b
Heat Light
- Touching heated parts for a long time may result in burns.
NOTICE:
Do not heat the back door outside garnish excessively.
(a) Clean the back door outside garnish surface.
(1) Using a heat light, heat the back door outside garnish surface.
(2) Remove the double-sided tape from the back door outside garnish.
(3) Wipe off any tape adhesive residue with cleaner.
(b) Using a heat light, heat the back door outside garnish.
(c) Remove the release paper from a new No. 1 back door outside garnish protector.
HINT:
After removing the release paper, keep the exposed adhesive free from foreign matter.
|
(d) Install the No. 1 back door outside garnish protector as shown in the illustration. HINT: Align the No. 1 back door outside garnish protector with the mark-off line of the back door outside garnish. |
|
9. INSTALL BACK DOOR GARNISH MOULDING PROTECTOR LH
HINT:
When installing the back door garnish moulding protector LH, heat the back door outside garnish and No. 2 back door outside garnish using a heat light.
Heating Temperature:
|
Item |
Temperature |
|---|---|
|
Back Door Outside Garnish and No. 2 Back Door Outside Garnish |
20 to 30°C (68 to 86°F) |
CAUTION:
- Do not touch the heat light and heated parts, touching the heat light
may result in burns.
*a
Heated Part
*b
Heat Light
- Touching heated parts for a long time may result in burns.
NOTICE:
Do not heat the back door outside garnish and No. 2 back door outside garnish excessively.
(a) for Back Door Outside Garnish Side:
(1) Clean the back door outside garnish surface.
- Using a heat light, heat the back door outside garnish surface.
- Remove the double-sided tape from the back door outside garnish.
- Wipe off any tape adhesive residue with cleaner.
(2) Using a heat light, heat the back door outside garnish.
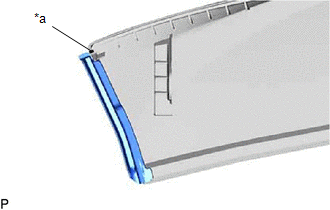
(3) Remove the release paper from a new back door garnish moulding protector LH.
HINT:
After removing the release paper, keep the exposed adhesive free from foreign matter.
|
(4) Install the back door garnish moulding protector LH as shown in the illustration. HINT: Align the back door garnish moulding protector LH with the mark-off line of the back door outside garnish |
|
(b) for No. 2 Back Door Outside Garnish Side:
(1) Clean the No. 2 back door outside garnish surface.
- Using a heat light, heat the No. 2 back door outside garnish surface.
- Remove the double-sided tape from the No. 2 back door outside garnish.
- Wipe off any tape adhesive residue with cleaner.
(2) Using a heat light, heat the No. 2 back door outside garnish.
(3) Remove the release paper from a new back door garnish moulding protector LH.
HINT:
After removing the release paper, keep the exposed adhesive free from foreign matter.
|
(4) Install the back door garnish moulding protector LH as shown in the illustration. HINT: Install each back door garnish moulding protector LH along the line on the No. 2 back door outside garnish. |
|
10. INSTALL BACK DOOR GARNISH MOULDING PROTECTOR RH
HINT:
Use the same procedure as for the LH side.
11. INSTALL BACK DOOR GARNISH MOULDING UPPER PROTECTOR
HINT:
When installing the back door garnish moulding upper protector, heat the No. 2 back door outside garnish using a heat light.
Heating Temperature:
|
Item |
Temperature |
|---|---|
|
No. 2 Back Door Outside Garnish |
20 to 30°C (68 to 86°F) |
CAUTION:
- Do not touch the heat light and heated parts, touching the heat light
may result in burns.
*a
Heated Part
*b
Heat Light
- Touching heated parts for a long time may result in burns.
NOTICE:
Do not heat the No. 2 back door outside garnish excessively.
(a) Clean the No. 2 back door outside garnish surface.
(1) Using a heat light, heat the No. 2 back door outside garnish surface.
(2) Remove the double-sided tape from the No. 2 back door outside garnish.
(3) Wipe off any tape adhesive residue with cleaner.
(b) Using a heat light, heat the No. 2 back door outside garnish.
(c) Remove the release paper from a new back door garnish moulding upper protector.
HINT:
After removing the release paper, keep the exposed adhesive free from foreign matter.
|
(d) Install the back door garnish moulding upper protector as shown in the illustration. HINT: Install each back door garnish moulding upper protector along the line on the back door outside garnish. |
|
12. INSTALL BACK DOOR OUTSIDE GARNISH PROTECTOR
HINT:
When installing the back door outside moulding protector, heat the No. 2 back door outside garnish using a heat light.
Heating Temperature:
|
Item |
Temperature |
|---|---|
|
No. 2 Back Door Outside Garnish |
20 to 30°C (68 to 86°F) |
CAUTION:
- Do not touch the heat light and heated parts, touching the heat light
may result in burns.
*a
Heated Part
*b
Heat Light
- Touching heated parts for a long time may result in burns.
NOTICE:
Do not heat the No. 2 back door outside garnish excessively.
(a) Clean the No. 2 back door outside garnish surface.
(1) Using a heat light, heat the No. 2 back door outside garnish surface.
(2) Remove the double-sided tape from the No. 2 back door outside garnish.
(3) Wipe off any tape adhesive residue with cleaner.
(b) Using a heat light, heat the No. 2 back door outside garnish.
(c) Remove the release paper from a new back door outside garnish protector.
HINT:
After removing the release paper, keep the exposed adhesive free from foreign matter.
|
(d) Install the back door outside garnish protector as shown in the illustration. HINT: Install eachback door outside garnish protector along the line on the back door outside garnish. |
|
13. INSTALL BACK DOOR GARNISH SIDE PROTECTOR LH
HINT:
When installing the back door garnish side protector LH, heat the No. 2 back door outside garnish using a heat light.
Heating Temperature:
|
Item |
Temperature |
|---|---|
|
Back Door Outside Garnish |
20 to 30°C (68 to 86°F) |
CAUTION:
- Do not touch the heat light and heated parts, touching the heat light
may result in burns.
*a
Heated Part
*b
Heat Light
- Touching heated parts for a long time may result in burns.
NOTICE:
Do not heat the No. 2 back door outside garnish excessively.
(a) Clean the No. 2 back door outside garnish surface.
(1) Using a heat light, heat the No. 2 back door outside garnish surface.
(2) Remove the double-sided tape from the No. 2 back door outside garnish.
(3) Wipe off any tape adhesive residue with cleaner.
(b) Using a heat light, heat the No. 2 back door outside garnish.
(c) Remove the release paper from a new back door garnish side protector LH.
HINT:
After removing the release paper, keep the exposed adhesive free from foreign matter.
|
(d) Install the back door garnish side protector LH as shown in the illustration. HINT: Install each back door garnish side protector LH along the line on the No. 2 back door outside garnish. |
|
14. INSTALL BACK DOOR GARNISH SIDE PROTECTOR RH
HINT:
Use the same procedure as for the LH side.
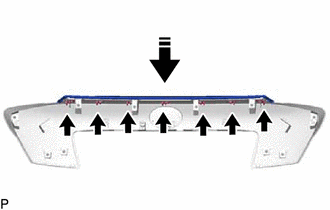
15. INSTALL NO. 2 BACK DOOR OUTSIDE GARNISH
(a) Install the No. 2 back door outside garnish and 7 No. 1 outside moulding retainers as shown in the illustration.
.png) |
Install in this Direction |
 Disassembly
DISASSEMBLY
PROCEDURE
1. REMOVE NO. 2 BACK DOOR OUTSIDE GARNISH
(a) Remove the 7 No. 1 outside moulding retainers and No. 2 back door outside
garnish as shown in the illustration.
...
 Installation
INSTALLATION
PROCEDURE
1. INSTALL NO. 2 BACK DOOR GARNISH RETAINER
(a) Engage the claws to install the No. 2 back door garnish retainer as shown
in the illustration.
Instal ...
Other materials:
Toyota CH-R Service Manual > Roof Headlining: Components
COMPONENTS
ILLUSTRATION
*A
w/ Package Tray Trim
*B
w/ Tonneau Cover
*1
PACKAGE TRAY TRIM PANEL ASSEMBLY
*2
TONNEAU COVER ASSEMBLY
ILLUSTRATION
*A
for Type A
...
Toyota CH-R Service Manual > Rear Brake(for Tmmt Made): Inspection
INSPECTION
PROCEDURE
1. INSPECT PAD LINING THICKNESS
(a) Using a ruler, measure the rear disc brake pad lining thickness.
Standard Thickness:
9.5 mm (0.374 in.)
Minimum Thickness:
1.0 mm (0.0394 in.)
If a rear disc brake pad lining thickness is less than the minimum th ...
Toyota C-HR (AX20) 2023-2026 Owner's Manual
Toyota CH-R Owners Manual
- For safety and security
- Instrument cluster
- Operation of each component
- Driving
- Interior features
- Maintenance and care
- When trouble arises
- Vehicle specifications
- For owners
Toyota CH-R Service Manual
- Introduction
- Maintenance
- Audio / Video
- Cellular Communication
- Navigation / Multi Info Display
- Park Assist / Monitoring
- Brake (front)
- Brake (rear)
- Brake Control / Dynamic Control Systems
- Brake System (other)
- Parking Brake
- Axle And Differential
- Drive Shaft / Propeller Shaft
- K114 Cvt
- 3zr-fae Battery / Charging
- Networking
- Power Distribution
- Power Assist Systems
- Steering Column
- Steering Gear / Linkage
- Alignment / Handling Diagnosis
- Front Suspension
- Rear Suspension
- Tire / Wheel
- Tire Pressure Monitoring
- Door / Hatch
- Exterior Panels / Trim
- Horn
- Lighting (ext)
- Mirror (ext)
- Window / Glass
- Wiper / Washer
- Door Lock
- Heating / Air Conditioning
- Interior Panels / Trim
- Lighting (int)
- Meter / Gauge / Display
- Mirror (int)
- Power Outlets (int)
- Pre-collision
- Seat
- Seat Belt
- Supplemental Restraint Systems
- Theft Deterrent / Keyless Entry

0.0081