Toyota CH-R Service Manual: Components
COMPONENTS
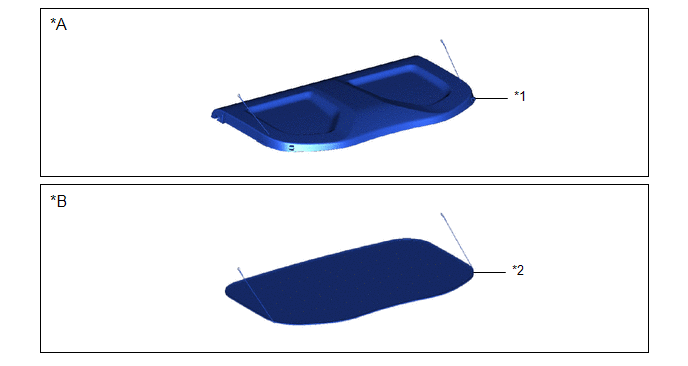
ILLUSTRATION
|
*A |
w/ Package Tray Trim |
*B |
w/ Tonneau Cover |
|
*1 |
PACKAGE TRAY TRIM PANEL ASSEMBLY |
*2 |
TONNEAU COVER ASSEMBLY |
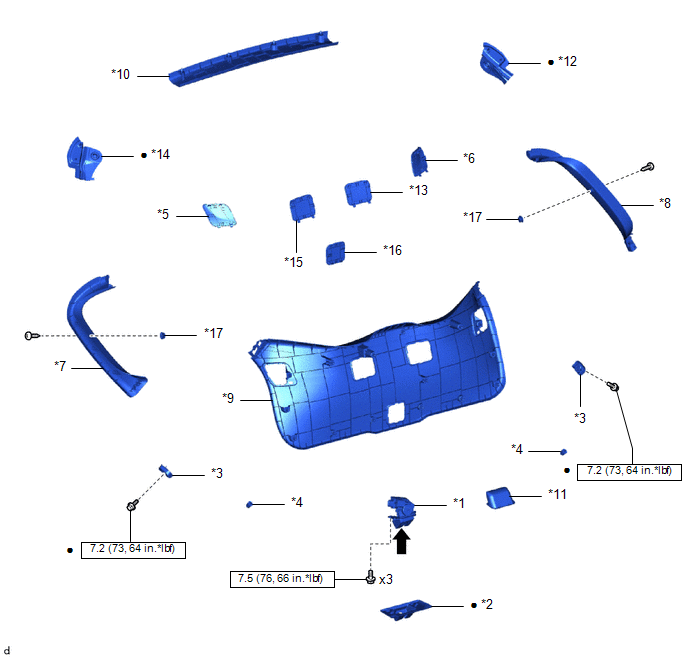
ILLUSTRATION
|
*1 |
BACK DOOR LOCK ASSEMBLY |
*2 |
BACK DOOR LOCK COVER |
|
*3 |
BACK DOOR LOWER STOPPER |
*4 |
BACK DOOR PANEL CUSHION |
|
*5 |
BACK DOOR SERVICE HOLE COVER LH |
*6 |
BACK DOOR SERVICE HOLE COVER RH |
|
*7 |
BACK DOOR SIDE GARNISH LH |
*8 |
BACK DOOR SIDE GARNISH RH |
|
*9 |
BACK DOOR TRIM PANEL ASSEMBLY |
*10 |
BACK DOOR TRIM UPPER PANEL ASSEMBLY |
|
*11 |
DOOR PULL HANDLE |
*12 |
NO. 1 BACK DOOR PANEL PROTECTOR |
|
*13 |
NO. 1 BACK DOOR SERVICE HOLE COVER |
*14 |
NO. 2 BACK DOOR PANEL PROTECTOR |
|
*15 |
NO. 2 BACK DOOR SERVICE HOLE COVER |
*16 |
NO. 3 BACK DOOR SERVICE HOLE COVER |
|
*17 |
PACKAGE TRAY TRIM GARNISH HOOK |
- |
- |
.png) |
N*m (kgf*cm, ft.*lbf): Specified torque |
● |
Non-reusable part |
.png) |
MP grease |
- |
- |
ILLUSTRATION
|
*A |
w/ Rear View Monitor System |
*B |
w/o Rear View Monitor System |
|
*C |
w/ Brand Mark |
- |
- |
|
*1 |
BACK DOOR OPENER SWITCH ASSEMBLY |
*2 |
BACK DOOR OUTSIDE GARNISH |
|
*3 |
LICENSE PLATE LIGHT ASSEMBLY |
*4 |
NO. 1 BACK DOOR EMBLEM |
|
*5 |
NO. 1 BACK DOOR NAME PLATE |
*6 |
NO. 2 BACK DOOR GARNISH RETAINER |
|
*7 |
NO. 2 BACK DOOR NAME PLATE |
*8 |
REAR TELEVISION CAMERA ASSEMBLY |
|
*9 |
REAR WIPER ARM AND BLADE ASSEMBLY |
*10 |
REAR WIPER MOTOR ASSEMBLY |
|
*11 |
REAR WIPER MOTOR GROMMET |
*12 |
REAR WIPER ARM HEAD CAP |
|
|
N*m (kgf*cm, ft.*lbf): Specified torque |
● |
Non-reusable part |
|
|
MP grease |
- |
- |
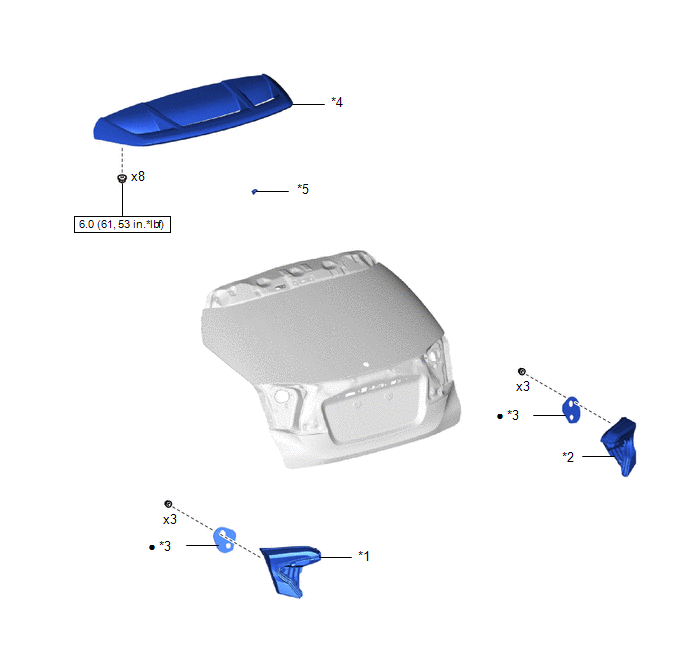
ILLUSTRATION
|
*1 |
REAR LIGHT ASSEMBLY LH |
*2 |
REAR LIGHT ASSEMBLY RH |
|
*3 |
REAR LIGHT PACKING |
*4 |
REAR SPOILER ASSEMBLY |
|
*5 |
REAR WASHER NOZZLE |
- |
- |
|
|
N*m (kgf*cm, ft.*lbf): Specified torque |
● |
Non-reusable part |
 Back Door
...
 Disassembly
DISASSEMBLY
PROCEDURE
1. REMOVE PACKAGE TRAY TRIM PANEL ASSEMBLY (w/ Package Tray Trim)
Click here
2. REMOVE TONNEAU COVER ASSEMBLY (w/ Tonneau Cover)
Click here
3. REMOVE BACK DOOR TRIM ...
Other materials:
Toyota CH-R Service Manual > Air Conditioning System(for Automatic Air Conditioning System With Side-mounted
Air Conditioner Pressure Sensor): Pressure Sensor Circuit (B1423)
DESCRIPTION
This DTC is stored if refrigerant pressure on the high pressure side is extremely
low (195 kPa (2.0 kgf/cm2, 28 psi) or less) or extremely high (2812 kPa (28.7 kgf/cm2,
408 psi) or more). The air conditioner pressure (2 words) sensor, which is installed
to the high pressure side p ...
Toyota CH-R Service Manual > Rear Brake(for Tmmt Made): Inspection
INSPECTION
PROCEDURE
1. INSPECT PAD LINING THICKNESS
(a) Using a ruler, measure the rear disc brake pad lining thickness.
Standard Thickness:
9.5 mm (0.374 in.)
Minimum Thickness:
1.0 mm (0.0394 in.)
If a rear disc brake pad lining thickness is less than the minimum th ...
Toyota C-HR (AX20) 2023-2026 Owner's Manual
Toyota CH-R Owners Manual
- For safety and security
- Instrument cluster
- Operation of each component
- Driving
- Interior features
- Maintenance and care
- When trouble arises
- Vehicle specifications
- For owners
Toyota CH-R Service Manual
- Introduction
- Maintenance
- Audio / Video
- Cellular Communication
- Navigation / Multi Info Display
- Park Assist / Monitoring
- Brake (front)
- Brake (rear)
- Brake Control / Dynamic Control Systems
- Brake System (other)
- Parking Brake
- Axle And Differential
- Drive Shaft / Propeller Shaft
- K114 Cvt
- 3zr-fae Battery / Charging
- Networking
- Power Distribution
- Power Assist Systems
- Steering Column
- Steering Gear / Linkage
- Alignment / Handling Diagnosis
- Front Suspension
- Rear Suspension
- Tire / Wheel
- Tire Pressure Monitoring
- Door / Hatch
- Exterior Panels / Trim
- Horn
- Lighting (ext)
- Mirror (ext)
- Window / Glass
- Wiper / Washer
- Door Lock
- Heating / Air Conditioning
- Interior Panels / Trim
- Lighting (int)
- Meter / Gauge / Display
- Mirror (int)
- Power Outlets (int)
- Pre-collision
- Seat
- Seat Belt
- Supplemental Restraint Systems
- Theft Deterrent / Keyless Entry

0.0076