Toyota CH-R Service Manual: Dtc Check / Clear
DTC CHECK / CLEAR
CHECK DTC (for TIRE PRESSURE WARNING ECU AND RECEIVER) (USING Techstream)
(a) Turn the ignition switch off.
(b) Connect the Techstream to the DLC3.
(c) Turn the ignition switch to ON.
(d) Turn the Techstream on.
(e) Enter the following menus: Chassis / Tire Pressure Monitor / Trouble Codes.
Chassis > Tire Pressure Monitor > Trouble Codes(f) Read the DTCs.
CHECK DTC (for MAIN BODY ECU (MULTIPLEX NETWORK BODY ECU))
(a) Turn the ignition switch off.
(b) Connect the Techstream to the DLC3.
(c) Turn the ignition switch to ON.
(d) Turn the Techstream on.
(e) Enter the following menus: Body Electrical / Main Body / Trouble Codes.
Body Electrical > Main Body > Trouble Codes(f) Read the DTCs.
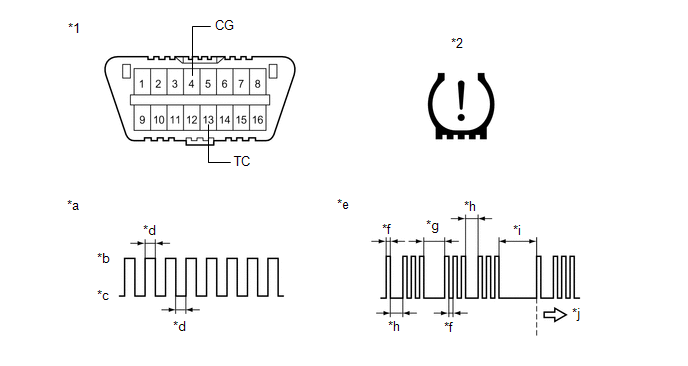
CHECK DTC (for TIRE PRESSURE WARNING ECU AND RECEIVER) (USING SST CHECK WIRE)
(a) Turn the ignition switch off.

|
*1 |
DLC3 |
*2 |
Tire Pressure Warning Light |
|
*a |
Normal System Code |
*b |
ON |
|
*c |
OFF |
*d |
0.25 sec. |
|
*e |
Code 13 and 33 |
*f |
0.5 sec. |
|
*g |
2.5 sec. |
*h |
1.5 sec. |
|
*i |
4.5 sec. |
*j |
Repeat |
(b) Using SST, connect terminals 13 (TC) and 4 (CG) of the DLC3.
SST: 09843-18040
(c) Turn the ignition switch to ON.
(d) Read and record any DTCs indicated by the tire pressure warning light on the combination meter assembly. Refer to the illustration for examples of a normal system code and codes 13 and 33.
HINT:
- If the tire pressure warning light does not indicate any DTCs or the
normal system code, inspect the tire pressure warning light circuit or TC
and CG terminal circuit.
Trouble Area
Link
Tire pressure warning light circuit
.gif)
TC and CG terminal circuit
.gif)
- If 2 or more malfunctions are indicated at the same time, the lowest numbered DTC is displayed first.
(e) Refer to Diagnostic Trouble Code Chart for DTC information.
Click here
.gif)
(f) After completing the check, turn the ignition switch off and remove SST from the DLC3.
CLEAR DTC (for TIRE PRESSURE WARNING ECU AND RECEIVER)
HINT:
After repairing the malfunctions, clear the DTCs.
(a) Turn the ignition switch off.
(b) Connect the Techstream to the DLC3.
(c) Turn the ignition switch to ON.
(d) Turn the Techstream on.
(e) Enter the following menus: Chassis / Tire Pressure Monitor / Trouble Codes.
Chassis > Tire Pressure Monitor > Clear DTCs(f) Clear the DTCs following the prompts on the Techstream screen.
HINT:
Refer to the Techstream operator's manual for further details.
CLEAR DTC (for MAIN BODY ECU (MULTIPLEX NETWORK BODY ECU))
HINT:
After repairing the malfunctions, clear the DTCs.
(a) Turn the ignition switch off.
(b) Connect the Techstream to the DLC3.
(c) Turn the ignition switch to ON.
(d) Turn the Techstream on.
(e) Enter the following menus: Body Electrical / Main Body / Trouble Codes.
Body Electrical > Main Body > Clear DTCs(f) Clear the DTCs following the prompts on the Techstream screen.
HINT:
Refer to the Techstream operator's manual for further details.
 Diagnosis System
DIAGNOSIS SYSTEM
CHECK WARNING LIGHT
NOTICE:
When there is a problem with the tire pressure warning system, the tire
pressure warning light blinks at 0.5 second intervals, and illuminat ...
 Fail-safe Chart
FAIL-SAFE CHART
FAIL-SAFE FUNCTION
(a) When a malfunction occurs in the tire pressure warning system, the tire pressure
warning light illuminates after blinking for 1 minute to inform the driver o ...
Other materials:
Toyota CH-R Service Manual > Headlight Assembly(for Led Headlight): Repair
REPAIR
CAUTION / NOTICE / HINT
HINT:
Use the same procedure for the RH side and LH side.
The following procedure is for the LH side.
If the installation area of the headlight assembly is damaged, use a
supply retainer for a low-cost repair.
Ensure that the headlight assemb ...
Toyota CH-R Service Manual > 3zr-fae Oil And Oil Filter: Components
COMPONENTS
ILLUSTRATION
*A
for Oil Filter Sub-assembly Type
*B
for Oil Filter Element Kit Type
*1
CENTER NO. 4 ENGINE UNDER COVER
*2
OIL FILTER CAP ASSEMBLY
*3
OIL FILLER CAP ...
Toyota C-HR (AX20) 2023-2026 Owner's Manual
Toyota CH-R Owners Manual
- For safety and security
- Instrument cluster
- Operation of each component
- Driving
- Interior features
- Maintenance and care
- When trouble arises
- Vehicle specifications
- For owners
Toyota CH-R Service Manual
- Introduction
- Maintenance
- Audio / Video
- Cellular Communication
- Navigation / Multi Info Display
- Park Assist / Monitoring
- Brake (front)
- Brake (rear)
- Brake Control / Dynamic Control Systems
- Brake System (other)
- Parking Brake
- Axle And Differential
- Drive Shaft / Propeller Shaft
- K114 Cvt
- 3zr-fae Battery / Charging
- Networking
- Power Distribution
- Power Assist Systems
- Steering Column
- Steering Gear / Linkage
- Alignment / Handling Diagnosis
- Front Suspension
- Rear Suspension
- Tire / Wheel
- Tire Pressure Monitoring
- Door / Hatch
- Exterior Panels / Trim
- Horn
- Lighting (ext)
- Mirror (ext)
- Window / Glass
- Wiper / Washer
- Door Lock
- Heating / Air Conditioning
- Interior Panels / Trim
- Lighting (int)
- Meter / Gauge / Display
- Mirror (int)
- Power Outlets (int)
- Pre-collision
- Seat
- Seat Belt
- Supplemental Restraint Systems
- Theft Deterrent / Keyless Entry
0.0098
