
Toyota CH-R Service Manual: Parts Location
PARTS LOCATION
ILLUSTRATION
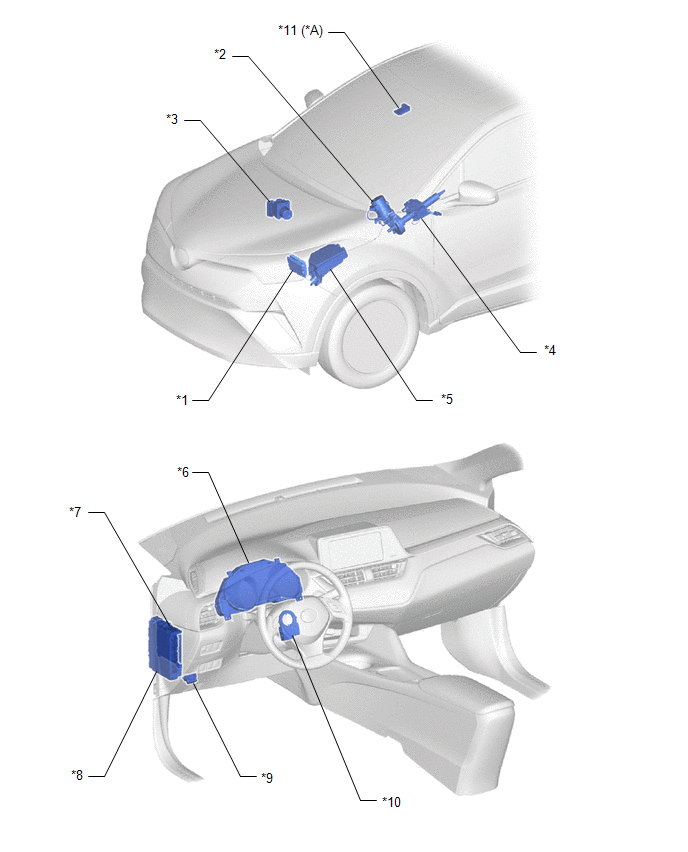
|
*A |
w/ Toyota Safety Sense P |
- |
- |
|
*1 |
ECM |
*2 |
POWER STEERING ECU ASSEMBLY - POWER STEERING MOTOR |
|
*3 |
BRAKE ACTUATOR ASSEMBLY - SKID CONTROL ECU |
*4 |
ELECTRIC POWER STEERING COLUMN SUB-ASSEMBLY - TORQUE SENSOR |
|
*5 |
NO. 1 ENGINE ROOM RELAY BLOCK - EPS FUSE |
*6 |
COMBINATION METER ASSEMBLY |
|
*7 |
MAIN BODY ECU (MULTIPLEX NETWORK BODY ECU) |
*8 |
INSTRUMENT PANEL JUNCTION BLOCK ASSEMBLY - EPS-IG1 FUSE |
|
*9 |
DLC3 |
*10 |
STEERING SENSOR |
|
*11 |
FORWARD RECOGNITION CAMERA |
- |
- |
 Precaution
PRECAUTION
IGNITION SWITCH EXPRESSION
HINT:
The type of ignition switch used on this model differs according to the specifications
of the vehicle. The expressions listed in the table below are us ...
 System Diagram
SYSTEM DIAGRAM
...
Other materials:
Toyota CH-R Service Manual > Power Window Control System: Operation Check
OPERATION CHECK
CHECK WINDOW LOCK FUNCTION
HINT:
Before performing the window lock switch operation check, make sure that the
window lock switch is off (the switch is not pushed in).
(a) Turn the window lock switch of the multiplex network master switch assembly
on (pushed in) and check th ...
Toyota CH-R Service Manual > Pre-collision System: Freeze Frame Data
FREEZE FRAME DATA
DESCRIPTION
(a) When a pre-collision system DTC is stored, the millimeter wave radar sensor
assembly stores the current vehicle (ECU or sensor) state as Freeze Frame Data.
CHECK FREEZE FRAME DATA
(a) Connect the Techstream to the DLC3.
(b) Turn the ignition switch to ON.
(c ...
Toyota C-HR (AX20) 2023-2026 Owner's Manual
Toyota CH-R Owners Manual
- For safety and security
- Instrument cluster
- Operation of each component
- Driving
- Interior features
- Maintenance and care
- When trouble arises
- Vehicle specifications
- For owners
Toyota CH-R Service Manual
- Introduction
- Maintenance
- Audio / Video
- Cellular Communication
- Navigation / Multi Info Display
- Park Assist / Monitoring
- Brake (front)
- Brake (rear)
- Brake Control / Dynamic Control Systems
- Brake System (other)
- Parking Brake
- Axle And Differential
- Drive Shaft / Propeller Shaft
- K114 Cvt
- 3zr-fae Battery / Charging
- Networking
- Power Distribution
- Power Assist Systems
- Steering Column
- Steering Gear / Linkage
- Alignment / Handling Diagnosis
- Front Suspension
- Rear Suspension
- Tire / Wheel
- Tire Pressure Monitoring
- Door / Hatch
- Exterior Panels / Trim
- Horn
- Lighting (ext)
- Mirror (ext)
- Window / Glass
- Wiper / Washer
- Door Lock
- Heating / Air Conditioning
- Interior Panels / Trim
- Lighting (int)
- Meter / Gauge / Display
- Mirror (int)
- Power Outlets (int)
- Pre-collision
- Seat
- Seat Belt
- Supplemental Restraint Systems
- Theft Deterrent / Keyless Entry

0.0072