Toyota CH-R Service Manual: Bleeding
BLEEDING
CAUTION / NOTICE / HINT
NOTICE:
- Move the shift lever to P and apply the parking brake before bleeding the brakes.
- Add brake fluid to keep the level between the MIN and MAX lines of the reservoir while bleeding the brakes.
- If brake fluid leaks onto any painted surface, immediately wash it off.
- Do not operate the brake actuator assembly while air is in the brake system or in the brake master cylinder sub-assembly. Doing so may cause air to enter the brake actuator assembly.
- If bleeding the brake actuator assembly is difficult due to air in the brake actuator assembly, replace it with a new one.
- When bleeding air, select the suitable procedure listed below.
Replaced/Installed Item
Work Procedure
Flexible hose (front/rear)
Bleed brake line
Disc brake cylinder assembly (front)
Brake actuator assembly
Brake master cylinder sub-assembly
Brake master cylinder reservoir sub-assembly
Brake booster assembly
Disc brake cylinder assembly (rear)
Bleed rear disc brake cylinder assembly
HINT:
If any work is performed on the brake system or if air in the brake tubes is suspected, bleed the air from the brake system.
PROCEDURE
1. FILL RESERVOIR WITH BRAKE FLUID
Click here
.gif)
2. BLEED BRAKE MASTER CYLINDER SUB-ASSEMBLY
NOTICE:
- To prevent brake fluid from damaging painted surfaces, cover any surrounding parts with a piece of cloth.
- Be sure to clean your hands before bleeding the master cylinder to avoid any potential contamination of the brake system. Contamination, for example by dirt particles or mineral oil, could lead to functional brake problems.
HINT:
If the brake master cylinder sub-assembly is reinstalled or runs out of brake fluid, bleed the brake master cylinder sub-assembly.
|
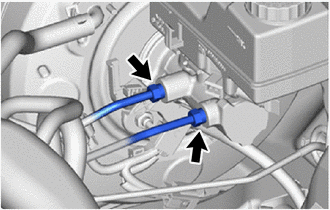
(a) Using a union nut wrench, disconnect the 2 brake tubes from the brake master cylinder sub-assembly. NOTICE:
|
|
|
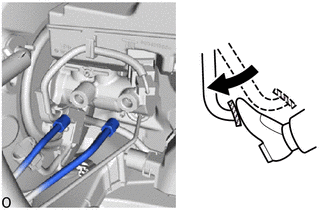
(b) Slowly depress the brake pedal and hold it.*1 |
|
|
(c) Cover the 2 outer holes with fingers and release the brake pedal.*2 |
|
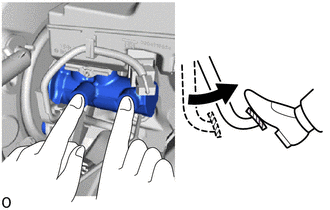
(d) Repeat steps *1 and *2, 3 or 4 times.
|
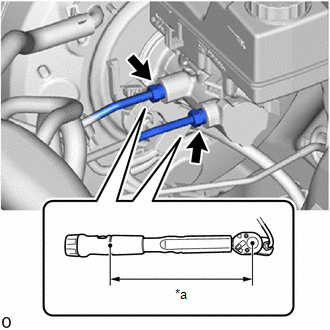
(e) Using a union nut wrench, connect the 2 brake tubes to the brake master cylinder sub-assembly. Torque: Specified tightening torque : 19.5 N·m {199 kgf·cm, 14 ft·lbf} NOTICE:
HINT:
|
|
3. BLEED BRAKE LINE
Click here
4. BLEED REAR DISC BRAKE CYLINDER ASSEMBLY
- for TMC Made:
Click here
- for TMMT Made:
Click here
5. INSPECT FOR BRAKE FLUID LEAK
6. INSPECT BRAKE FLUID LEVEL IN RESERVOIR
Click here
 On-vehicle Inspection
ON-VEHICLE INSPECTION
PROCEDURE
1. INSPECT BRAKE FLUID LEVEL IN RESERVOIR
(a) Check the fluid level.
If brake fluid level is lower than the MIN line, check for leaks and
inspect t ...
 Brake Line
Precaution
PRECAUTION
TROUBLESHOOTING PRECAUTION
NOTICE:
Since the brake lines are critical safety related parts, be sure to
disassemble and inspect the components if a brake fluid l ...
Other materials:
Toyota CH-R Service Manual > Rear Console Box: Disassembly
DISASSEMBLY
PROCEDURE
1. REMOVE NO. 1 POWER OUTLET SOCKET ASSEMBLY
Click here
2. REMOVE NO. 1 POWER OUTLET SOCKET COVER
Click here
3. REMOVE CONSOLE REAR END PANEL
(a) Using a moulding remover A, disengage the clips to remove the console rear
end panel as shown in the illustration.
...
Toyota CH-R Service Manual > Front Seat Outer Belt Assembly: Precaution
PRECAUTION
CAUTION:
Replace any faulty parts of the seat belt systems (outer belt, inner belt, bolts,
nuts, adjustable shoulder anchor, tether anchor hardware and other related parts).
When inspecting a vehicle that has been involved in a collision, be sure to check
all of the seat belt syst ...
Toyota C-HR (AX20) 2023-2026 Owner's Manual
Toyota CH-R Owners Manual
- For safety and security
- Instrument cluster
- Operation of each component
- Driving
- Interior features
- Maintenance and care
- When trouble arises
- Vehicle specifications
- For owners
Toyota CH-R Service Manual
- Introduction
- Maintenance
- Audio / Video
- Cellular Communication
- Navigation / Multi Info Display
- Park Assist / Monitoring
- Brake (front)
- Brake (rear)
- Brake Control / Dynamic Control Systems
- Brake System (other)
- Parking Brake
- Axle And Differential
- Drive Shaft / Propeller Shaft
- K114 Cvt
- 3zr-fae Battery / Charging
- Networking
- Power Distribution
- Power Assist Systems
- Steering Column
- Steering Gear / Linkage
- Alignment / Handling Diagnosis
- Front Suspension
- Rear Suspension
- Tire / Wheel
- Tire Pressure Monitoring
- Door / Hatch
- Exterior Panels / Trim
- Horn
- Lighting (ext)
- Mirror (ext)
- Window / Glass
- Wiper / Washer
- Door Lock
- Heating / Air Conditioning
- Interior Panels / Trim
- Lighting (int)
- Meter / Gauge / Display
- Mirror (int)
- Power Outlets (int)
- Pre-collision
- Seat
- Seat Belt
- Supplemental Restraint Systems
- Theft Deterrent / Keyless Entry

0.0075