
Toyota CH-R Service Manual: Airbag Signal Malfunction/Not Input (B15C4)
DESCRIPTION
If the DCM (Telematics Transceiver) detects an error in communication between the DCM (Telematics Transceiver) and the airbag sensor assembly as a result of the DCM (Telematics Transceiver) self check, this DTC will be set.
|
DTC No. |
Detection Item |
DTC Detection Condition |
Trouble Area |
|---|---|---|---|
|
B15C4 |
Airbag Signal Malfunction/Not Input |
DCM (Telematics Transceiver) detects an error in signals from airbag sensor assembly when ignition switch is ON. |
|
WIRING DIAGRAM
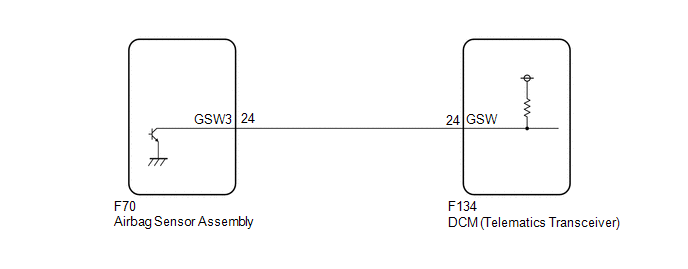
CAUTION / NOTICE / HINT
NOTICE:
The vehicle is equipped with an SRS (Supplemental Restraint System) which includes components such as airbags. Before servicing (including removal or installation of parts), be sure to read the Precaution in the SRS.
Click here
.gif)
PROCEDURE
|
1. |
CHECK DTC (AIRBAG SYSTEM) |
(a) Turn the ignition switch off.
(b) Connect the Techstream to the DLC3.
(c) Turn the ignition switch ON and wait for 10 seconds.
(d) Turn the Techstream on.
(e) Clear the DTCs.
Body Electrical > SRS Airbag > Clear DTCs(f) Recheck for DTCs.
Body Electrical > SRS Airbag > Trouble Codes|
Result |
Proceed to |
|---|---|
|
DTCs are not output |
A |
|
DTCs are output |
B |
| B | .gif) |
GO TO AIRBAG SYSTEM |
|
.gif)
|
2. |
INSPECT DCM (TELEMATICS TRANSCEIVER) (GSW SIGNAL) |
|
(a) Remove the DCM (Telematics Transceiver) but do not disconnect the connectors. Click here
|
|
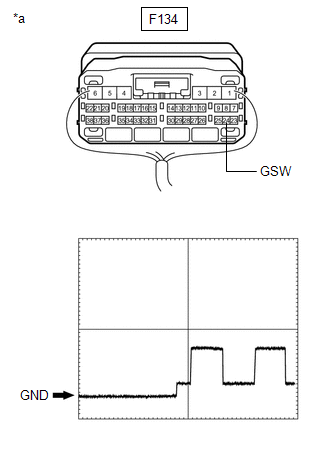
(b) Measure the voltage according to the value(s) in the table below.
Standard Voltage:
|
Tester Connection |
Switch Condition |
Specified Condition |
|---|---|---|
|
F134-24 (GSW) - Body ground |
Ignition switch ON |
6.5 to 8.5 V |
Reference Waveform:
|
Item |
Condition |
|---|---|
|
Tester connection |
F134-24 (GSW) - Body ground |
|
Tool setting |
5.0 V/DIV., 20 ms/DIV. |
|
Vehicle condition |
Ignition switch ON |
|
Result |
Proceed to |
|---|---|
|
8.5 V or higher |
A |
|
Below 6.5 V |
B |
|
6.5 to 8.5 V |
C |
| B | |
GO TO STEP 4 |
| C | |
GO TO STEP 5 |
|
|
3. |
CHECK HARNESS AND CONNECTOR (FOR OPEN CIRCUIT) |
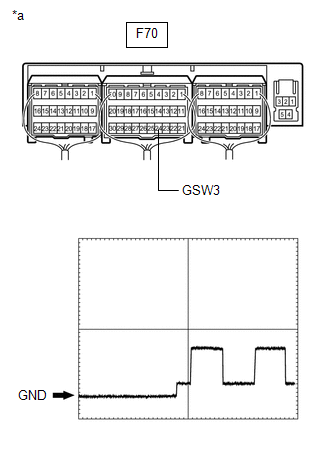
(a) Remove the airbag sensor assembly but do not disconnect the connectors.
Click here
|
(b) Measure the voltage according to the value(s) in the table below. Standard Voltage:
Reference Waveform:
|
|
| OK | |
REPLACE AIRBAG SENSOR ASSEMBLY |
| NG | |
REPAIR OR REPLACE HARNESS OR CONNECTOR |
|
4. |
CHECK HARNESS AND CONNECTOR (FOR SHORT CIRCUIT) |
(a) Disconnect the F134 DCM (Telematics Transceiver) connector.
(b) Measure the resistance according to the value(s) in the table below.
Standard Resistance:
|
Tester Connection |
Condition |
Specified Condition |
|---|---|---|
|
F134-24 (GSW) - Body ground |
Always |
10 kΩ or higher |
|
F70-24 (GSW3) - Body ground |
Always |
10 kΩ or higher |
| NG | |
GO TO STEP 6 |
|
|
5. |
REPLACE DCM (TELEMATICS TRANSCEIVER) |
(a) Replace the DCM (Telematics Transceiver).
Click here
NOTICE:
- The ignition switch must be off.
- Do not swap the DCM (Telematics Transceiver) with one from another vehicle.
| NEXT | |
PERFORM DCM ACTIVATION |
|
6. |
CHECK HARNESS AND CONNECTOR (DCM (TELEMATICS TRANSCEIVER) - AIRBAG SENSOR ASSEMBLY) |
(a) Disconnect the F134 DCM (Telematics Transceiver) connector.
(b) Disconnect the F70 airbag sensor assembly connector.
(c) Measure the resistance according to the value(s) in the table below.
Standard Resistance:
|
Tester Connection |
Condition |
Specified Condition |
|---|---|---|
|
F134-24 (GSW) - F70-24 (GSW3) |
Always |
Below 1 Ω |
|
F134-24 (GSW) or F70-24 (GSW3) - Body ground |
Always |
10 kΩ or higher |
| OK | |
REPLACE AIRBAG SENSOR ASSEMBLY |
| NG | |
REPAIR OR REPLACE HARNESS OR CONNECTOR |
 Manual (SOS) Switch Green Indicator Malfunction (B1571)
DESCRIPTION
This DTC is set when the DCM (Telematics Transceiver) detects an open or short
in the manual (SOS) switch green indicator circuit of the manual (SOS) switch. The
manual (SOS) switch g ...
 Manual Button Malfunction (B15C5)
DESCRIPTION
This DTC is set when the DCM (Telematics Transceiver) detects an open or short
circuit in the manual (SOS) switch.
DTC No.
Detection Item
DTC Detection ...
Other materials:
Toyota CH-R Service Manual > Occupant Classification System: Fail-safe Chart
FAIL-SAFE CHART
FAIL-SAFE FUNCTION
(a) The following chart shows the status of the front passenger SRS items and
passenger airbag ON/OFF indicator operation under each condition.
The passenger airbag ON/OFF indicator ("ON" and "OFF") comes on for
approximately 4 s ...
Toyota CH-R Service Manual > Automatic High Beam System: Diagnosis System
DIAGNOSIS SYSTEM
DESCRIPTION
(a) Automatic high beam system data and Diagnostic Trouble Codes (DTCs) can be
read from the Data Link Connector 3 (DLC3) of the vehicle. When the system seems
to be malfunctioning, use the Techstream to check for malfunctions and perform repairs.
CHECK DLC3
(a) ...
Toyota C-HR (AX20) 2023-2026 Owner's Manual
Toyota CH-R Owners Manual
- For safety and security
- Instrument cluster
- Operation of each component
- Driving
- Interior features
- Maintenance and care
- When trouble arises
- Vehicle specifications
- For owners
Toyota CH-R Service Manual
- Introduction
- Maintenance
- Audio / Video
- Cellular Communication
- Navigation / Multi Info Display
- Park Assist / Monitoring
- Brake (front)
- Brake (rear)
- Brake Control / Dynamic Control Systems
- Brake System (other)
- Parking Brake
- Axle And Differential
- Drive Shaft / Propeller Shaft
- K114 Cvt
- 3zr-fae Battery / Charging
- Networking
- Power Distribution
- Power Assist Systems
- Steering Column
- Steering Gear / Linkage
- Alignment / Handling Diagnosis
- Front Suspension
- Rear Suspension
- Tire / Wheel
- Tire Pressure Monitoring
- Door / Hatch
- Exterior Panels / Trim
- Horn
- Lighting (ext)
- Mirror (ext)
- Window / Glass
- Wiper / Washer
- Door Lock
- Heating / Air Conditioning
- Interior Panels / Trim
- Lighting (int)
- Meter / Gauge / Display
- Mirror (int)
- Power Outlets (int)
- Pre-collision
- Seat
- Seat Belt
- Supplemental Restraint Systems
- Theft Deterrent / Keyless Entry

0.0096