Toyota CH-R Service Manual: Installation
INSTALLATION
PROCEDURE
1. INSTALL HORN BUTTON ASSEMBLY
(a) Check that the ignition switch off.
(b) Check that the cable is disconnected from the negative (-) battery terminal.
CAUTION:
Wait at least 90 seconds after disconnecting the cable from the negative (-) battery terminal to disable the SRS system.
.png)
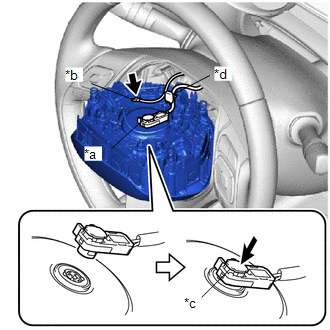
(c) for Single Type:
|
(1) Engage the wire harness clamp. |
|
(2) Connect the airbag connector to the horn button assembly.
NOTICE:
When connecting any airbag connector, take care not to damage the airbag wire harness.
(3) Push in the airbag connector lock to install the airbag connector.
NOTICE:
Securely lock the airbag connector lock.
(4) Connect the horn connector to the horn button assembly.
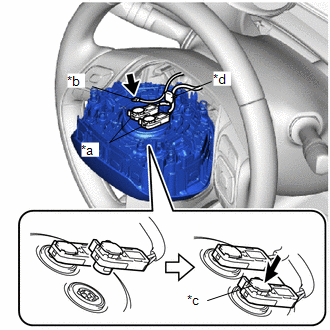
(d) for Dual Type:
|
(1) Engage the wire harness clamp. |
|
(2) Connect the 2 airbag connectors to the horn button assembly.
NOTICE:
- When connecting any airbag connector, take care not to damage the airbag wire harness.
- Be sure to connect the connectors to each corresponding color.
(3) Push in the 2 airbag connector locks to install the 2 airbag connectors.
NOTICE:
Securely lock the airbag connector lock.
(4) Connect the horn connector to the horn button assembly.
|
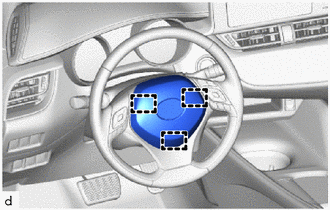
(e) Push the horn button assembly to engage the hooks carefully and install the horn button assembly. NOTICE:
|
|
2. CONNECT CABLE TO NEGATIVE BATTERY TERMINAL
Click here .gif)
NOTICE:
When disconnecting the cable, some systems need to be initialized after the cable is reconnected.
Click here .gif)
.gif)
3. INSPECT HORN BUTTON ASSEMBLY
(a) Make sure that the horn sounds.
If the horn does not sound, inspect the horn system.
Click here .gif)
4. PERFORM DIAGNOSTIC SYSTEM CHECK
Click here .gif)
5. INSPECT SRS WARNING LIGHT
Click here .gif)
 Disposal
DISPOSAL
CAUTION / NOTICE / HINT
CAUTION:
Before performing pre-disposal deployment of any SRS part, review and closely
follow all applicable environmental and hazardous material regulations. Pre ...
Other materials:
Toyota CH-R Service Manual > Name Plate: Components
COMPONENTS
ILLUSTRATION
*1
NO. 1 BACK DOOR EMBLEM
*2
NO. 1 BACK DOOR NAME PLATE
*3
NO. 2 BACK DOOR NAME PLATE
-
-
●
Non-reusable part
-
-
...
Toyota CH-R Owners Manual > BSM (Blind Spot Monitor): BSM function
The BSM function uses radar sensors to detect the following vehicles traveling
in adjacent lanes and advises the driver of the presence of such vehicles via the
indicators on the outside rear view mirrors.
Vehicles that are traveling in areas that are not visible using the outside
rea ...
Toyota C-HR (AX20) 2023-2026 Owner's Manual
Toyota CH-R Owners Manual
- For safety and security
- Instrument cluster
- Operation of each component
- Driving
- Interior features
- Maintenance and care
- When trouble arises
- Vehicle specifications
- For owners
Toyota CH-R Service Manual
- Introduction
- Maintenance
- Audio / Video
- Cellular Communication
- Navigation / Multi Info Display
- Park Assist / Monitoring
- Brake (front)
- Brake (rear)
- Brake Control / Dynamic Control Systems
- Brake System (other)
- Parking Brake
- Axle And Differential
- Drive Shaft / Propeller Shaft
- K114 Cvt
- 3zr-fae Battery / Charging
- Networking
- Power Distribution
- Power Assist Systems
- Steering Column
- Steering Gear / Linkage
- Alignment / Handling Diagnosis
- Front Suspension
- Rear Suspension
- Tire / Wheel
- Tire Pressure Monitoring
- Door / Hatch
- Exterior Panels / Trim
- Horn
- Lighting (ext)
- Mirror (ext)
- Window / Glass
- Wiper / Washer
- Door Lock
- Heating / Air Conditioning
- Interior Panels / Trim
- Lighting (int)
- Meter / Gauge / Display
- Mirror (int)
- Power Outlets (int)
- Pre-collision
- Seat
- Seat Belt
- Supplemental Restraint Systems
- Theft Deterrent / Keyless Entry
0.0094


