Toyota CH-R Service Manual: Customize Parameters
CUSTOMIZE PARAMETERS
CUSTOMIZE LIGHTING SYSTEM (EXT)
NOTICE:
- When the customer requests a change in a function, first make sure that the function can be customized.
- Be sure to make a note of the current settings before customizing.
- When troubleshooting a function, first make sure that the function is set to the default setting.
HINT:
The following items can be customized.
(a) Customizing with the Techstream
(1) Connect the Techstream to the DLC3.
(2) Turn the ignition switch to ON.
(3) Turn the Techstream on.
(4) Enter the following menus: Body Electrical / Main Body / Utility / Customize / Light Control, Illuminated Entry or Warning.
(5) Select the setting by referring to the table below.
Light Control|
Tester Display |
Description |
Default |
Setting |
ECU |
|---|---|---|---|---|
|
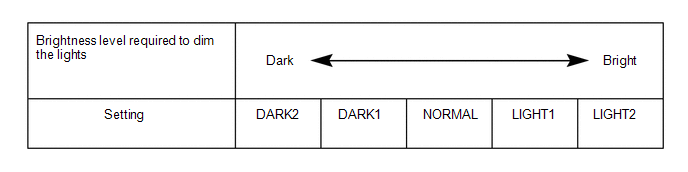
Disp Ex ON Sen |
Changes the ambient brightness level required to dim the lights such as the indicator lights of the combination meter, A/C indicator light and clock.*A |
NORMAL |
000:NORMAL,001:DARK2,010:DARK1,011:LIGHT1,100:LIGHT2 |
Main Body ECU (Multiplex Network Body ECU) |
|
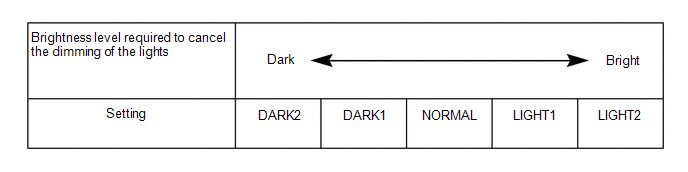
Disp Ex OFF Sen |
Changes the ambient brightness level required to cancel the dimming of the lights such as the indicator lights of the combination meter, A/C indicator light and clock.*B |
NORMAL |
000:NORMAL,001:DARK2,010:DARK1,011:LIGHT1,100:LIGHT2 |
Main Body ECU (Multiplex Network Body ECU) |
|
Light Auto OFF Delay |
Keep the headlight son for a certain period of time after turning the ignition switch off and closing all of door switch the low beam headlights on.*1 |
30 s |
00:OFF,01:30 s,10:60 s,11:90 s |
Main Body ECU (Multiplex Network Body ECU) |
|
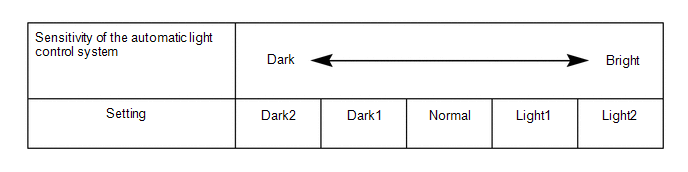
Sensitivity |
Adjusts the sensitivity of the automatic light control system.*C |
Normal |
000:Normal,001:Dark2,010:Dark1,011:Light1,100:Light2 |
Main Body ECU (Multiplex Network Body ECU) |
|
DRL Function |
Turns the DRL function on/off. |
ON |
0:OFF,1:ON |
Main Body ECU (Multiplex Network Body ECU) |
|
Follow Me Home Lighting Time |
Sets the headlight lighting time after the ignition switch is turned off.*2 |
30 s |
00:30 s,01:60 s,10:90 s,11:120 s |
Main Body ECU (Multiplex Network Body ECU) |
- *1: w/ Toyota Safety Sense P
- *2: w/o Toyota Safety Sense P
|
Tester Display |
Description |
Default |
Setting |
ECU |
|---|---|---|---|---|
|
Lane Change Flashing Times Setting |
Function to change the lane change flashing times. |
3 |
000:OFF,001:3,010:4,011:5,100:6,101:7 |
Combination Meter Assembly |
HINT:
The sensitivity adjustment may be difficult to confirm. Check by driving the vehicle.
- *A
- *B
- *C
(b) Customizing with the multi-display (w/ Toyota Safety Sense P).
(1) Turn the ignition switch to ON.
(2) Enter the following menus: MENU / Setup / Vehicle / Vehicle customization / Lights Settings.
(3) Select the setting by referring to the table below.
Lights settings|
Tester Display |
Description |
Default |
Setting |
ECU |
|---|---|---|---|---|
|
Headlights Auto-on Sensitivity |
Adjusts the sensitivity of the automatic light control system. |
0 |
-2, -1, 0, +1 or +2 |
Main Body ECU (Multiplex Network Body ECU) |
|
Headlights Auto-off Timer |
Keep the headlight son for a certain period of time after turning the ignition switch off and closing all of door switch the low beam headlights on. |
30sec. |
Off, 30 sec., 60 sec. or 90 sec. |
Main Body ECU (Multiplex Network Body ECU) |
|
Daytime Running Lights |
Turns the DRL function on/off. |
On |
ON or OFF |
Main Body ECU (Multiplex Network Body ECU) |
 Operation Check
OPERATION CHECK
AUTOMATIC LIGHT CONTROL SYSTEM OPERATION CHECK
(a) Turn the ignition switch to ON.
(b) Turn the light control switch to the AUTO position.
(c) Cover the automatic light control sen ...
 Initialization
INITIALIZATION
HEADLIGHT ECU SUB-ASSEMBLY LH INITIALIZATION (for LED Headlight)
NOTICE:
If any of the work in the table below has been performed, vehicle information
registration and in ...
Other materials:
Toyota CH-R Service Manual > Wiper And Washer System: Data List / Active Test
DATA LIST / ACTIVE TEST
DATA LIST
HINT:
Using the Techstream to read the Data List allows the values or states of switches,
sensors, actuators and other items to be read without removing any parts. This non-intrusive
inspection can be very useful because intermittent conditions or signals may ...
Toyota CH-R Service Manual > Rear Door Courtesy Switch: Inspection
INSPECTION
PROCEDURE
1. INSPECT REAR DOOR COURTESY LIGHT SWITCH ASSEMBLY
(a) Check the resistance.
(1) Measure the resistance according to the value(s) in the table below.
Standard Resistance:
Tester Connection
Condition
Spec ...
Toyota C-HR (AX20) 2023-2026 Owner's Manual
Toyota CH-R Owners Manual
- For safety and security
- Instrument cluster
- Operation of each component
- Driving
- Interior features
- Maintenance and care
- When trouble arises
- Vehicle specifications
- For owners
Toyota CH-R Service Manual
- Introduction
- Maintenance
- Audio / Video
- Cellular Communication
- Navigation / Multi Info Display
- Park Assist / Monitoring
- Brake (front)
- Brake (rear)
- Brake Control / Dynamic Control Systems
- Brake System (other)
- Parking Brake
- Axle And Differential
- Drive Shaft / Propeller Shaft
- K114 Cvt
- 3zr-fae Battery / Charging
- Networking
- Power Distribution
- Power Assist Systems
- Steering Column
- Steering Gear / Linkage
- Alignment / Handling Diagnosis
- Front Suspension
- Rear Suspension
- Tire / Wheel
- Tire Pressure Monitoring
- Door / Hatch
- Exterior Panels / Trim
- Horn
- Lighting (ext)
- Mirror (ext)
- Window / Glass
- Wiper / Washer
- Door Lock
- Heating / Air Conditioning
- Interior Panels / Trim
- Lighting (int)
- Meter / Gauge / Display
- Mirror (int)
- Power Outlets (int)
- Pre-collision
- Seat
- Seat Belt
- Supplemental Restraint Systems
- Theft Deterrent / Keyless Entry

0.0105