Toyota CH-R Service Manual: Reassembly
REASSEMBLY
CAUTION / NOTICE / HINT
HINT:
- Use the same procedure for the RH side and LH side.
- The following procedure is for the LH side.
PROCEDURE
1. INSTALL FRONT SIDE MARKER LIGHT BULB (for USA and Canada)
(a) Install the front side marker light bulb to the front side marker light socket.
.png)
.png) |
Install in this Direction |
(b) Turn the front side marker light socket with the front side marker light bulb as shown in the illustration to install them as a unit.
.png)
.png) |
Install in this Direction |
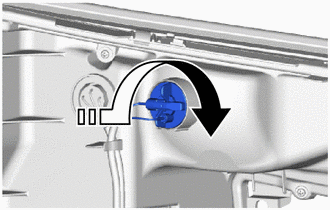
2. INSTALL FRONT TURN SIGNAL LIGHT BULB
(a) Turn the front turn signal light bulb to install it to the front turn signal light socket as shown in the illustration.
.png)
.png) |
Install in this Direction |
(b) Turn the front turn signal light socket with the front turn signal light bulb as shown in the illustration to install them as a unit.

.png) |
Install in this Direction |
3. INSTALL HEADLIGHT SOCKET COVER
|
(a) Install the headlight socket cover to the headlight unit assembly. |
|
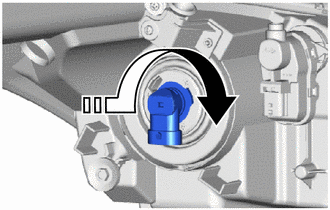
4. INSTALL NO. 1 HEADLIGHT BULB
(a) Turn the No. 1 headlight bulb in the direction indicate by the arrow shown in the illustration, and install it.

.png) |
Install in this Direction |
NOTICE:
Do not touch the No. 1 headlight bulb glass.
5. INSTALL HEADLIGHT PROTECTOR
(a) Install a new headlight protector.
 Adjustment
ADJUSTMENT
CAUTION / NOTICE / HINT
PROCEDURE
1. PREPARE VEHICLE FOR HEADLIGHT AIM ADJUSTMENT
(a) Prepare the vehicle:
Ensure that there is no damage or deformation to the vehicle body arou ...
 Installation
INSTALLATION
CAUTION / NOTICE / HINT
HINT:
Use the same procedure for the RH side and LH side.
The following procedure is for the LH side.
PROCEDURE
1. INSTALL HEADLIGHT ASSEMBL ...
Other materials:
Toyota CH-R Service Manual > Power Window Control System: Front Passenger Side Power Window Auto Up / Down Function does not Operate with
Front Passenger Side Power Window Switch
DESCRIPTION
If the manual up and down functions operate normally but the auto up and down
functions do not, the power window control system may be in fail-safe mode.
If power window initialization has not been performed, the auto up and down functions
will not operate.
Click here
WIRING ...
Toyota CH-R Service Manual > Air Conditioning System(for Automatic Air Conditioning System With Side-mounted
Air Conditioner Pressure Sensor): Back-up Power Source Circuit
DESCRIPTION
The back-up power source circuit for the air conditioning amplifier assembly
is shown below. Power is supplied even when the ignition switch is off. This power
is used for diagnostic trouble code memory, etc.
WIRING DIAGRAM
CAUTION / NOTICE / HINT
NOTICE:
Inspect the fuses for ...
Toyota C-HR (AX20) 2023-2026 Owner's Manual
Toyota CH-R Owners Manual
- For safety and security
- Instrument cluster
- Operation of each component
- Driving
- Interior features
- Maintenance and care
- When trouble arises
- Vehicle specifications
- For owners
Toyota CH-R Service Manual
- Introduction
- Maintenance
- Audio / Video
- Cellular Communication
- Navigation / Multi Info Display
- Park Assist / Monitoring
- Brake (front)
- Brake (rear)
- Brake Control / Dynamic Control Systems
- Brake System (other)
- Parking Brake
- Axle And Differential
- Drive Shaft / Propeller Shaft
- K114 Cvt
- 3zr-fae Battery / Charging
- Networking
- Power Distribution
- Power Assist Systems
- Steering Column
- Steering Gear / Linkage
- Alignment / Handling Diagnosis
- Front Suspension
- Rear Suspension
- Tire / Wheel
- Tire Pressure Monitoring
- Door / Hatch
- Exterior Panels / Trim
- Horn
- Lighting (ext)
- Mirror (ext)
- Window / Glass
- Wiper / Washer
- Door Lock
- Heating / Air Conditioning
- Interior Panels / Trim
- Lighting (int)
- Meter / Gauge / Display
- Mirror (int)
- Power Outlets (int)
- Pre-collision
- Seat
- Seat Belt
- Supplemental Restraint Systems
- Theft Deterrent / Keyless Entry
0.0072

.png)