Toyota CH-R Service Manual: Inspection
INSPECTION
PROCEDURE
1. INSPECT TIRES
(a) Inspect the tires for wear and proper inflation pressure.
Cold Tire Inflation Pressure:
|
Tire Size |
Cold Tire Inflation Pressure |
|
|---|---|---|
|
Front |
Rear |
|
|
215/60R17 96H |
230 kPa (2.3 kgf/cm2, 33 psi) |
230 kPa (2.3 kgf/cm2, 33 psi) |
|
225/50R18 95V |
230 kPa (2.3 kgf/cm2, 33 psi) |
230 kPa (2.3 kgf/cm2, 33 psi) |
Cold Tire Inflation Pressure (for Compact Spare Tire):
|
Tire Size |
Cold Tire Inflation Pressure |
|---|---|
|
T145/70D18 107M |
420 kPa (4.2 kgf/cm2, 60 psi) |
|
T145/90D16 106M |
420 kPa (4.2 kgf/cm2, 60 psi) |
(1) Perform initialization.
Click here
.gif)
(2) Tire pressure adjustment method when warm:
- Turn the ignition switch off.
- Connect the Techstream to the DLC3.
- Turn the ignition switch to ON.
- Turn the Techstream on.
- Enter the following menus: Chassis / Tire Pressure Monitor / Data List.
- Adjust the tire pressure so that the displayed value is equal to the set pressure.
- Perform initialization and check that initialization completes.
Click here
- Check and record the value of the Data List item "Temperature in Tire". (Ts)
- Check and record the ambient temperature during tire pressure adjustment. (Tm)
- Readjust the tire pressure according to the difference between the tire
internal temperature (Ts) and the ambient temperature (Tm). (P)
HINT:
Tire internal temperature: Ts, Ambient temperature: Tm, Tire pressure readjustment value: P
P = (Specified Pressure) + (Ts - Tm)
- Check the pressure adjustment value with the Data List item "Tire Inflation Pressure".
|
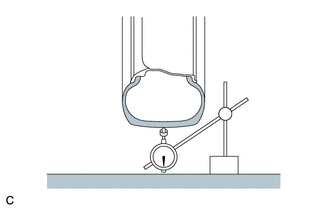
(b) Using a dial indicator, check the runout of the tires. Maximum Tire Runout: 1.4 mm (0.0551 in.) HINT: Measure the runout with the wheel assembly removed from the vehicle. |
|
2. ROTATE TIRES
(a) Remove the wheel assembly.
Click here
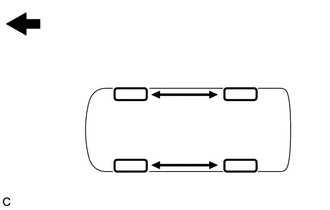
(b) for North America:
(1) Rotate the tires as shown in the illustration.
.png) |
Front |
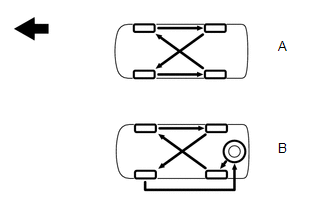
(c) except North America:
(1) If the spare tire uses a different type of wheel than the other tires, rotate the tires as shown by (A) in the illustration. If the spare tire has the same type of wheel as the other tires, rotate the tires, including the spare tire, as shown by (B) in the illustration.
|
|
Front |
(d) Install the wheel assembly.
Click here
(e) Perform initialization.
Click here
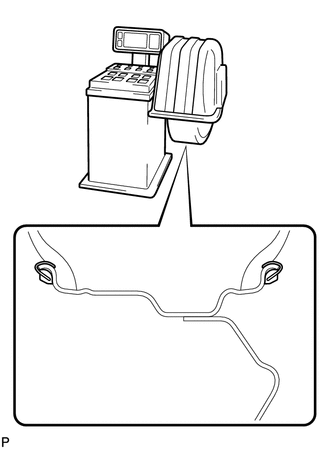
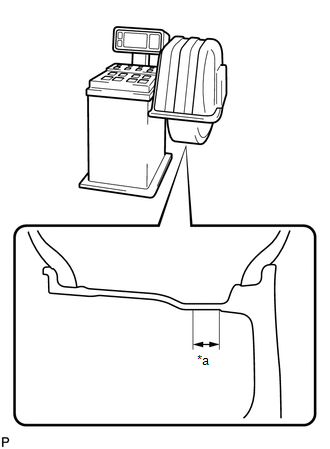
3. INSPECT AND ADJUST WHEEL BALANCE
(a) Inspect and adjust the off-the-car balance.
|
(1) for Steel Wheel: Maximum Wheel Imbalance: 8.0 g (0.0176 lb) HINT:
|
|
|
(2) for Aluminum Wheel: Maximum Wheel Imbalance: 8.0 g (0.0176 lb) NOTICE:
HINT:
|
|
4. INSPECT FRONT AXLE HUB BEARING
Click here
5. INSPECT REAR AXLE HUB BEARING
Click here
 How To Proceed With Troubleshooting
PROCEDURE
1.
CHECK TIRE AND WHEEL SYSTEM
DIAGNOSIS OF IRREGULAR TIRE WEAR
GO TO STEP 11
DIAGNOSIS OF TIRE VIBRATIO ...

Other materials:
Toyota CH-R Service Manual > Audio And Visual System(for Radio Receiver Type): Sound Quality is Bad Only when CD is Played (Volume is Too Low)
PROCEDURE
1.
REPLACE CD AND RECHECK
(a) Replace the CD with a known good one and check that the malfunction disappears.
OK:
Malfunction disappears.
OK
END
NG
REPLACE RADIO RECEIVER ASSEMBLY
...
Toyota CH-R Service Manual > Blind Spot Monitor System: Freeze Frame Data
FREEZE FRAME DATA
FREEZE FRAME DATA
(a) Whenever DTCs are detected, the blind spot monitor sensor stores the current
vehicle (sensor) state as freeze frame data.
CHECK FREEZE FRAME DATA
(a) Connect the Techstream to the DLC3.
(b) Turn the ignition switch to ON.
(c) Turn the blind spot monito ...
Toyota C-HR (AX20) 2023-2026 Owner's Manual
Toyota CH-R Owners Manual
- For safety and security
- Instrument cluster
- Operation of each component
- Driving
- Interior features
- Maintenance and care
- When trouble arises
- Vehicle specifications
- For owners
Toyota CH-R Service Manual
- Introduction
- Maintenance
- Audio / Video
- Cellular Communication
- Navigation / Multi Info Display
- Park Assist / Monitoring
- Brake (front)
- Brake (rear)
- Brake Control / Dynamic Control Systems
- Brake System (other)
- Parking Brake
- Axle And Differential
- Drive Shaft / Propeller Shaft
- K114 Cvt
- 3zr-fae Battery / Charging
- Networking
- Power Distribution
- Power Assist Systems
- Steering Column
- Steering Gear / Linkage
- Alignment / Handling Diagnosis
- Front Suspension
- Rear Suspension
- Tire / Wheel
- Tire Pressure Monitoring
- Door / Hatch
- Exterior Panels / Trim
- Horn
- Lighting (ext)
- Mirror (ext)
- Window / Glass
- Wiper / Washer
- Door Lock
- Heating / Air Conditioning
- Interior Panels / Trim
- Lighting (int)
- Meter / Gauge / Display
- Mirror (int)
- Power Outlets (int)
- Pre-collision
- Seat
- Seat Belt
- Supplemental Restraint Systems
- Theft Deterrent / Keyless Entry

0.0093